| Table of Contents |
|---|
Templates on the Opportunity level and Account levels can be upgraded with to a newly created template while retaining selected data from existing OpportunitiesTemplates on the Opportunity or Account.
Both Playbook and Scorecard templates can be upgraded.
...
With Template Upgrade, Organizations can now upgrade existing templates with newly created data and events, while still keeping all or some of the existing data.
Before You Start - Important!
| Note |
|---|
Important! Data that needs to be retained in current Opportunity ClosePlans must be mapped to synchronize the |
new Template with the old |
Template. Failure to correctly map data will result in the loss of data |
! |
We strongly recommend testing an upgrade of one test Opportunity ClosePlan to ensure your settings are correct and all data migrates successfully.
You will receive an email when the upgrade is complete.
Check that all data has migrated correctly.
Data that is lost cannot be recovered.
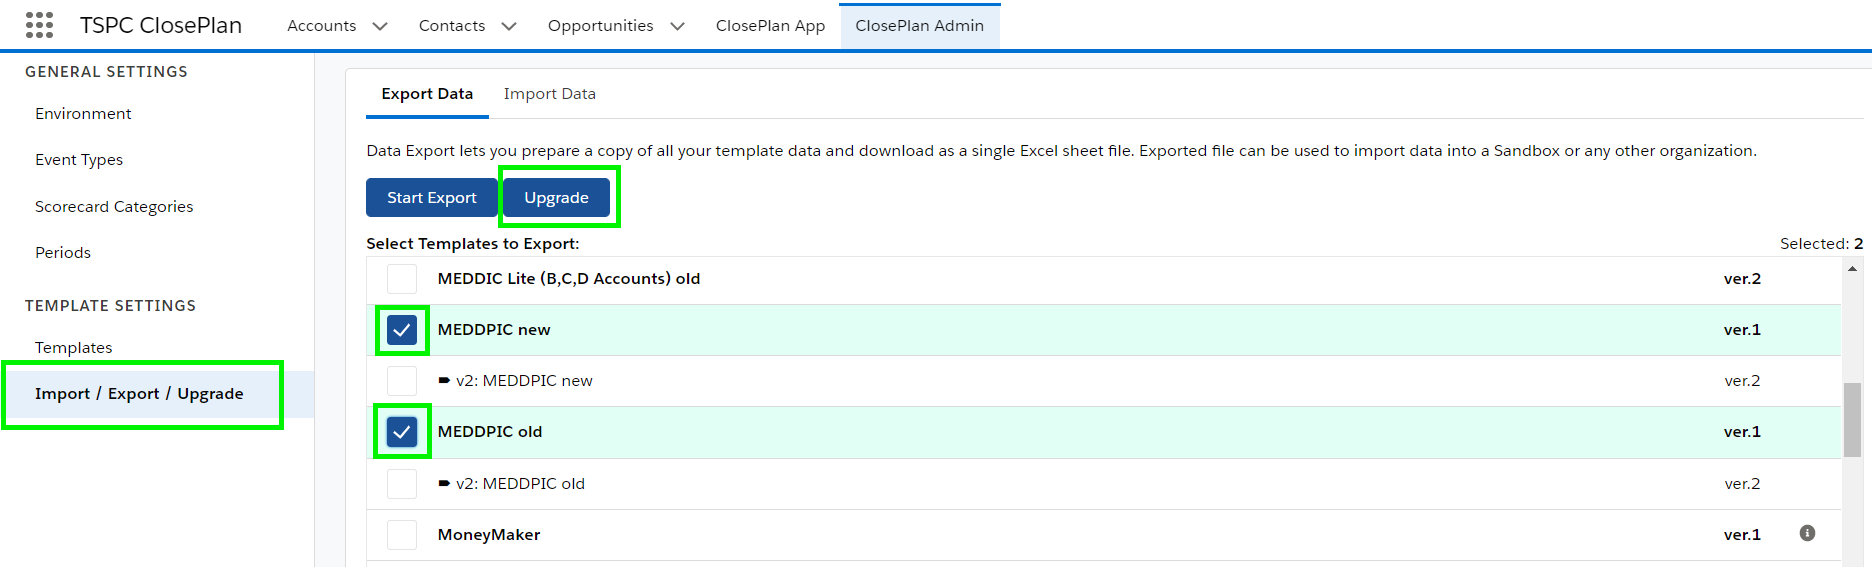
Upgrading a Template
Make sure the Target (new) Template is ready for upgrade and is in Active mode.
Go to Import / Export and select the Source Template (oldthe current Template) Template, and the Target Template (the new template to which you will upgrade) Template
Click the Upgrade button
Upgrade Process
Once you click Clicking the Upgrade button you will go through initiate a setup process.
1. Check and double check to ensure that you have the correct templates for Source and Target templates are selected.
2. If you choose, you may select options to delete custom data.
...
5. Select Opportunities for upgrade and start the upgrade.
1. Get Started
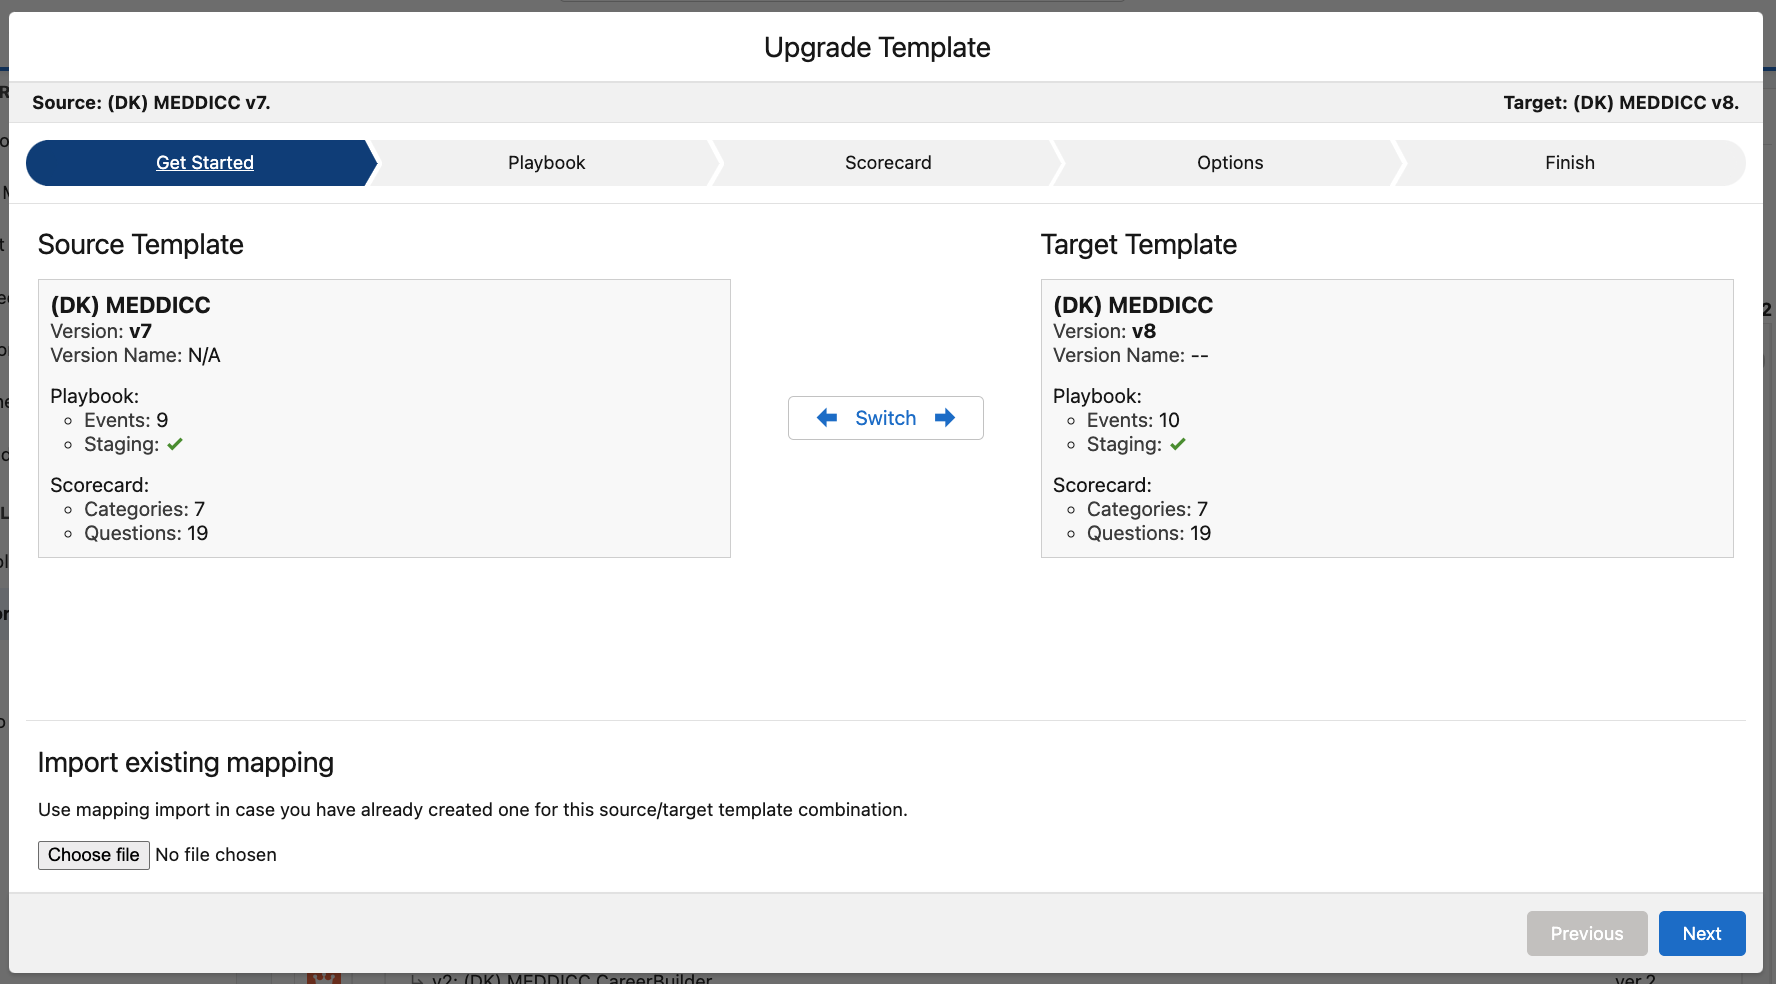
‘Get Started’ displays the selected Source Template and the selected Target Template, with the option to switch between templates.
Make sure the Source Template is the old template and the Target Template is the new template.
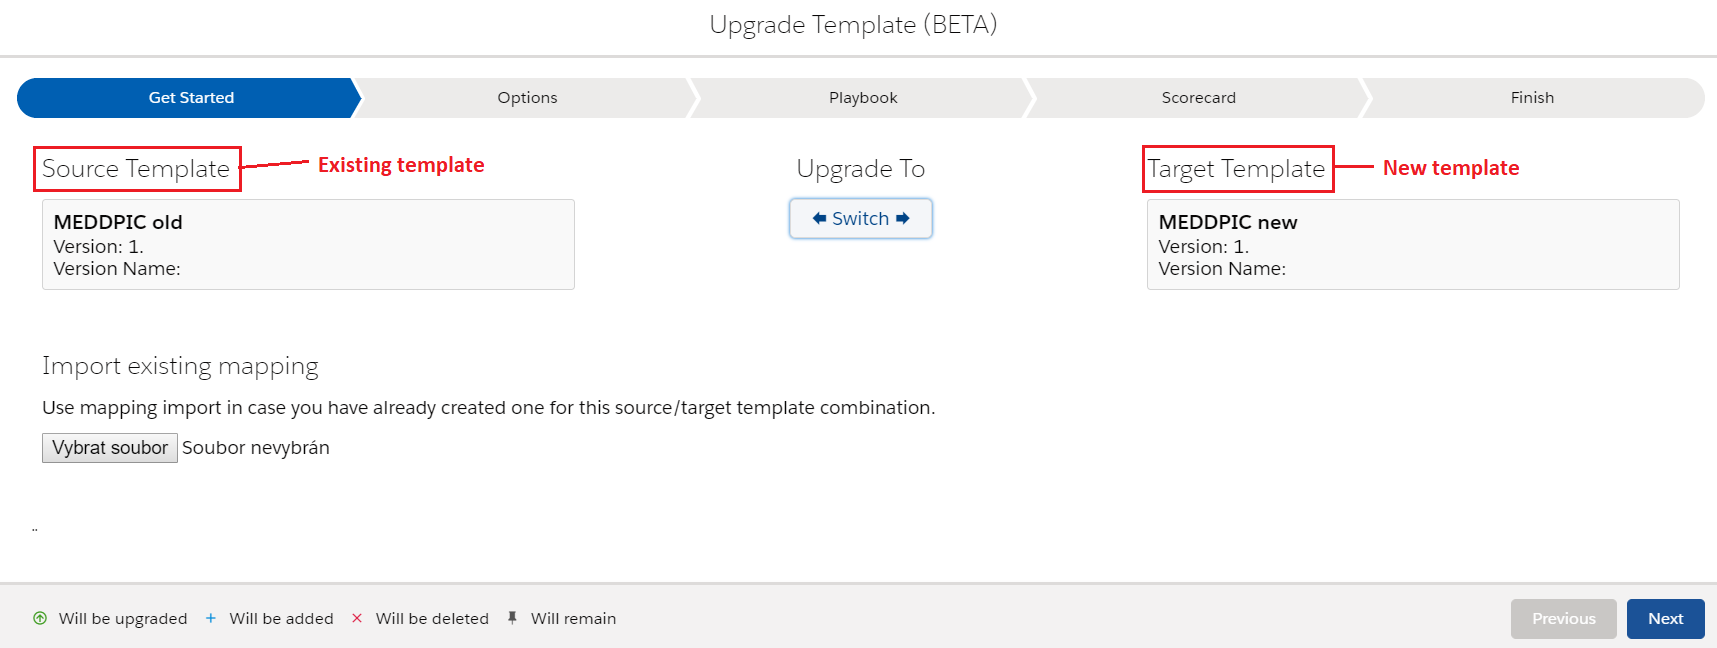
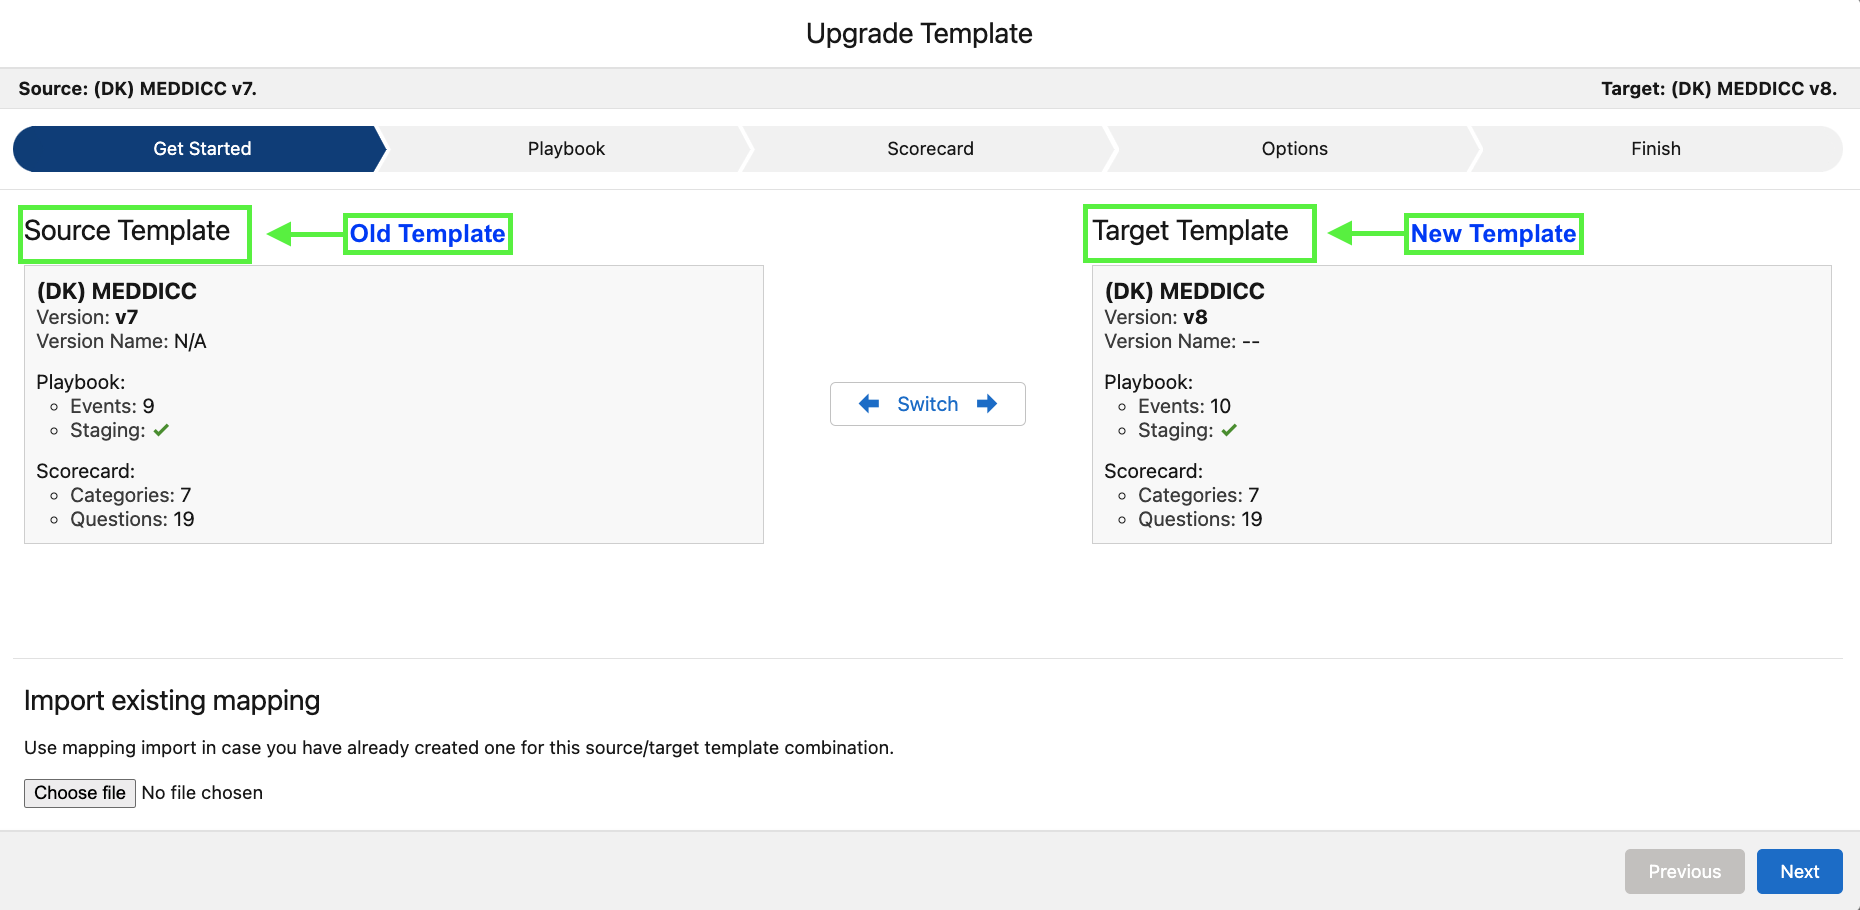
- If you have already created and saved a data migration map for this source/target template combination, select the file to migrate the data.
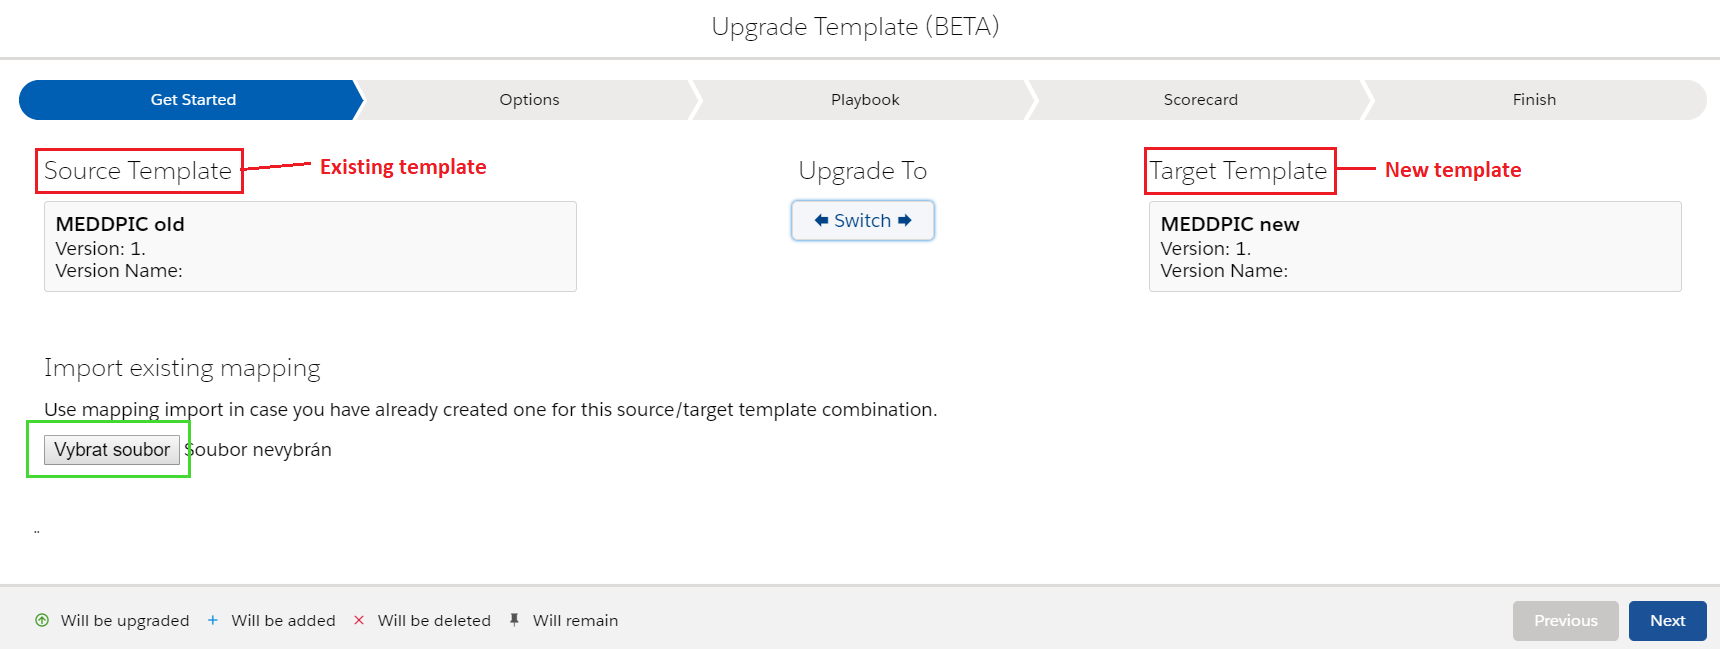

- Click Next
2.
...
‘Options’ allows you to delete custom Events, Checklist items and Documents which may have been added into the old template by users. You can choose to exclude these items from migrating to the new template.
If you choose to delete custom data, select the option(s).
Click Next.
...
Playbook
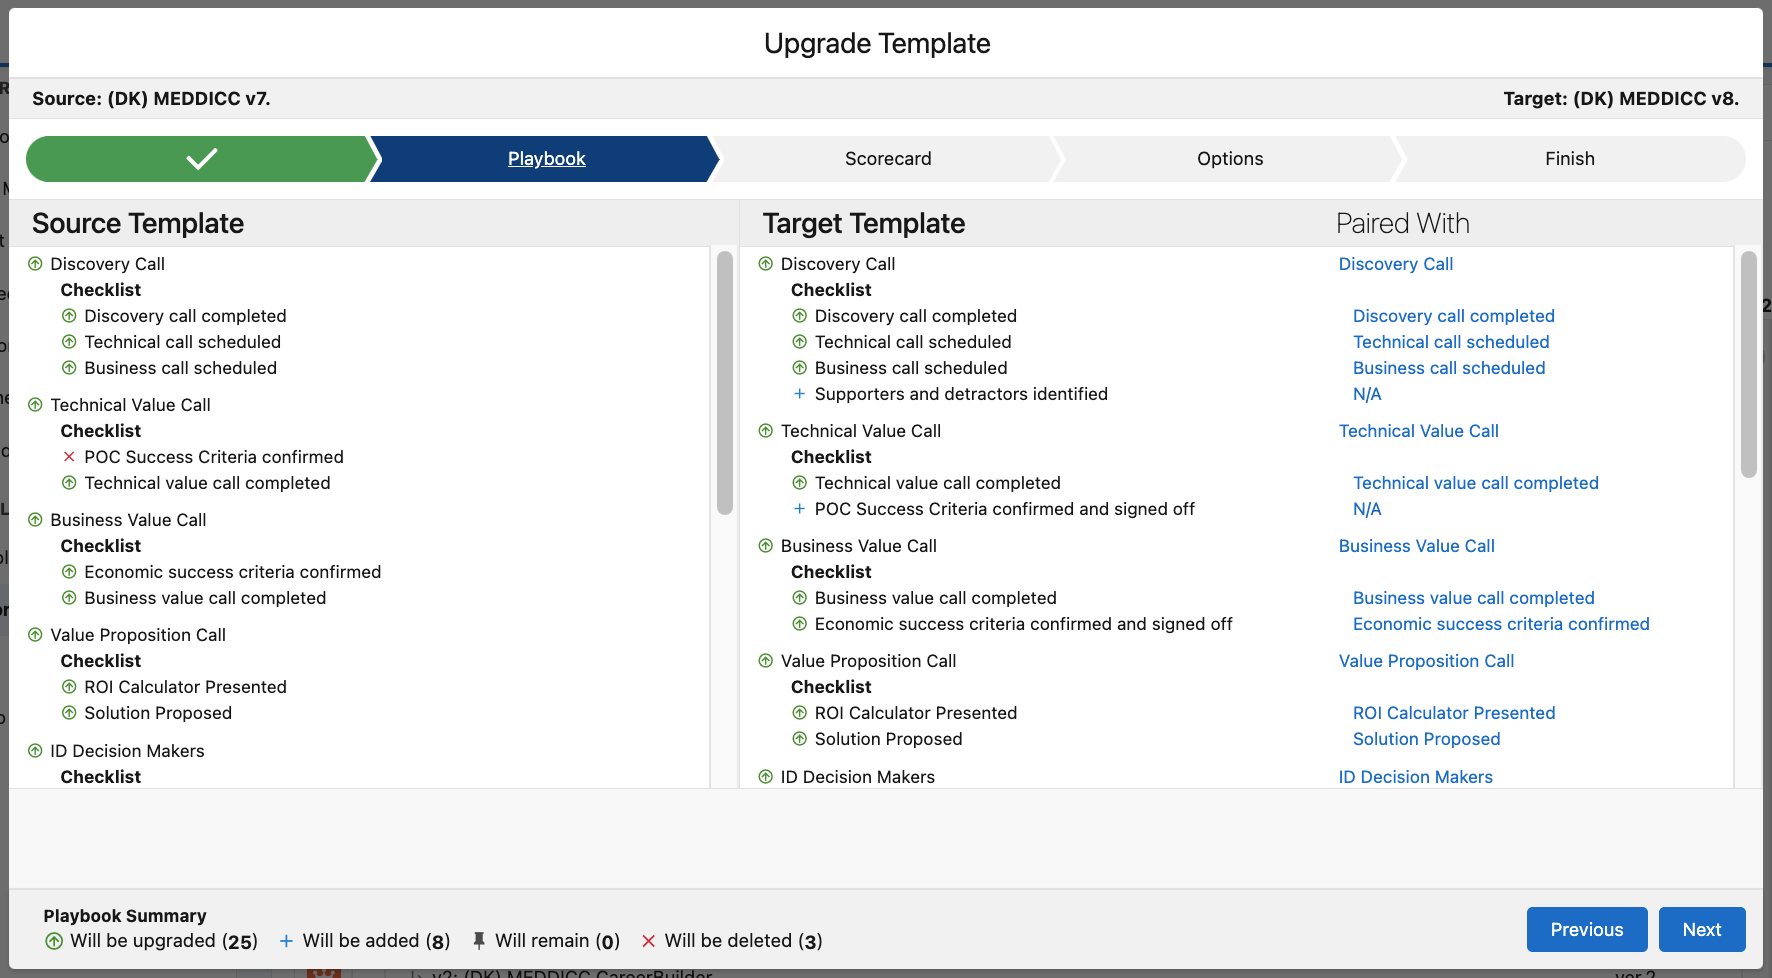
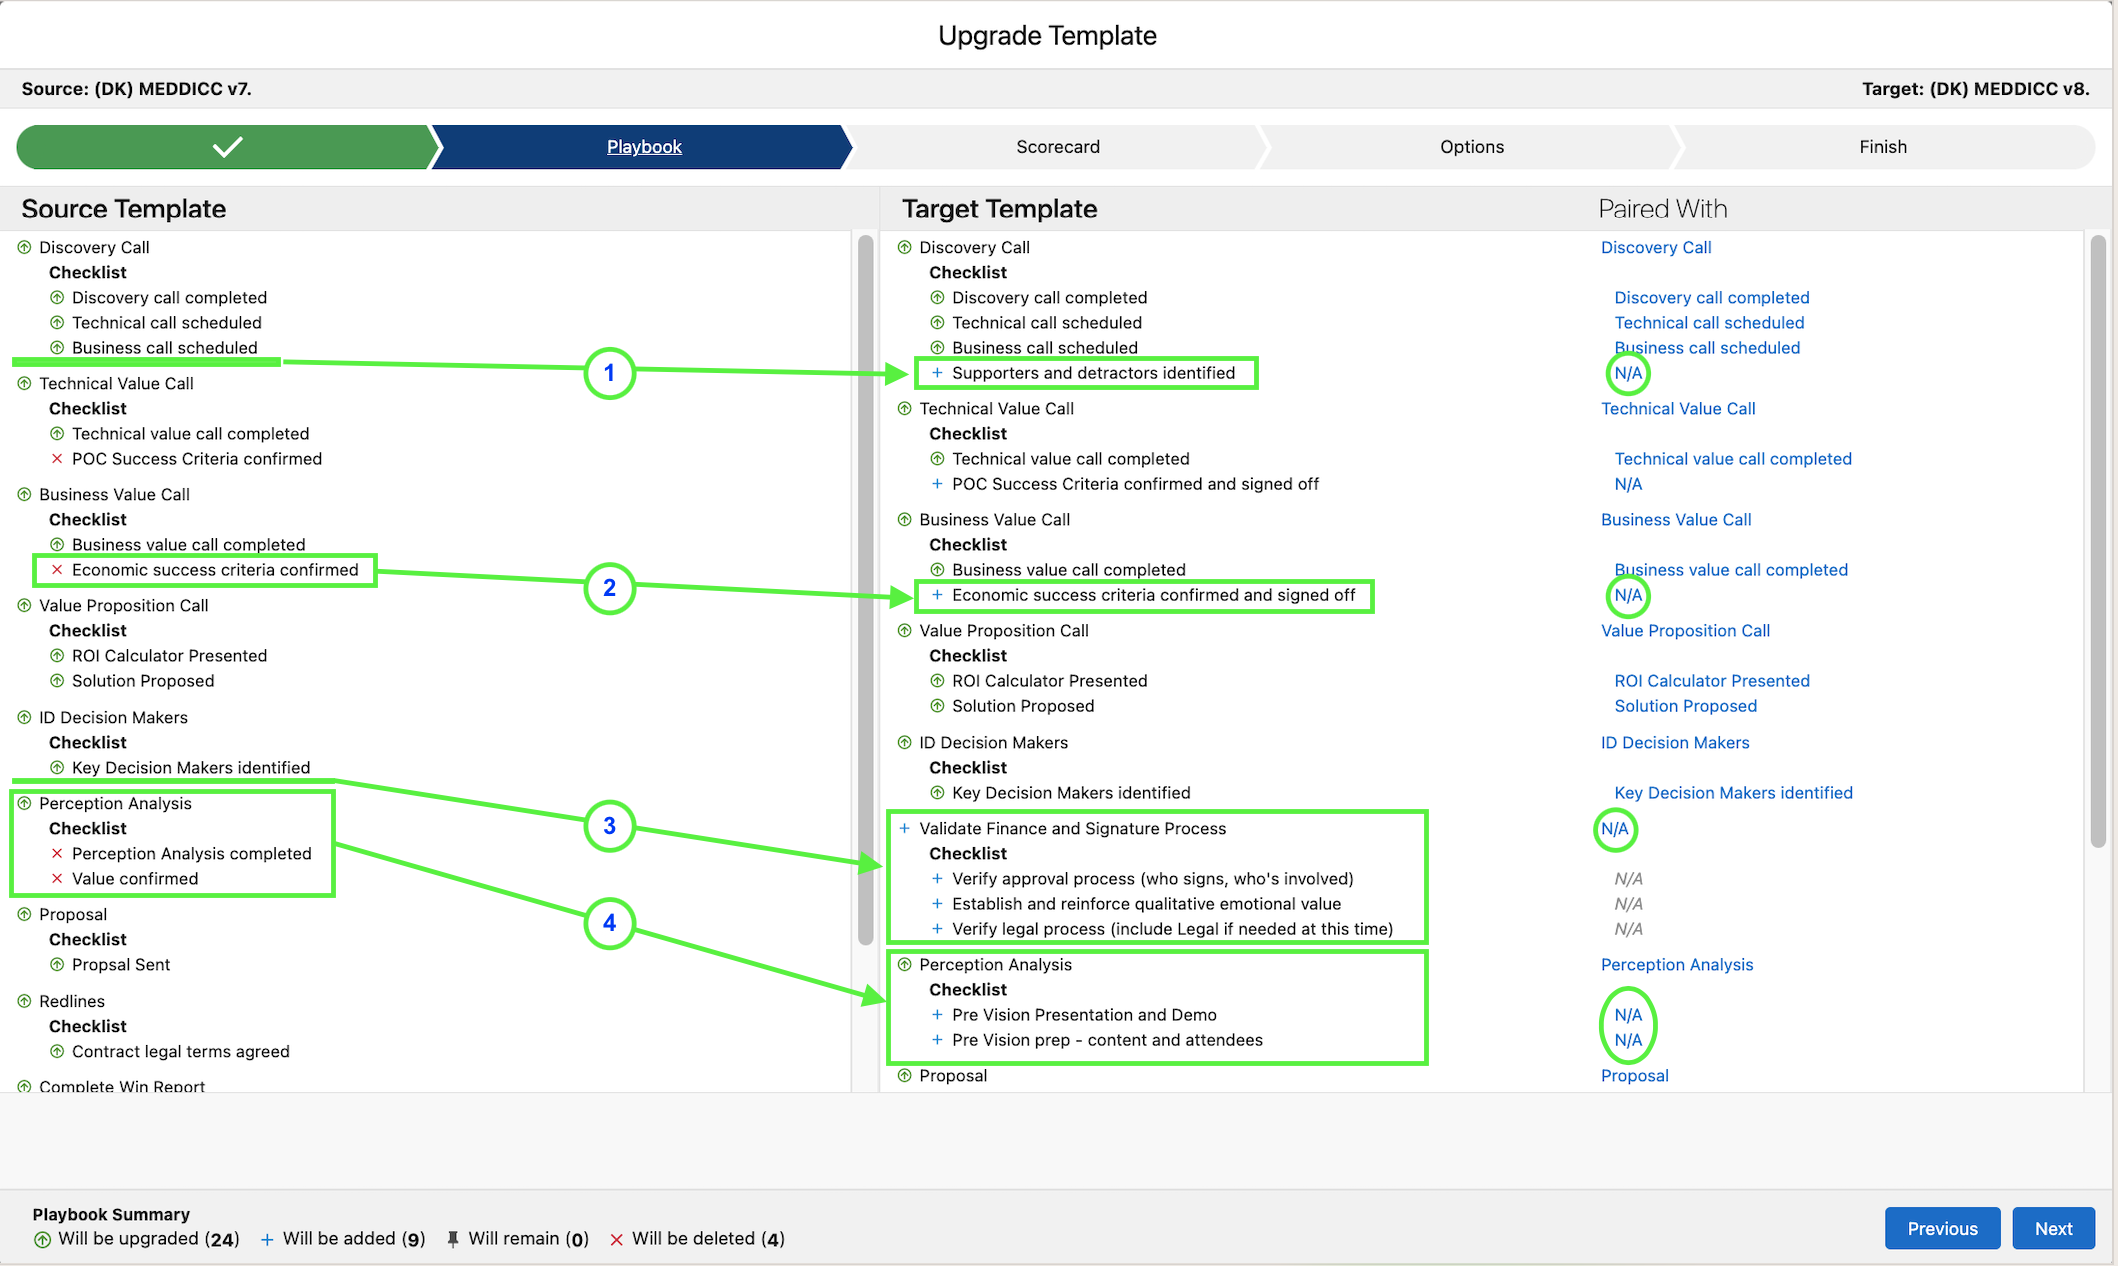
‘Playbook’ displays data from the Source (old) Template and from the Target (new) Template for Playbook.
...
 = Will remain in the Target Template
Examples of Mapping:
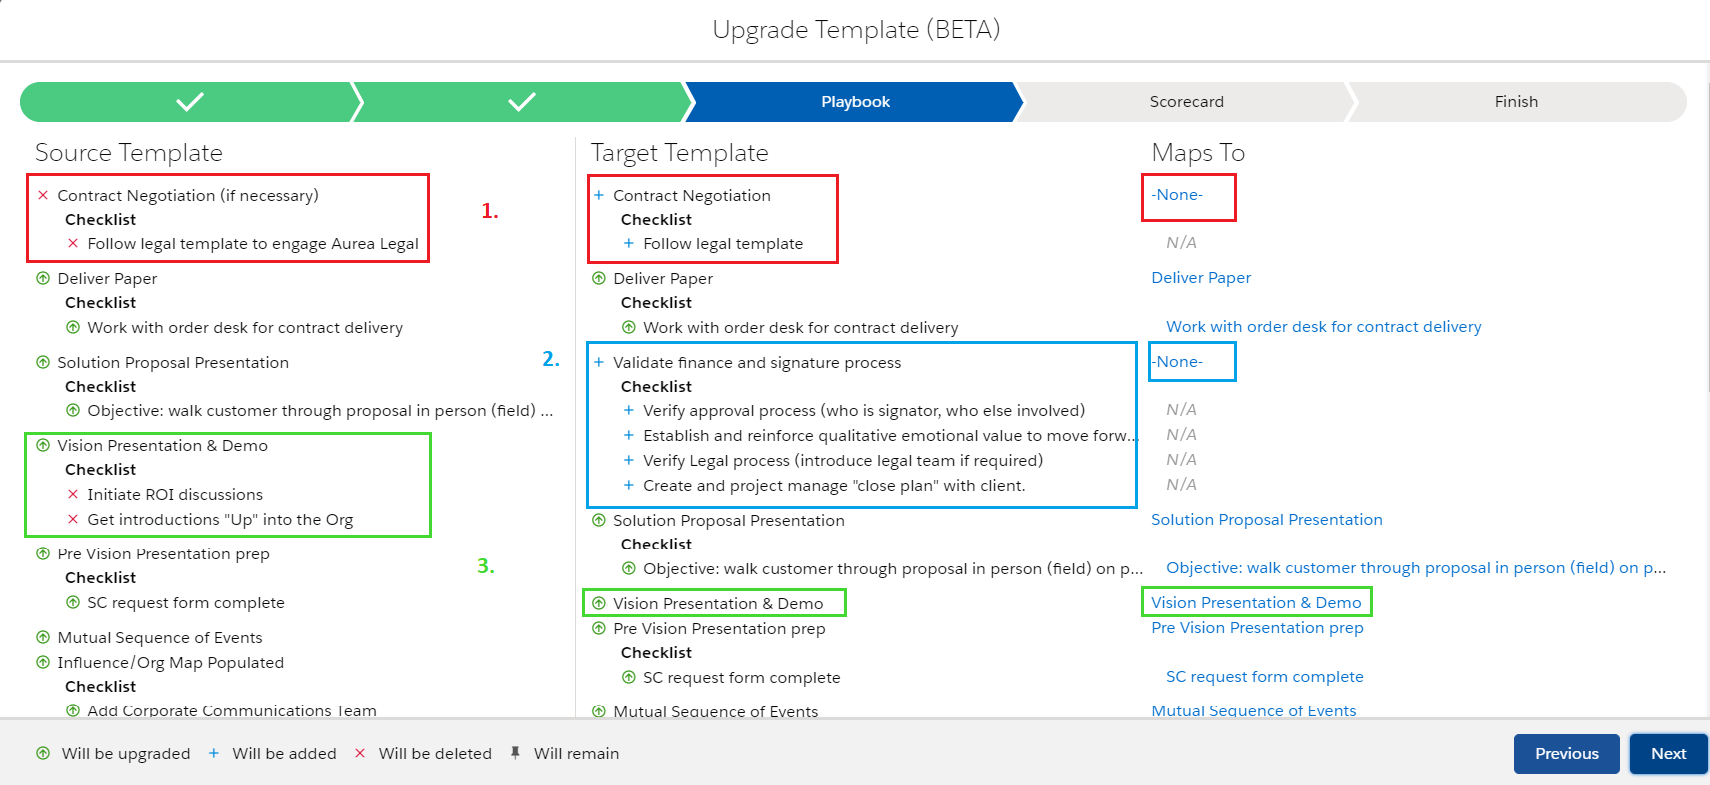
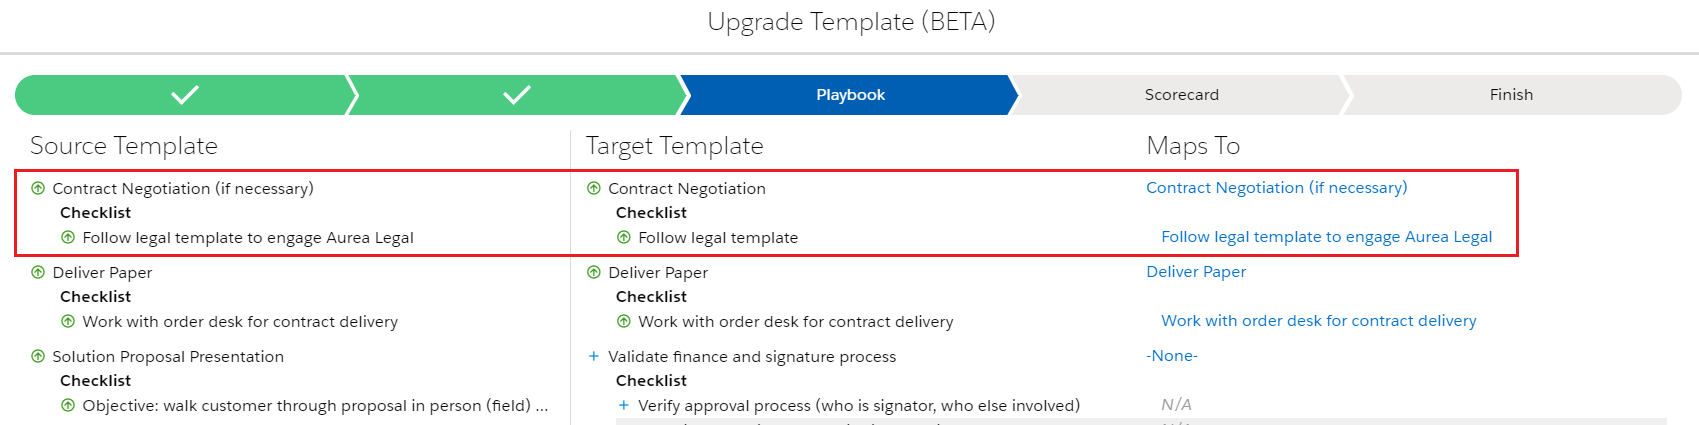
- In Example 1: Changes were made to the event and checklist item = “(if necessary)” and “to engage Aurea Legal” were deleted in the new template.
- In this example, the upgrade detected that the two items are not the same and automatically determines that the event in the Source Template will be deleted (x) and the new information in the Target Template will be added (+).
- In this example the checklist item “Follow legal template to engage Aurea Legal” will be deleted. If you want to retain that checklist item, then you will need to map the checklist item to the Target Template.
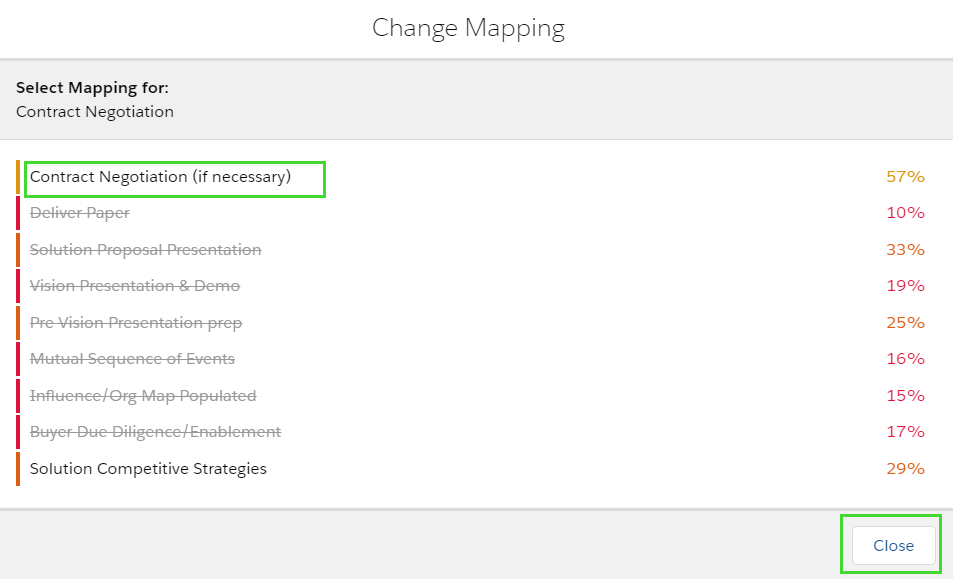
- Under Maps To, open -None- and select the option to map data.

- Example 2: Shows a new event with checklist items that were NOT present in the old template.
- In this case, the new information will be added to the Target (new) Template.
- No Data mapping is required.
- Example 3: Shows an event with checklist items in the Source (old) Template in which check list items have been deleted.
- The deleted items will NOT upgrade to the Target Template.
- When you have finished setting your map for deleted and added information, click Next
...
- A checklist item was added to the Target Template that is not present in the Source Template.
- Because the item in the Target does not exist in the Source, It is not paired with any item from the Source.
- Status = N/A
- In this example, the Target Item would not be paired with any item from the Source Template, the status would remain N/A
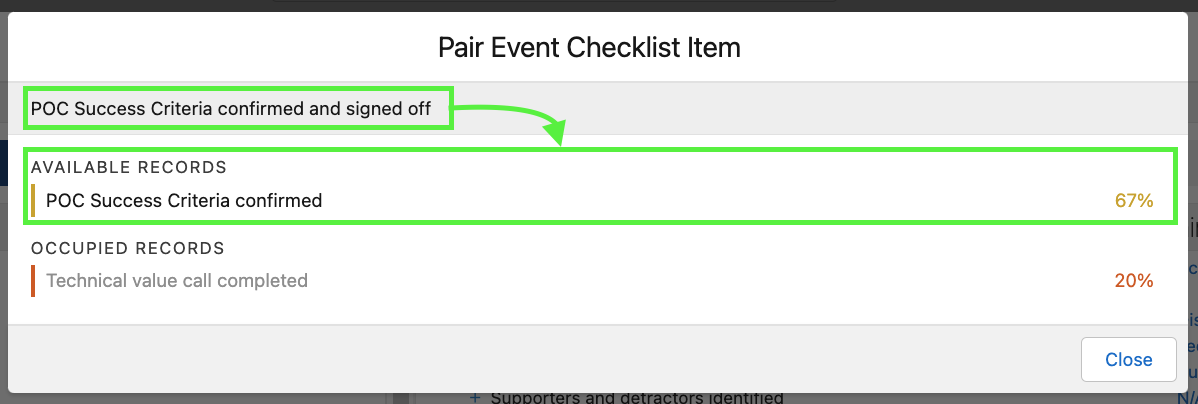
- A checklist item in the Source template has been changed in the Target Template.
- The item in the Source Template has been reworded in the Target Template.
- Current Status = N/A
- In this example, the User would pair the Target Template Item with the Source Template Item by clicking on N/A
- From the pop up, select the correct Item
Result:
- An Event with Checklist Items was added to the Target Template
- Because the item in the Target does not exist in the Source, It is not paired with any item from the Source.
- Status = N/A
- In this example, the Event and Checklist Target Items would not be paired with any item from the Source Template, the status would remain N/A
- Checklist Items have been fundamentally changed.
- Because the item in the Target Template is not a 100% match with the Item in the Source, it is not automatically paired with any item from the Source.
- Status = N/A
- In this example, the Admin will decide whether to map the items or not.
- NOTE: Unmapped data will be deleted. - Work logically and deliberately.
When you have finished, click Next
3. Scorecard
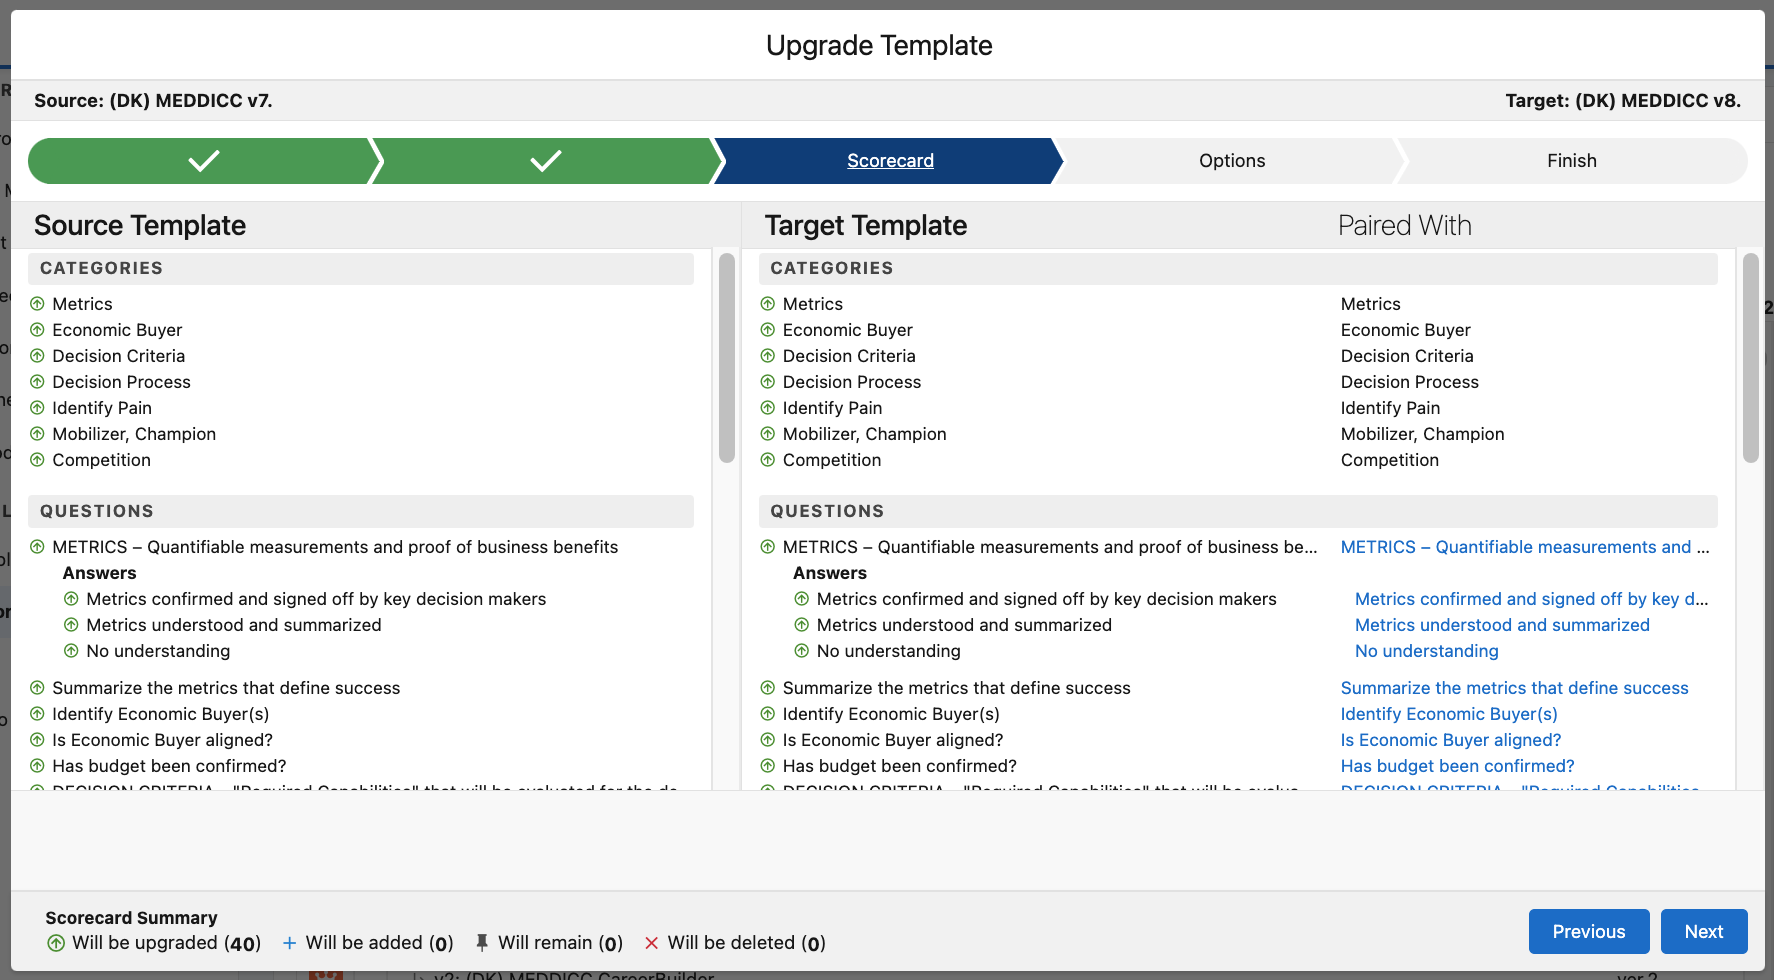
Scorecard mapping behaves in the same manner as Playbook.
When you have finished setting your map for deleted and added information, click Next
5. Finish
You are now ready to save your mapping and finish the upgrade process.
...
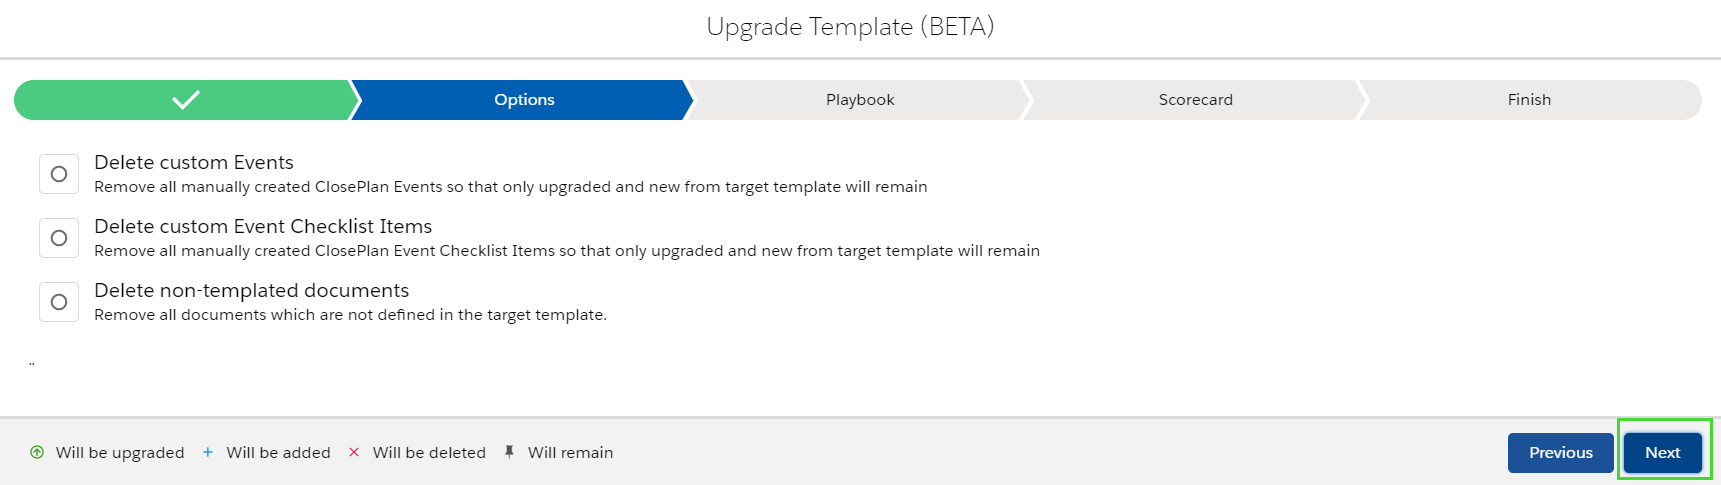
4. Options
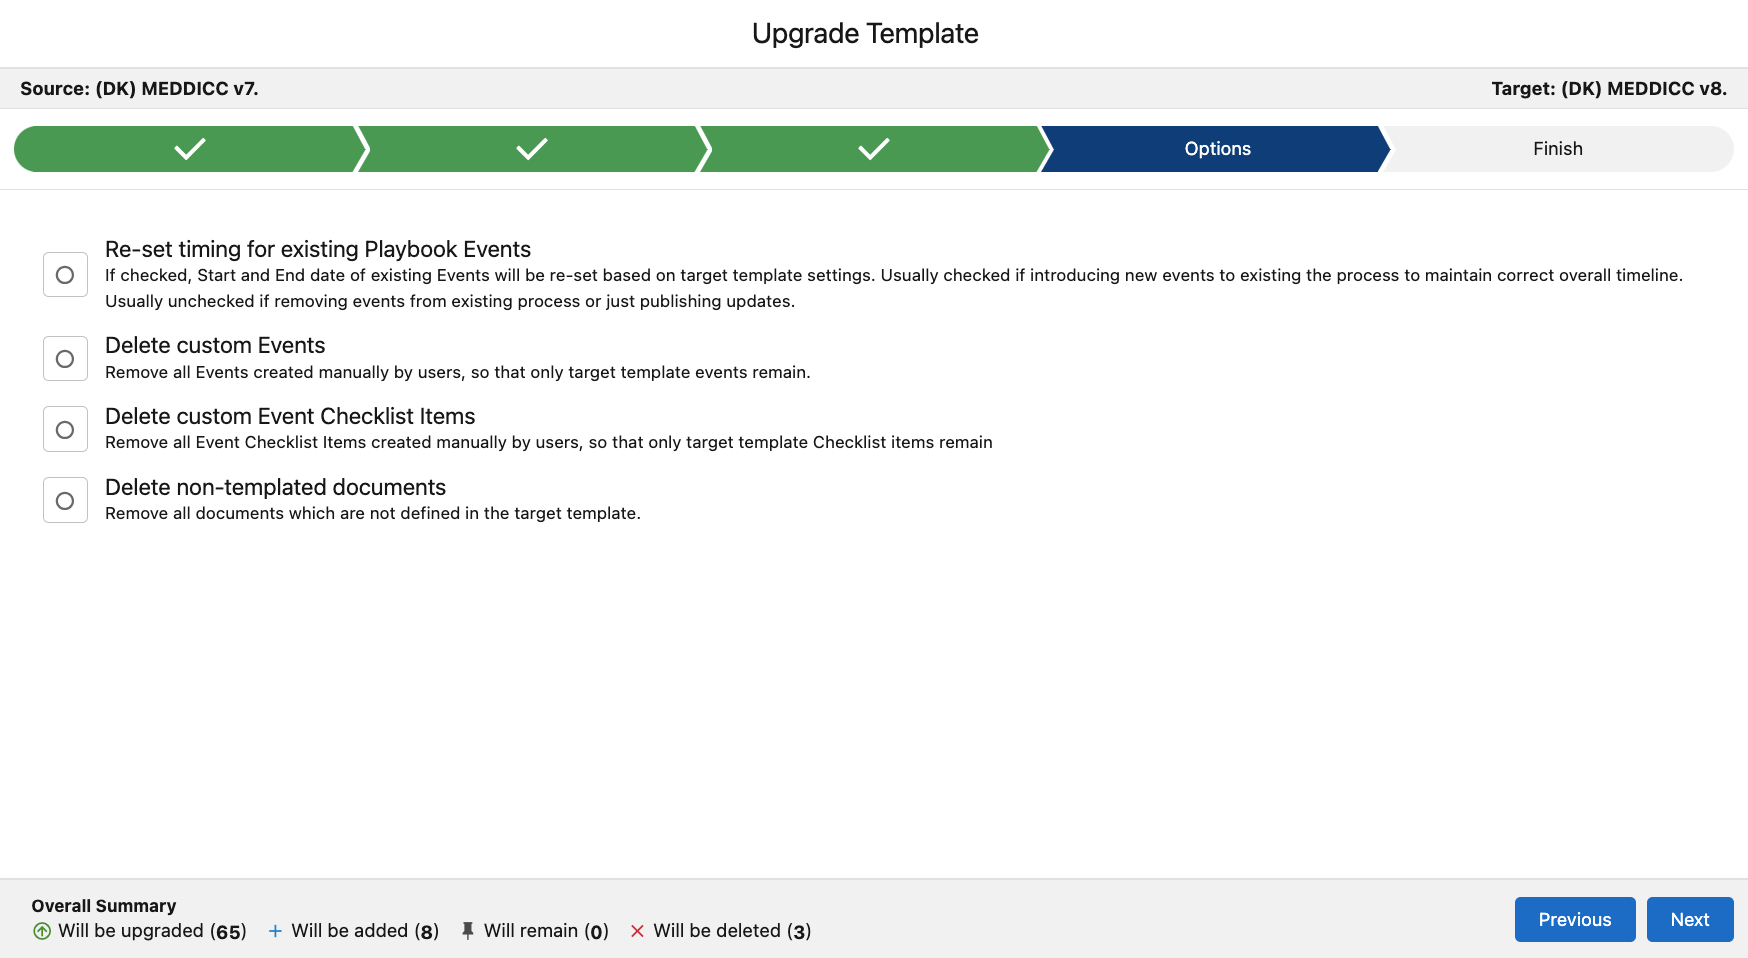
‘Options’ allows you to
- Reset timing for existing Playbook Events
- Delete custom Events
- Delete custom Checklist items
- Delete non-templated documents
- If you choose to delete custom data, select the option(s).
Click Next.
5. Finish
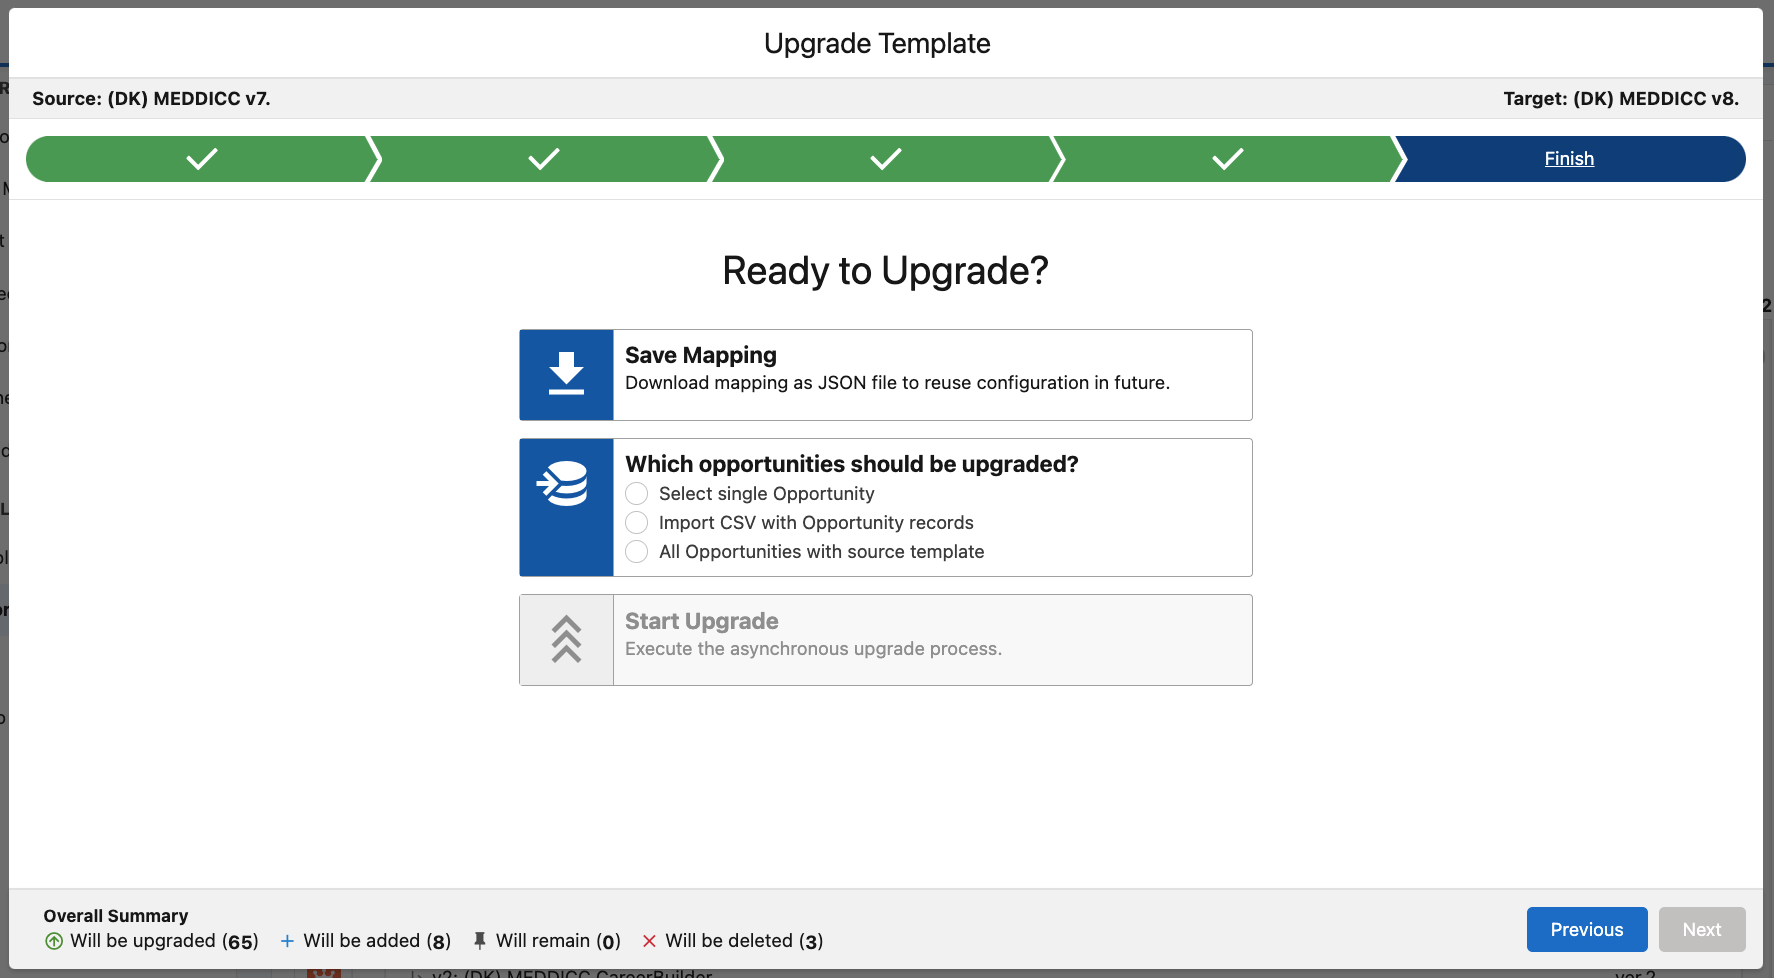
Save Mapping - will download your mapping for future use. It is recommended to save your mapping before testing or upgrading.
Which Opportunities should be upgraded?
Select Single Opportunity - will upgrade only one Opportunity.
Import CSV with Opportunity records
All Opportunities with Source template - will upgrade all Opportunities with Source template.
Start Upgrade - initiates the upgrade process
Upgrade single Opportunity:
Tick the Click the Select single Opportunity option
Enter the name of Opportunity you want to upgrade and select it
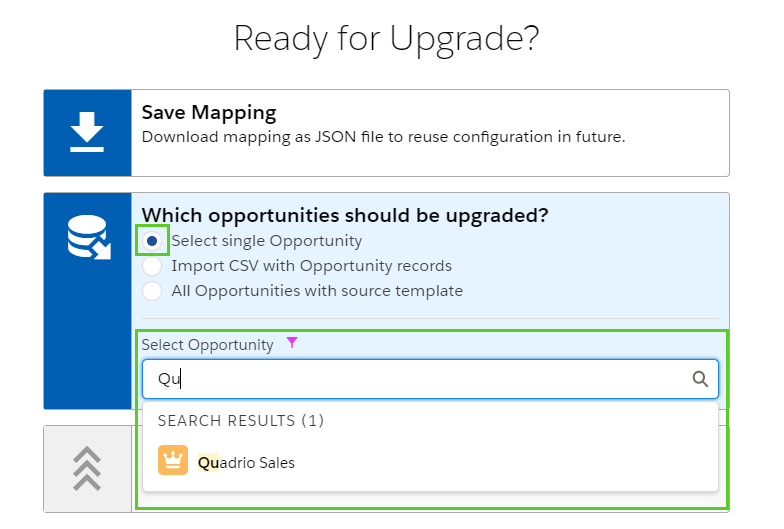

Click Start Upgrade and Confirm
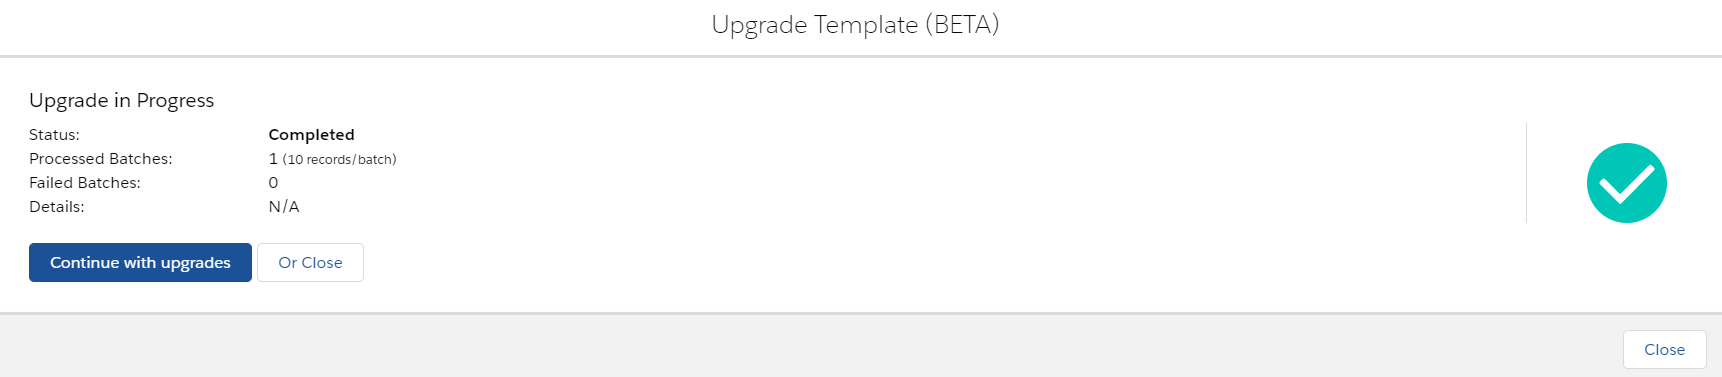
Wait a little bit and click Refresh Job Progress to see job status.
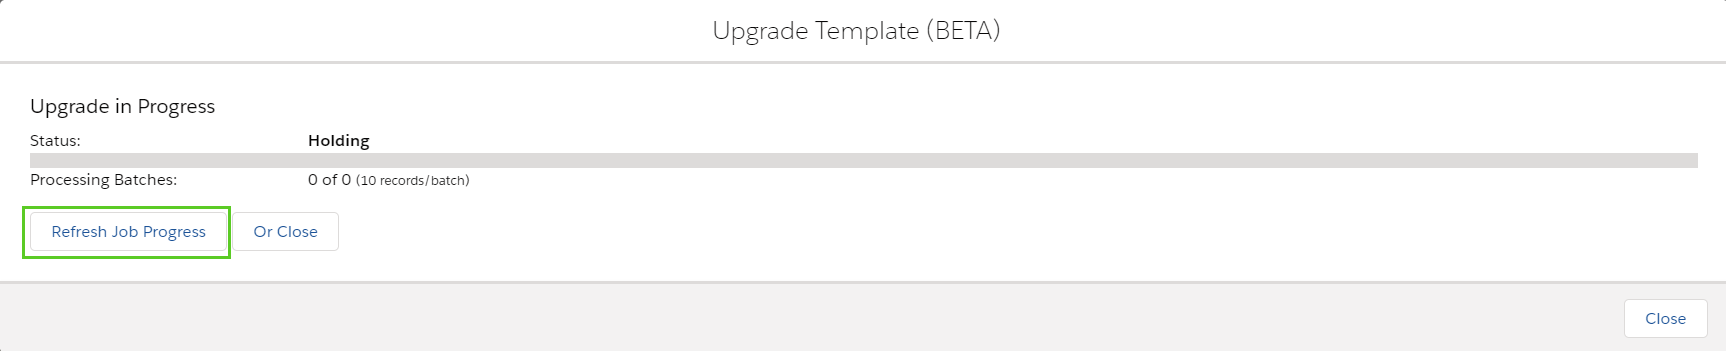
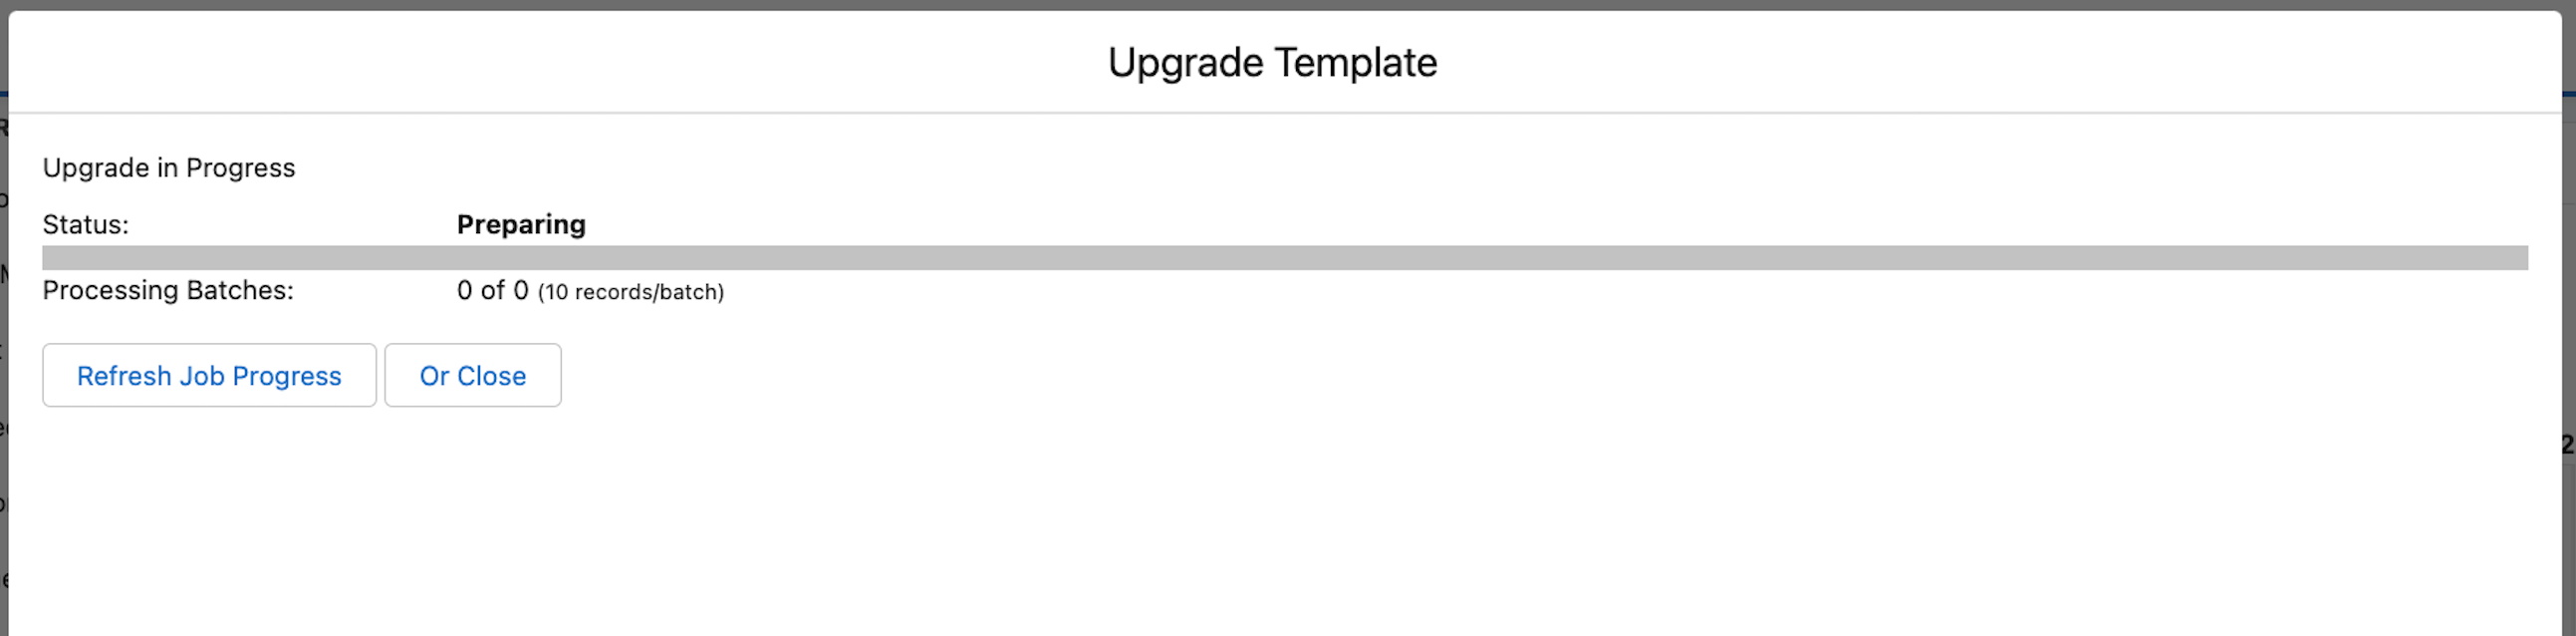
When the upgrade has been completed, you will get a screen confirmation. You will also receive an email.
If you want to continue with additional upgrades click Continue with upgrades and repeat the process.
If you are finished click Close button

Upgrade all Opportunities:
Tick the All Opportunities with source template option
In ‘Exclude Filters’ you can select which Opportunities will be upgraded.
Exclude Closed Opportunities will upgrade : Upgrade only ‘open’ Opportunities. If you also want to upgrade ‘closed’ Opportunities, unmark the checkbox.
Exclude if Opportunity created sets the dates which opportunities will not be upgraded..Created: Will not upgrade ClosePlan Templates created before and/or after the specified dates.
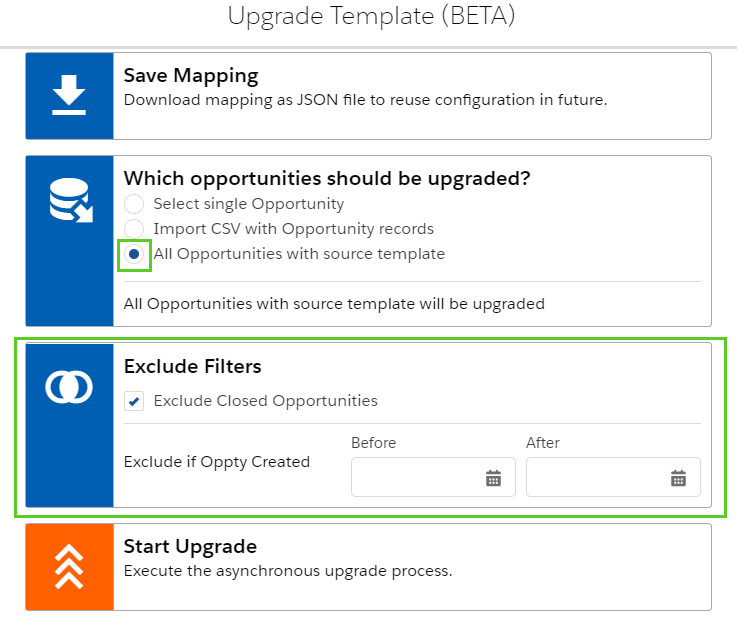
Click Start Upgrade and Confirm
Wait a little bit and click Refresh Job ProgressProgress to see job status
When the upgrade has been completed, you will get see a screen confirmation. You will also receive an email.
If you want to continue with additional upgrades click Continue with upgrades and repeat the process.
If you are finished click Close button.
...