...
...
...
...
...
...
...
...
...
...
...
...
...
...
...
...
...
...
...
...
...
...
...
...
...
...
...
...
...
...
...
...
...
...
...
...
...
...
...
...
...
...
...
...
...
...
...
...
...
...
...
...
...
...
...
...
...
...
...
...
...
...
...
...
...
...
...
...
...
...
...
...
...
...
...
...
...
...
...
...
...
...
...
...
...
...
...
...
...
...
...
...
...
...
...
...
...
...
...
...
...
...
...
...
...
...
...
...
...
...
...
...
...
...
...
...
...
...
...
...
...
...
...
...
...
...
...
...
...
...
...
...
...
...
...
...
...
...
...
...
...
...
...
...
...
...
...
...
...
...
...
...
...
...
...
...
...
...
...
...
...
...
...
...
...
...
...
...
...
...
...
...
...
...
...
...
...
...
...
...
...
...
...
...
...
...
...
...
...
...
| Table of Contents |
|---|
Overview
The Sales Playbook is composed of Events displayed in the Event List, in Gantt and in Kanban.
ClosePlan Sales Playbooks
enablesenable sales process alignment at scale.
Playbooks make it easy for you and your team to execute your sales strategy by guiding you through a best practices sequence of events based on your sales methodology.
Help best practices permeate throughout the sales organization.
Create custom Sales Playbooks for different business lines like Renewals, Global & Commercial Sales, Consulting Services and more.
Introduce repeatable processes and consistency to help reduce end of quarter surprises and increase win rates.
ClosePlan Sales Playbooks
supportsupport any sales methodology.
Optimize the Opportunity-to-Close process.
Accessing Playbook
You can access Playbook Access Playbooks in different ways based on your configuration. See See the general accessibility description description here.
Note:
A ClosePlan must be created in order to see the Playbook. If you have not created a ClosePlan, follow our
...
description here.
Events
Users lower in the hierarchy will not be able to view Events in a Playbook unless they are added to the Opportunity Team. For more information, see Playbook Read/Edit accessibility
Events
Events are the key components of a ClosePlan and represent the tasks required to complete a deal in your organization.
Events are displayed in the Event List, in the Gantt view and in the Kanban view.
Events are set by templates, but you new Events can also create new eventsbe created in the Playbook.
Events can be set with or without Stage progression, Dependencies and/or Checklist items.
Stage and Event Behavior
Sales stages monitor the progression of the deal.
...
If event stages are set with auto-progression, they will affect event behavior and the subsequent closure of each stage.
Additional settings that may affect event closure and dependent stage closures are:
...
Event Dependencies and Checklist items.
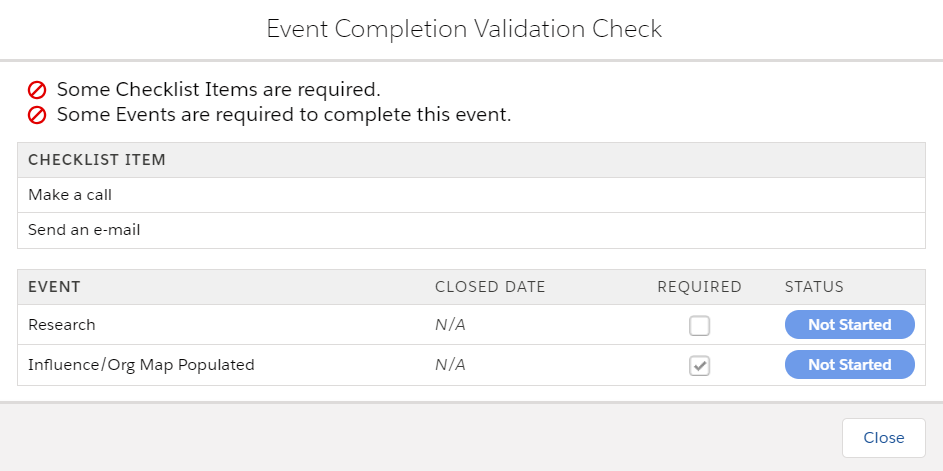
Stage Closure: there are 3 conditions that can affect the closing of an event:
Block if event is required: Events can be set as required, and will block users from moving to the next stage until the event is completed.
Auto-Complete open Event: Events are created without being Required. You can move to the next stage even if there is an open event.
Block if event is required, otherwise Auto-Complete Event: This is a combination of both possibilities. If there is a required event, you Users will be blocked from moving to the next stage, otherwise you Users can move to the next stage even if there is an open event that is not required.
...
Event Closure: there are 2 conditions that can affect the closing of an event
1.Event Dependency
...
Required Dependency - A
...
Required Dependency
...
is marked in orange, and allows you to close the main Event only after closing the subordinate event on which it is dependent.
Not Required Dependency - A Not Required
...
Dependency is marked in grey color and allows you to close the main Event even if the subordinate event on which it is dependent remains open.
...
| Drawio | ||||||||||||||||||||||||||||
|---|---|---|---|---|---|---|---|---|---|---|---|---|---|---|---|---|---|---|---|---|---|---|---|---|---|---|---|---|
|
2. Checklist item - Lists the tasks of team members.
Required - Required items are marked with a red line next to the checkbox and will block the closing of the Event if the task is open.
Not Required - Items that are Not Required do not have to be completed before closing the Event.
...
| Drawio | ||||||||||||||||||||||||||||
|---|---|---|---|---|---|---|---|---|---|---|---|---|---|---|---|---|---|---|---|---|---|---|---|---|---|---|---|---|
|
...
Example:
Open a required Event Dependency with check list items. You need to close the required check list items and then the dependent event if you want to close the Event
Adding a New Event
You can add a new Events to customize your process.
Note:
Creating
...
a
...
new
...
event
...
does
...
not
...
permit
...
you
...
to
...
set
...
a
...
Dependency
...
on
...
another
...
Event,
...
and
...
you
...
cannot
...
mark
...
new
...
tasks
...
in
...
the
...
checklist
...
as
...
mandatory.
...
...
These
...
options
...
are
...
only
...
possible
...
when
...
creating
...
a
...
new
...
template
...
for
...
a
...
given
...
ClosePlan
...
in the
...
ClosePlan Admin section.
Events can only be added by users on the Opportunity Team or those higher in the hierarchy
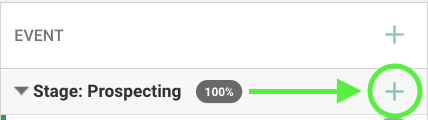
New Events can be created from:
Event list:
ClickClick the
+ EventNew button.
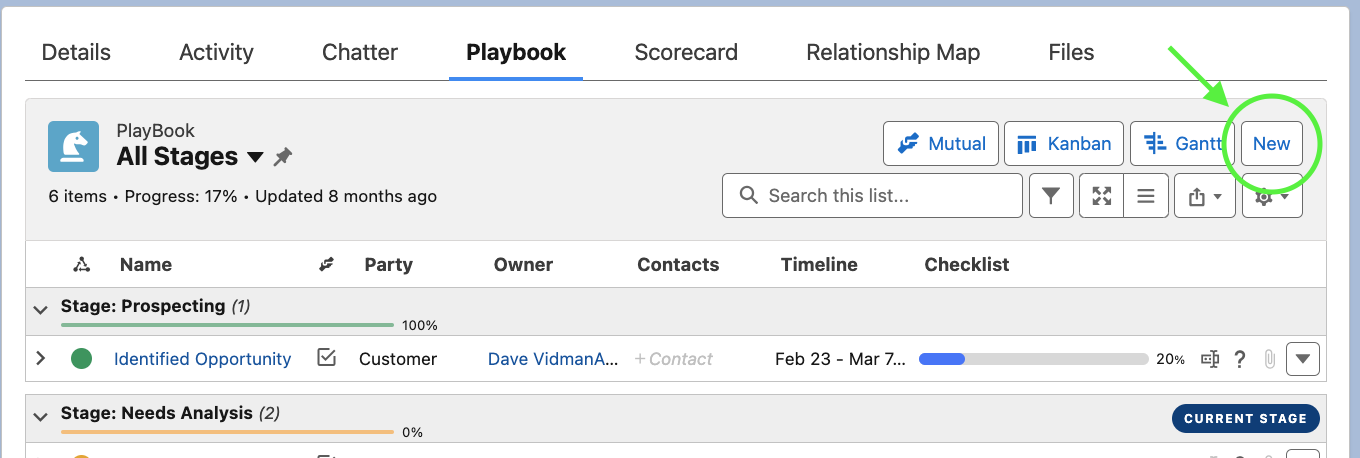
Gantt: Click the
 button.
 + next to Event

Note: If there are stages set, clickthe + by the stage where the new Event is needed.
Kanban: Click the
+ EventNew button.

Event Panel Window
When creating a new Event, the Detail Detail section of the event Event allows you to add Checklist items and attach Files for that Event.
After the Event is created, editing or viewing the Event allows you to add Files, Notes and Chatter, Chatter and Help & Job Aids.
The event Event panel window can be displayed in 2 ways: You can view all data stacked on one page, or in individual tabs.
To change the event display open any event by clicking on the
event name > click the right top button
Event Name
...
Detail:
- Type - Assign the type of event. Types options are set through your organization in the event types settings.
- Event Name - Name of the event.
- Assigned To - Assign an individual responsible for the event. Suggested users will appear if related to the selected Event Type.
- ClosePlan - The ClosePlan is already selected.
- Start Date - Click on
 to add the start date of the Event.
 - Due Date - Click on
 to add the end date of the Event.
 - Stage - Enable to assign the event to the chosen stage.
- Status - Indicates the present status of the event.
- Event Description - Description of the event.
- Event Goal - Goals of the event.
Checklist:
...
...
To Edit the Event - click on the pencil icon in the top right
...
Editing Events
...
Tab set:
Detail - Details about the Event (More details below)
Files - Files can be linked or attached to the Event that help Users with additional information
Notes - Notes can be added to the Event that help Users with additional information
Chatter - Allows Users to view and add Chatter posts
Help & Job Aids - Information about the purpose and goals of the Event.
Event Name - Name of the Event
Start Date / End Date - Start and End date for the Event
Assigned To - Assign an individual responsible for the event. Suggested users will appear if related to the selected Event Type.
Mutual - Toggle to indicate the Event is Mutual
Stage - Enable to assign the event to the chosen stage.
Party - Party responsible for the Event (Internal, Partner Customer, Other)
Status - Indicates the present status of the event.
Key Opportunity Fields - Key Opportunity Fields as noted.
Checklist:
The Checklist is used to add tasks for team members. It shows % complete in the progress bar and in the Gantt event bar.
...
To add a new Checklist Item:
Double click an existing Event to open the Event side bar
...
Click ‘Add Checklist Item’
...
Add the Checklist Item information (Name, Date)
...
Save or cancel
Created Tasks can be edited or deleted
Created tasks can be
alsoreordered
Drag the task and move to another task to change the position
Once the task is done, mark the checkbox as
complete and
and complete and it will be shown in the event progress bar.
(The checkbox is possible to mark by editing or viewing the event)
...
...
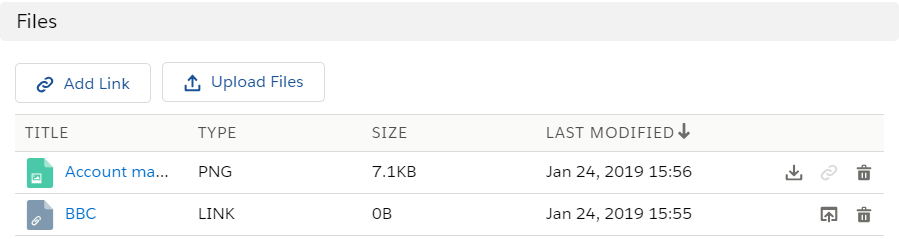
Files:
Allows you to add specific links and/or files to an individual event.
Click
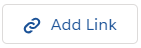
Add a link with a valid URL address and Title > Save
Link will open if you click on the Link Title or
 icon
icon
Click
 to add one or more Files
Files can be downloaded by clicking the
 icon. The
  button will create a link to send and share the file with others.
Notes:
Notes enables you to add notes to the event.
Open an Event > go to the Notes section
Click + Note button > add your note > Save
Chatter:
Chatter enables you to create a post related to the event that allows for feedback.
If there is not Chatter tab, the Chatter is set as disable.
Open an Event > go to the Chatter section
Write your post > click Post
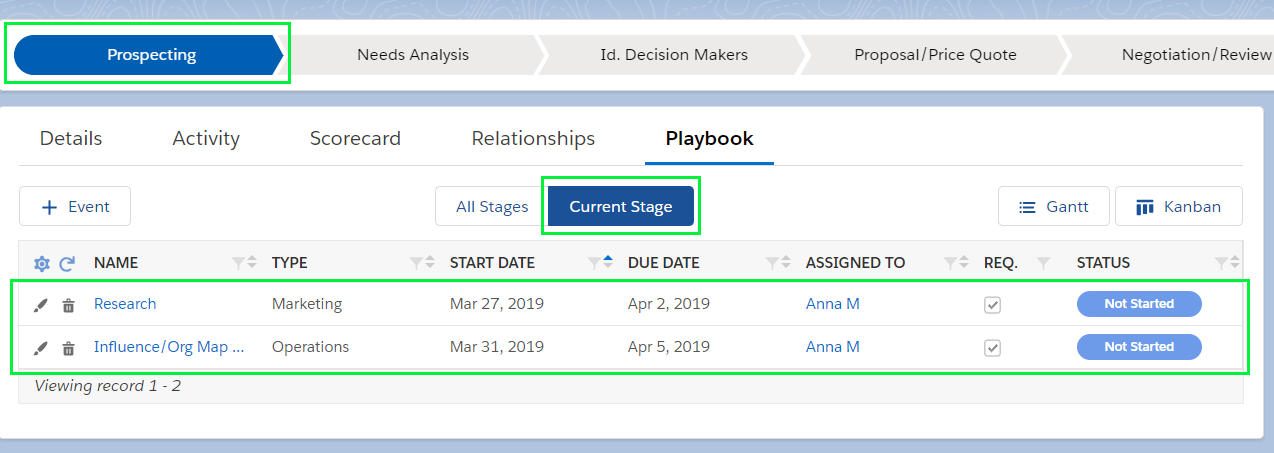
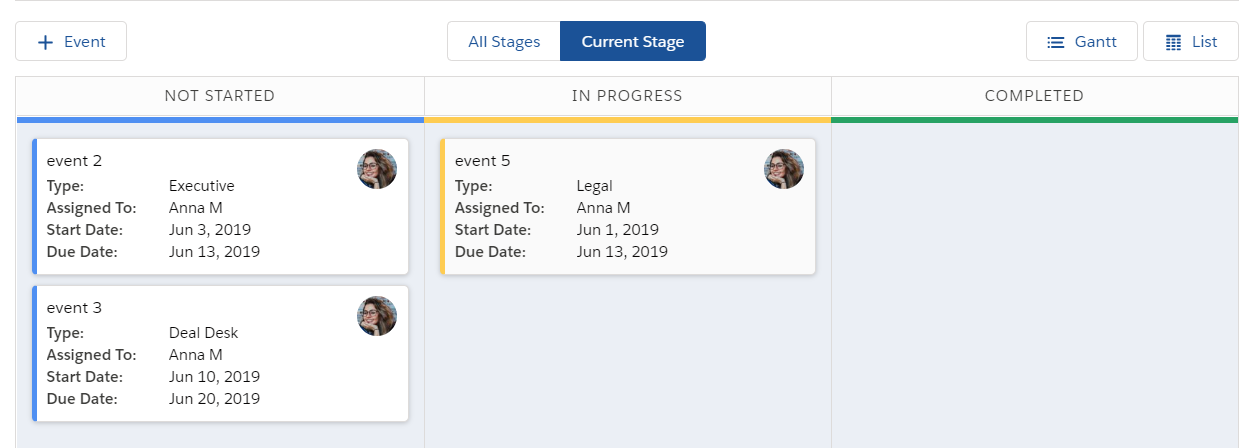
Event List
Event List shows a list of events created by your organization and also newly created events.
With
...
stage
...
progression
...
turned
...
on,
...
Event
...
List
...
displays
...
events
...
for
...
the
...
Current
...
Stage.
...
You
...
can
...
also
...
switch
...
to
...
All
...
Stage
...
view
...
mode.
Current stage display: All stages display:
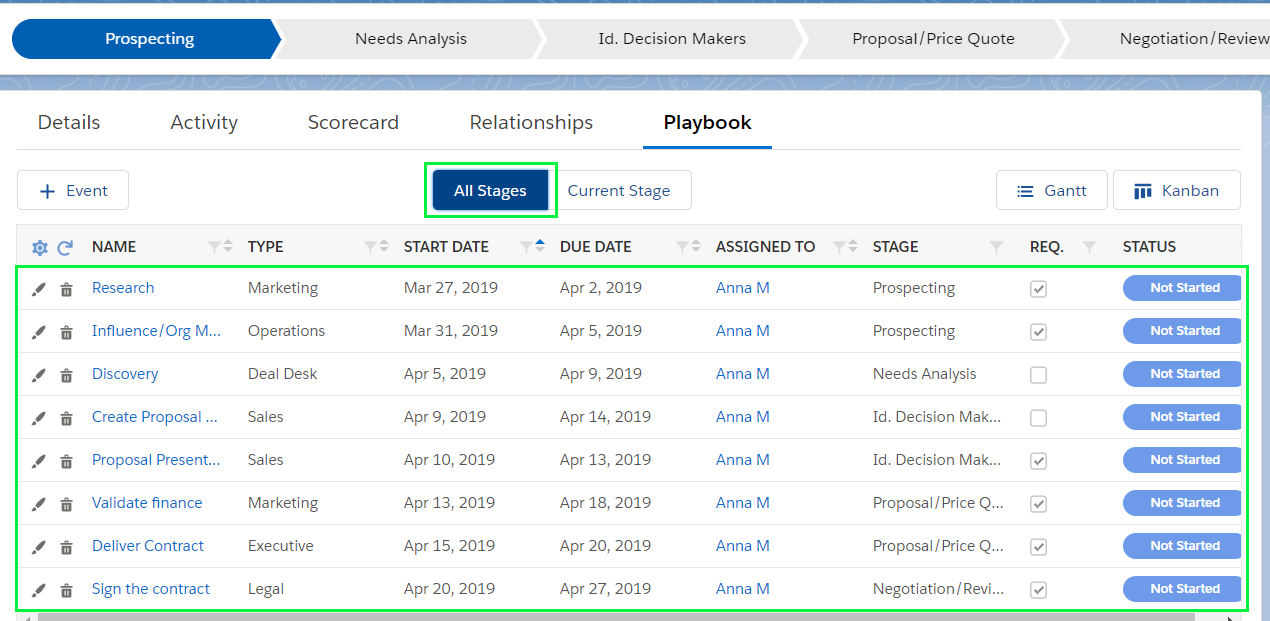
Event List Layout & Navigation
Event List Layout & Navigation

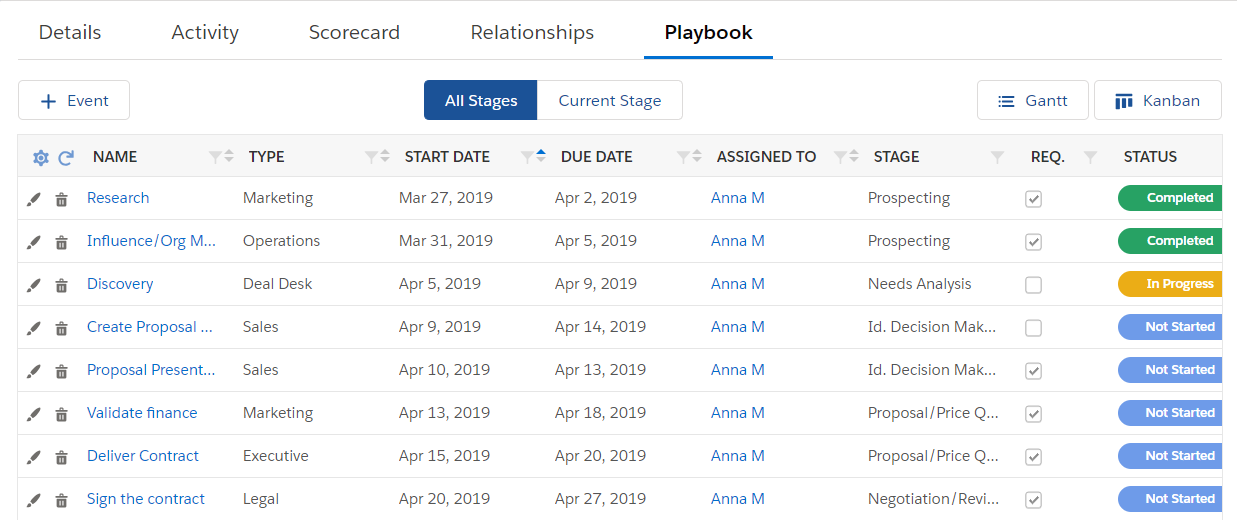
 - Click to create a new event
 - Shows all events from all stages
 - Shows events only for the current stage
 - Switch to Gantt chart view
 - Switch to Kanban list view
 - Open to Clear Filters, Toggle Fullscreen and Export the Event list into XLS format
 - Refreshes the page
 - Enables you to Apply Filters and Refresh Data, Apply Filters and Clear Filters
 - Edit the Event
 - Delete the Event
 - Name - Click on the desired Event to open the Event Details. You can add Notes, Actions and Chatter posts for the Event, edit or delete the Event, change the Status and upload files or links.
- REQ. - shows if the event is required before you are permitted to move to the next stage
- Status - shows the actual status of the event. Click on the button to change the Event Status
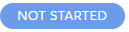 - The Event has been not started yet - Nobody is working on it
 - The Event is in progress
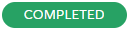 - The Event has been completed
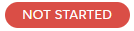 - The Event has been terminated. Displays when the Event is terminated and nobody was working on it.
Gantt
...
Playbook view setting
All Stages
Current Stage
Mutual - Toggle Mutual Event
Kanban - Switch to Kanban view
Gantt - Switch to Gantt chart view
New - Create new Event
Search bar
Filter - Select view filters
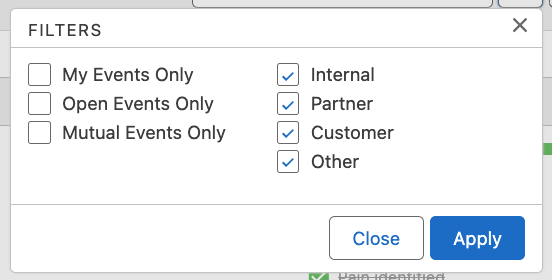
My Events Only
Open Events Only
Mutual Events Only
Internal
Partner
Customer
Other
Expand Playbook view area
Show all Checklist items in all Events
Playbook Export
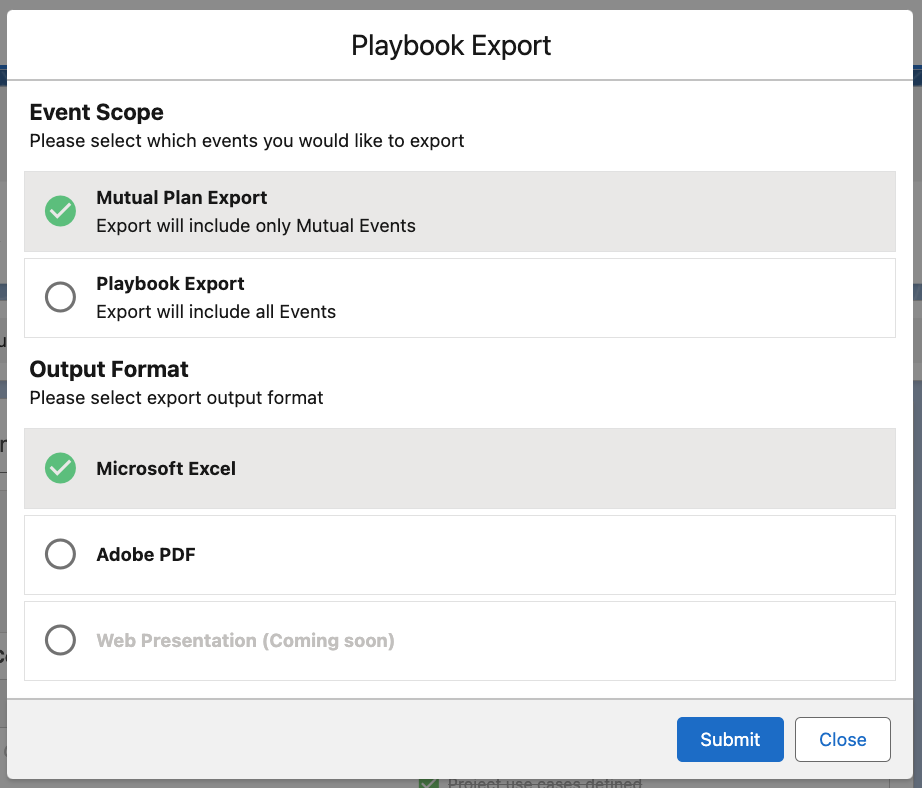
Mutual Plan Export - Export will include only Mutual Events
Playbook Export - Export will include all Events
Format: Excel
PDF
Web Presentation
Gear icon
Refresh - Refreshes and updates
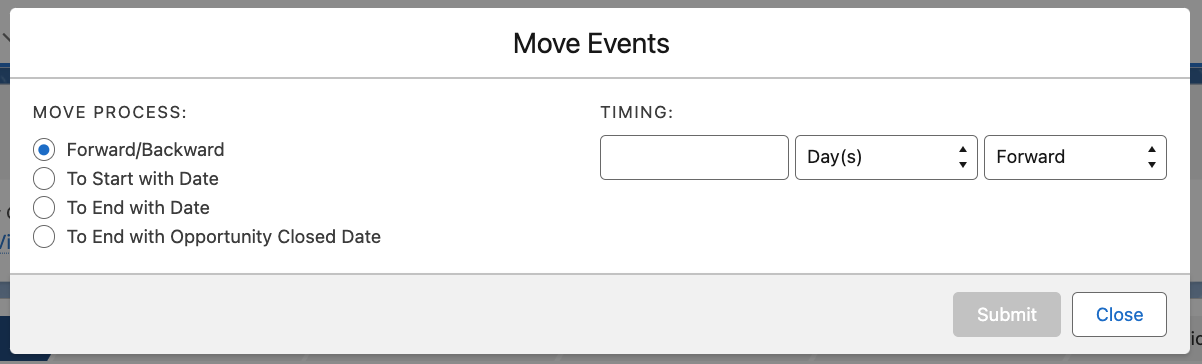
Move Events - Changes the timing of Events in Playbook
Stage - Displays Stage name
Status - shows the actual status of the event. Click on the button to change the Event Status

Not Started -The Event has been not started yet - Nobody is working on it
In Progress - The Event is in progress
On Hold - Event is on hold
Completed - The Event has been completed
Canceled - The Event has been canceled.
Not Applicable - Event is not applicable to this deal.
Event Name
Checklist Items
Edit Event - Opens a modal to edit Event details
Help and Jpb Aids - Opens a modal to access company provided Support Materials
Attachments - Indicates the presence of and accesses attachments
Edit of Delete Event
Current Stage - Displays the Current Stage
Gantt
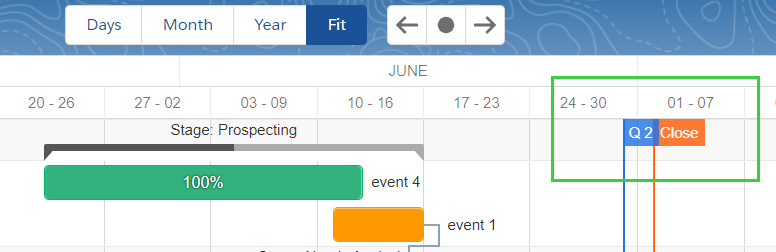
The Gantt chart illustrates the Events in a Grid and Bar area.
If auto stage progression is set, events are sorted by the stage to which they are assigned. (These settings are made when creating a template for a given ClosePlan)
New events can be added directly to the stage.
Gantt displays event dependencies.
If
...
the
...
event
...
has
...
set
...
checklists,
...
the
...
event
...
shows
...
the
...
percentage
...
of
...
their
...
fulfillment.
Gantt Layout & Navigation
| Drawio | ||||||||||||||||||||||||||||
|---|---|---|---|---|---|---|---|---|---|---|---|---|---|---|---|---|---|---|---|---|---|---|---|---|---|---|---|---|
|
 Toolbar
 - Toggles visibility of the Sidebar

- Switches Events view between days, months, year or fit events to the visible Gantt area.

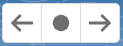
- Scroll the Gantt area left and right or to today's date.


- Toggles visibility of critical path


- Export data as Excel, PDF, Image or MS Project


- Enables you to move or resize individual Events in the Gantt area
 - Returns back to the Event List or Kanban
 Sidebar area
The Sidebar area allows you to:
Add a new Event: Click


and add information to the new event panel window.
View and edit the event: Click on the event you would like to see or edit.
Hide events - click
 by the stage to hide events belong to the stage.
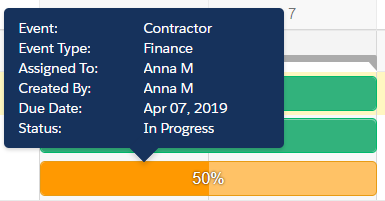
Hover over the event to show the Event information.
Click 1x on the event to highlight Event location on the Gantt chart.
 Gantt area
Contains Events in the timeline and in stages. Also allows you to see selected time periods (e.g. Q1, Q2).
Shows event dependency and checklist items progress
Events can be moved and resized
Drag the Event Bar to the right or left. Doing so will alter the assigned start and/or finish dates
Resize to alter the duration of the Event by moving the edges of the bar. These actions will change the Event duration and start and/or end dates.
![]()
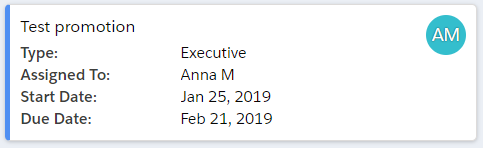
Hover over the Event to show basic event information.
Periods (Q2) are set by your organization and mark important dates.
Close marks the close date of the Opportunity
Kanban
Divides the Events according to current Status.
...
Click on the desired Event to open the event details. You can add Notes and Chatter posts for the Event, edit or delete the Event, and change the Status.

- Click to create a new Event

- Displays all events across entire ClosePlan


- Displays Events assigned to the current stage

- Switch to Gantt chart

- Switch to Event List

- Click on an individual Event node to open the Event information.