| Table of Contents |
|---|
Using Environment Settings
Environment Settings allow ClosePlan Admin Users to:
- Specify which ClosePlan features and functions are presented to their teams.
- Select and deploy ClosePlan modules and fields that will appear in ClosePlan.
- Assign Permission Sets to Users for ClosePlan access.
- Delete ClosePlan context Metadata
...
| Note |
|---|
You must be a Salesforce Administrator with Customized Application permission settings in Salesforce to update these settings. Environment Settings are processed asynchronously and may take longer than you might expect for changes to be applied. |
Access
ClosePlan Admin tab > Environment on the left panel menu
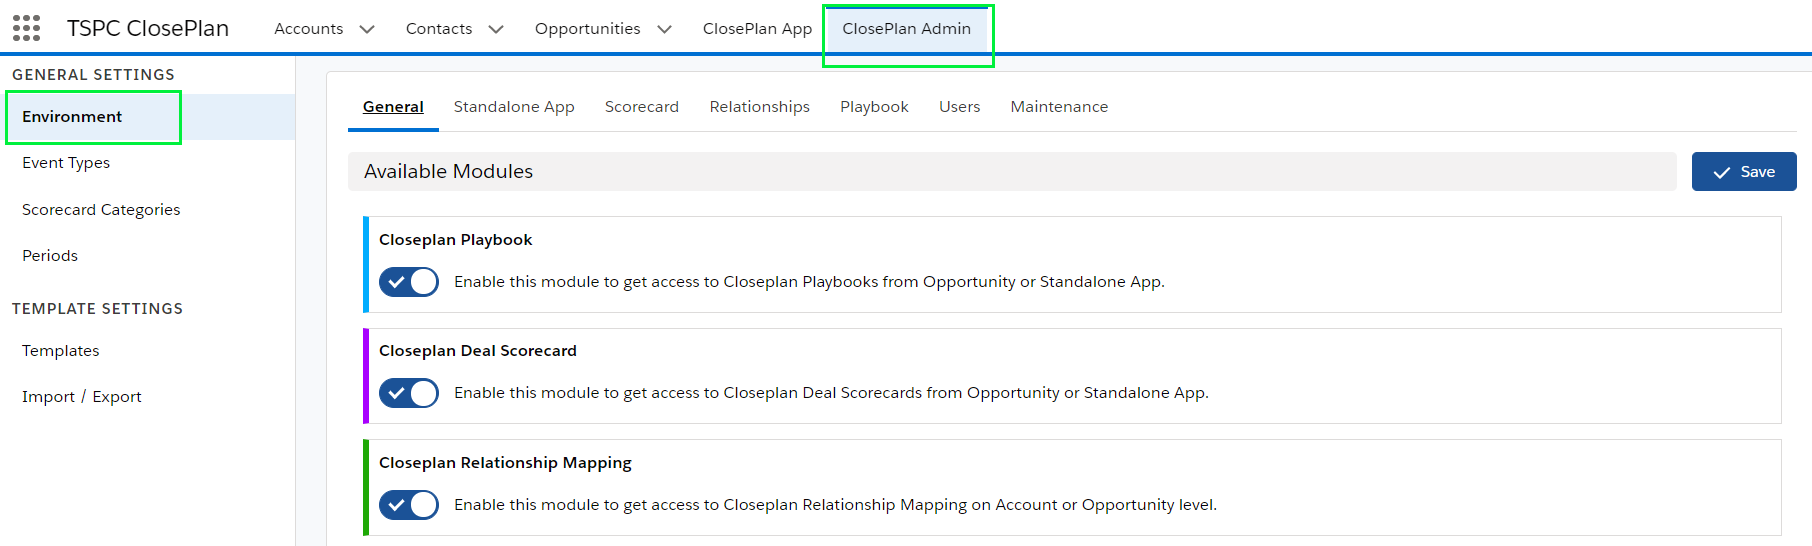
General
Allows Admins to enable which ClosePlan features and functions are presented to their Users.
ClosePlan is configured into 3 modules: Playbook, Deal Scorecard and Relationship Mapping.
- Select which modules will appear to Users in ClosePlan (for Classic and Standalone app)
![]() = will appear in ClosePlan
= will appear in ClosePlan
![]() = will be not shown in ClosePlan
= will be not shown in ClosePlan
- Click Save to save your settings

| Info |
|---|
Some ClosePlan customers may not have access to all modules. Refer to your customer agreement for complete details. |
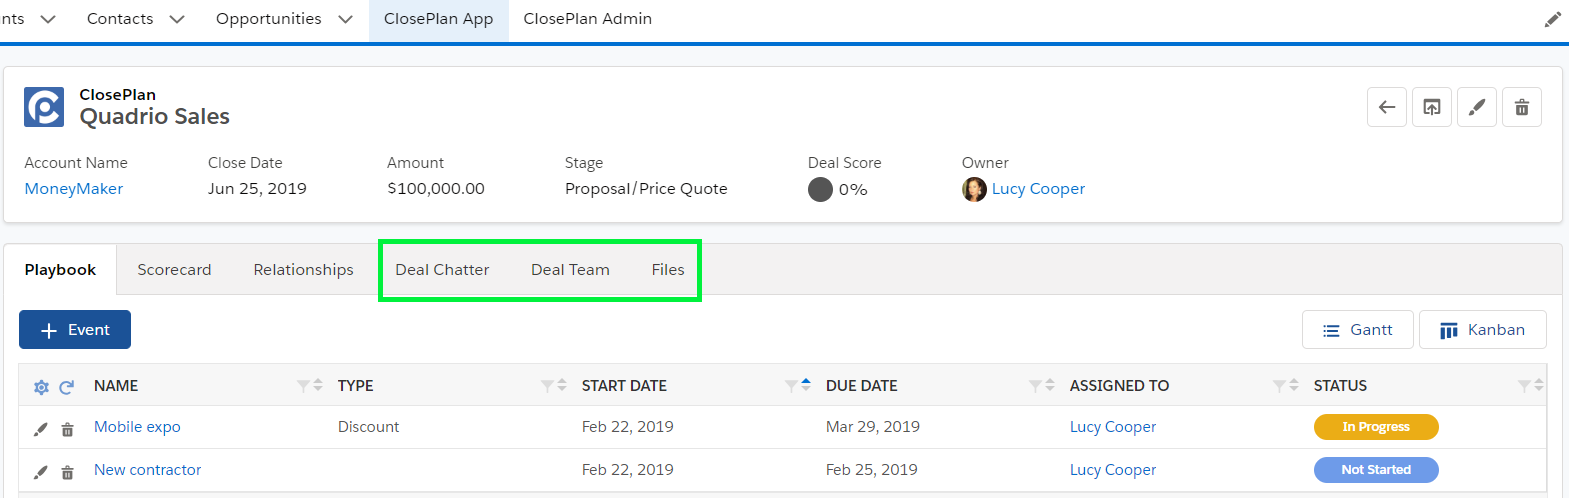
Standalone App
The Standalone App tab allows Admins to enable Teams, Chatter and Files in the Standalone Application.
- Select which options will appear in the Standalone App
- Click Save
Settings:
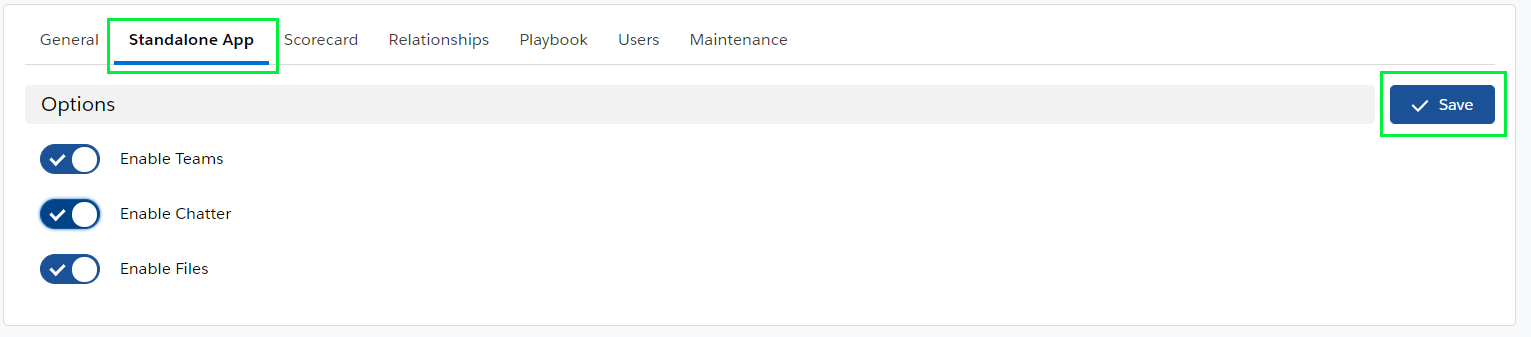
Result:
Scorecard
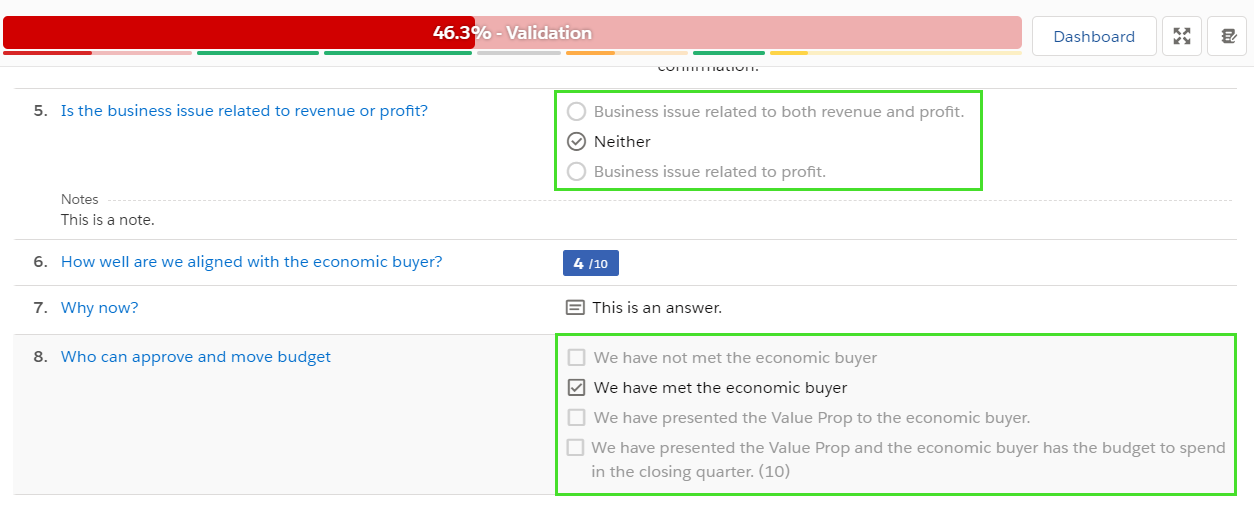
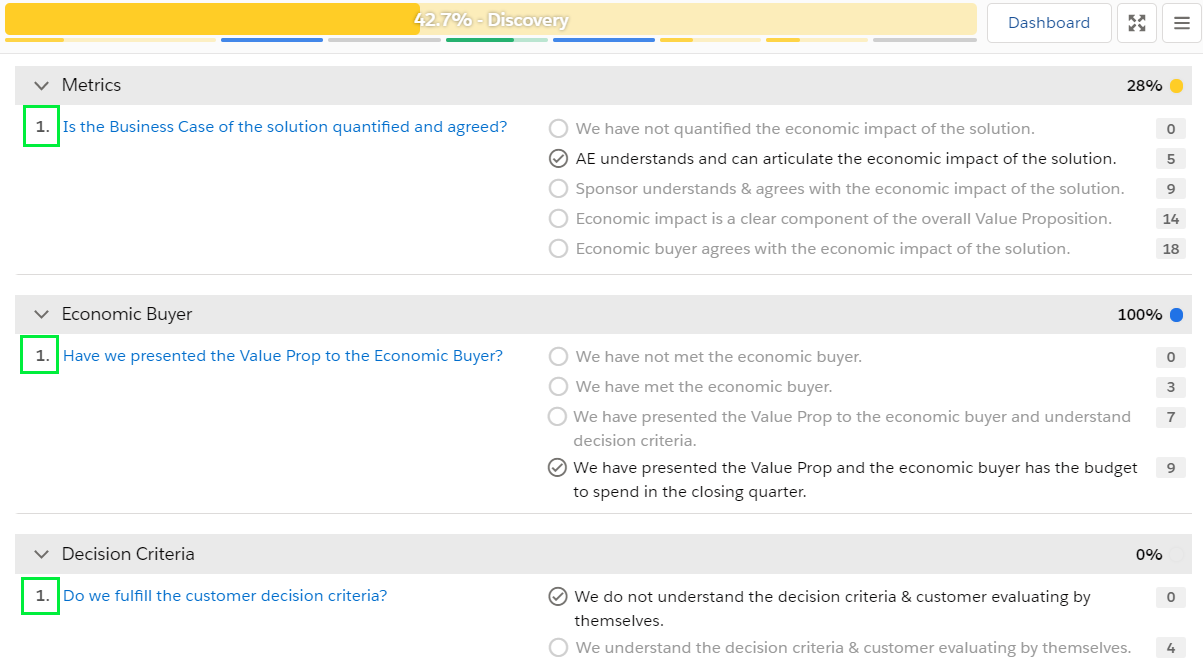
The Scorecard tab allows Admins to enable or disable features in the Scorecard Layout and Questions.
- Select Scorecard Options to enable or disable items, and click Save.
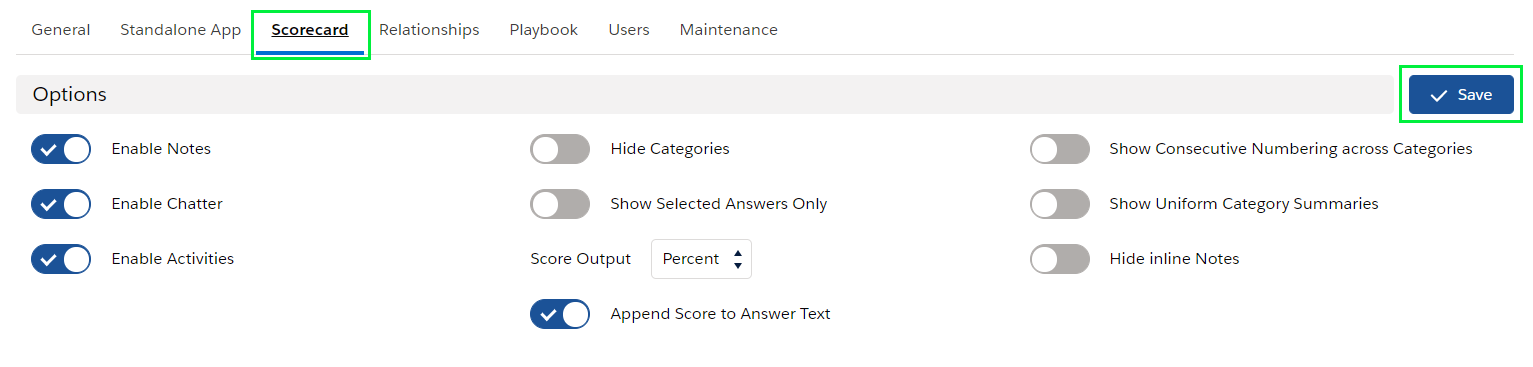
- Enable Notes = When Notes is enabled, Users can add notes for relevant Question.
Enabled:


Disabled:
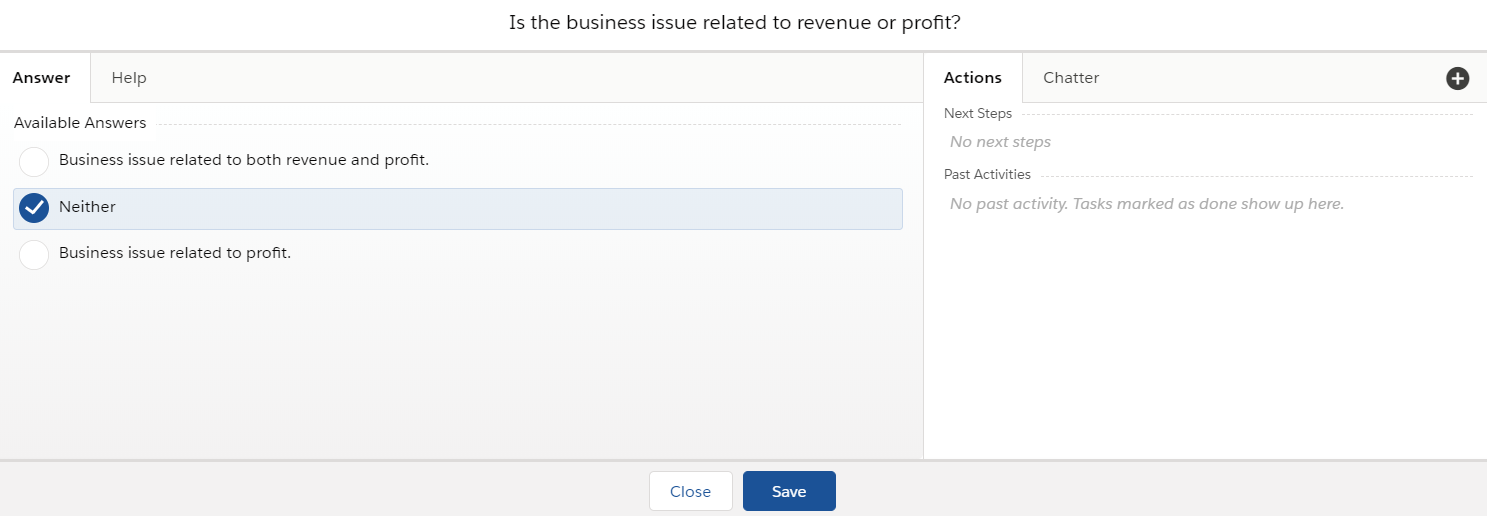

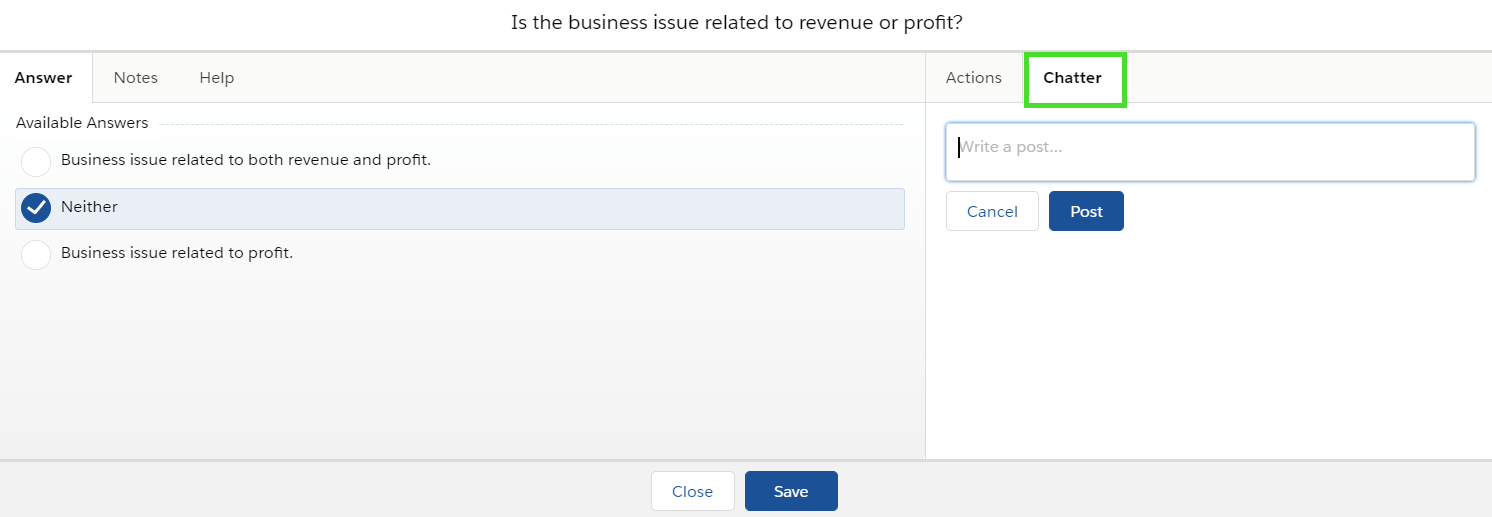
- Enable Chatter = When enabled, Users can post comments related to relevant Questions.
Enabled:
Disabled:
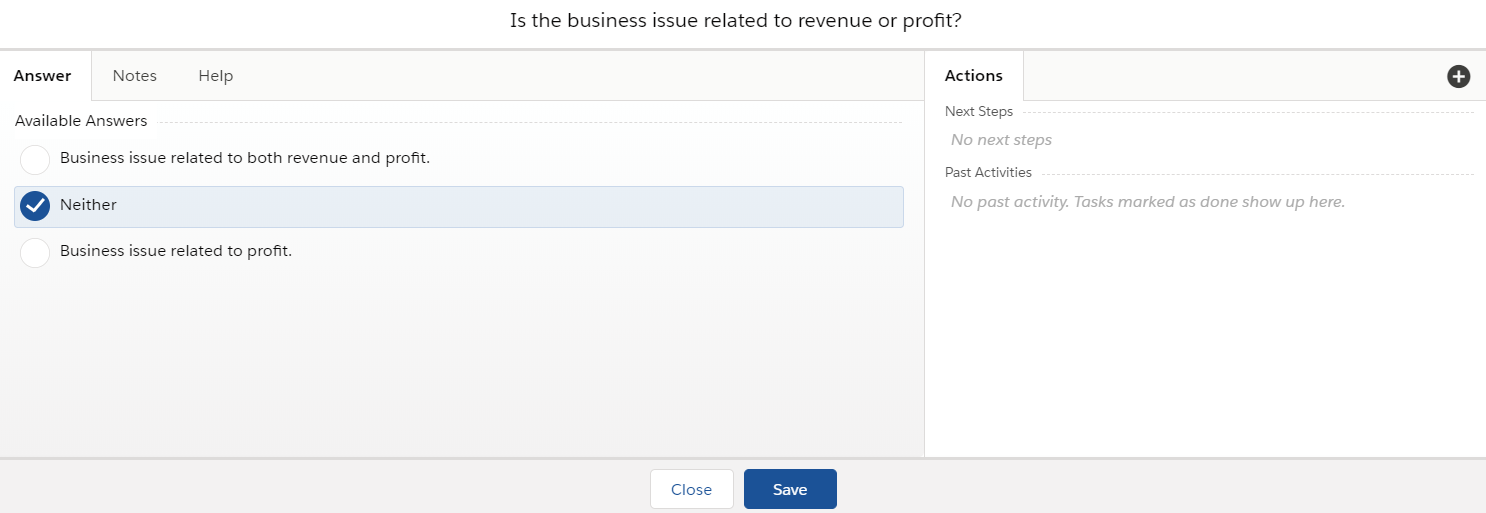
- Enable Activities = When enabled, Users can add tasks for relevant Questions.
Enabled:
Disabled:
- Hide Categories = When enabled, Scorecard Categories are displayed in the Scorecard Layout.
Enabled:
Disabled:
- Show Selected Answers Only = When enabled, will show only selected answer/s for relevant Question in the Scorecard Layout.
Enabled:
Disabled:
- Score Output = When enabled, determines how scoring is displayed in the Scorecard.
The following options are available:
None

Percentage

Points

Both

- Append Score to Answer Text = When enabled, will show score value for answers.
Enabled:

Disabled:

- Show Consecutive Numbering across Categories = When enabled, will change numbering of Questions in the Scorecard layout (1, 2, 3, 4, 5, ...)
Enabled:

Disabled:
- Show Uniform Category Summaries = When enabled, will set the same width of categories in the Score bar.
Enabled:

Disabled:

- Hide inline Notes = When enabled, will hide added notes in Scorecard Layout.
Enabled:

Disabled:

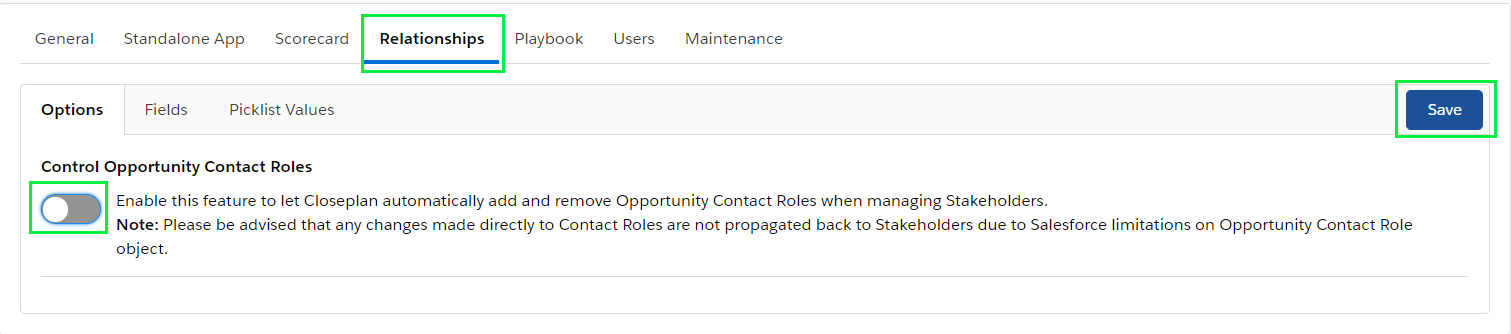
Relationships
Relationships contains Options, Fields and Picklist Values that configure Stakeholders and their relationships.
Options
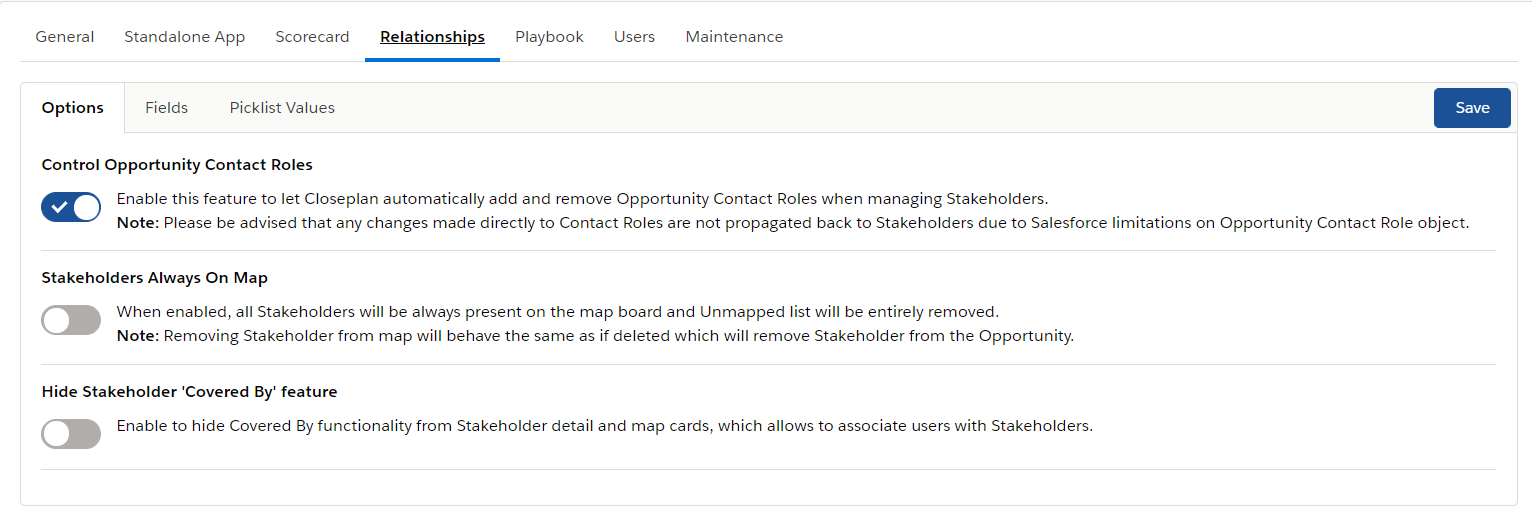
Control Opportunity Contact Roles
Enable this feature to allow ClosePlan to automatically create/delete/update Opportunity Contact Roles while managing Stakeholders.
If ClosePlan Stakeholders have the same Role definition as Opportunity Contact Roles (Recommended), value will be synchronized when creating Stakeholders from Contact Roles or when Contact Roles created/updated based on Stakeholder changes.
Note: Changes made directly to Contact Roles are not propagated back to Stakeholders due to Salesforce limitations on Opportunity Contact Role object. Once ClosePlan is deployed, Users should work with Stakeholders only.
Note: Whereas one contact may represent multiple Stakeholders on different Opportunities or Account maps (e.g. Budget Owner, Champion, etc), propagation to the contact does not happen. Doing so would mean that the contact would be assigned one role across all instances.
=> If enabled and you will deploy a template, Contact Roles on the Opportunity will be propagated to the Role on the Stakeholders. If you want to change the Role, you have to change it on the Stakeholder and it will propagate the change to the Contact Role on the Opportunity.
- Toggle the button to enable the function and Save.
Stakeholders Always On Map
When enabled, all Stakeholders will be always present on the map and the Unmapped list will be removed.
Note: Removing Stakeholders from the map will behave the same as if deleted. Stakeholders are removed from the Opportunity.
- Toggle the button to enable the function and Save.

Disabled = unmapped Stakeholders are found under the Unmapped Stakeholders icon
Enabled = The Unmapped Stakeholders icon is not available and Stakeholders are always in the map. If a Stakeholder is removed, they will be placed in the Contact list.
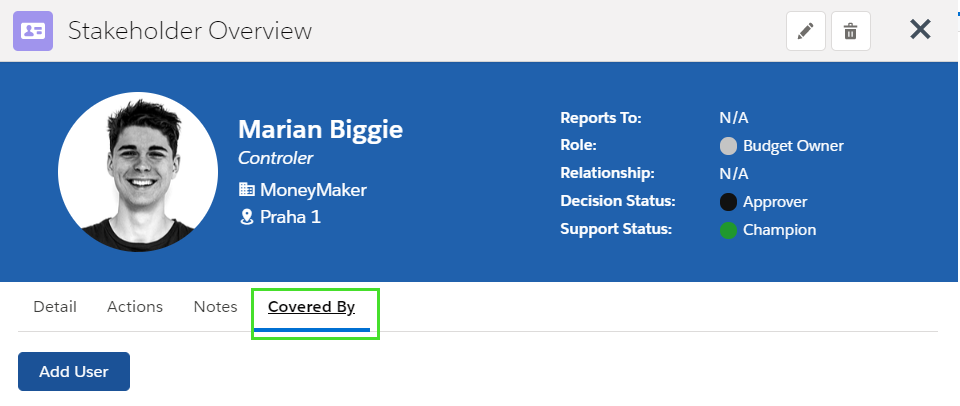
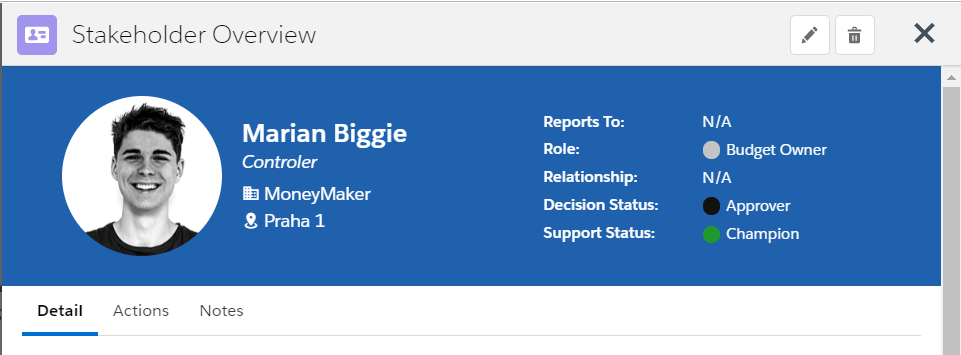
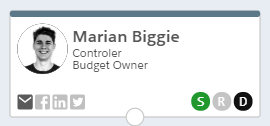
Hide Stakeholder "Covered by" feature
When enabled, will hide Covered by functionality from Stakeholder detail window and map node
- Toggle the button to enable the function and Save.
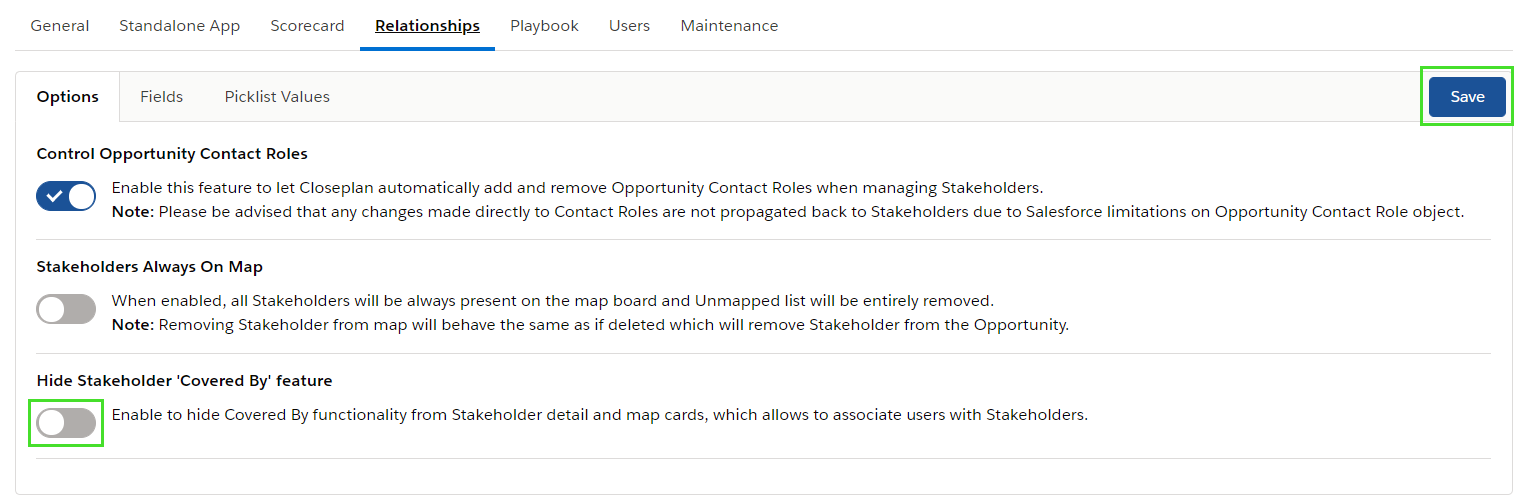
Disabled:
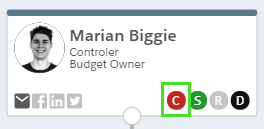
Enabled:
Fields
Displayed Fields
Hide or display fields in Stakeholder detail/edit panels, lists and/or mapper tool.
- To hide a field, select it from the visible section > click
 button > click Save Fields
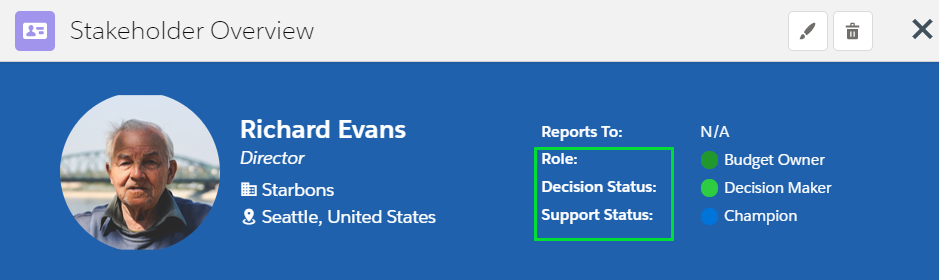
Setting:
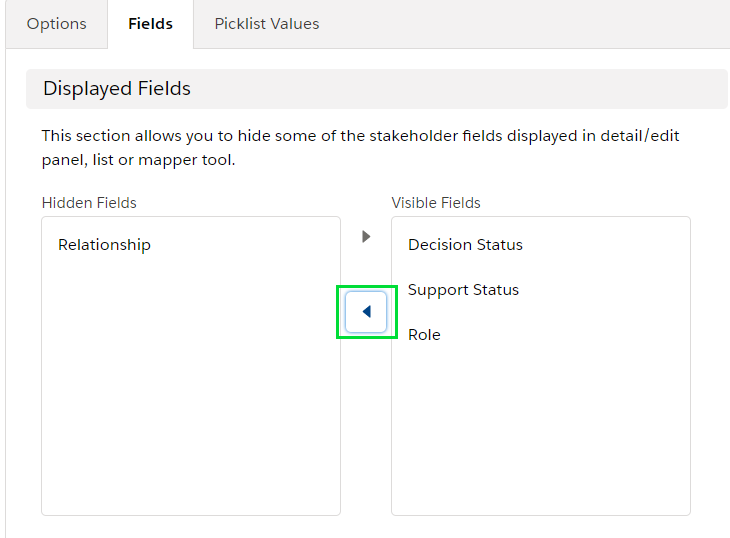
Result:
Additional Contact Fields
Add specific contact fields into Stakeholder detail/edit forms.
- From Available Fields select the desired field and move to Selected fields via
 button > reorder if needed > click Save Fields
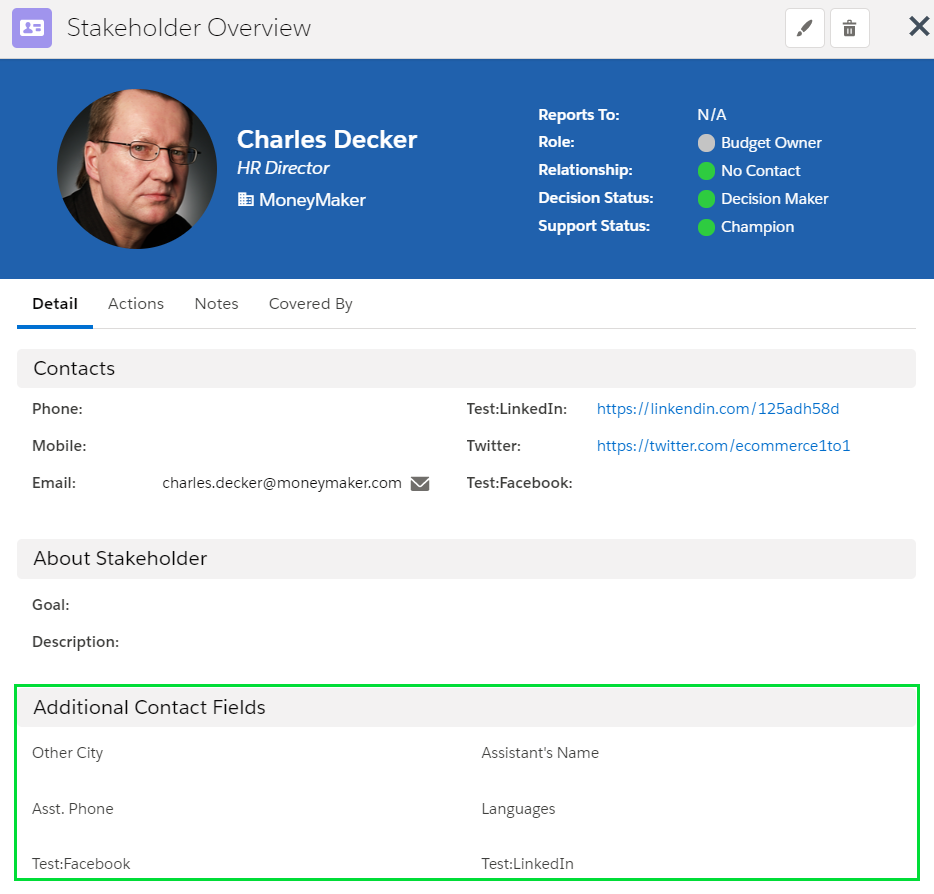
Setting:
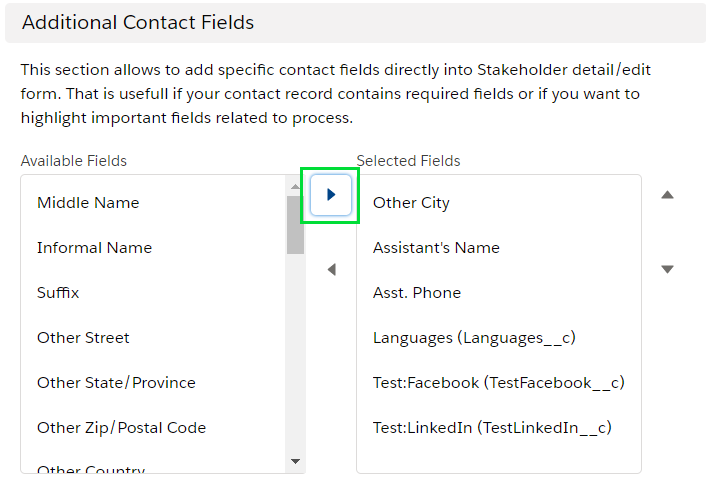
Result:
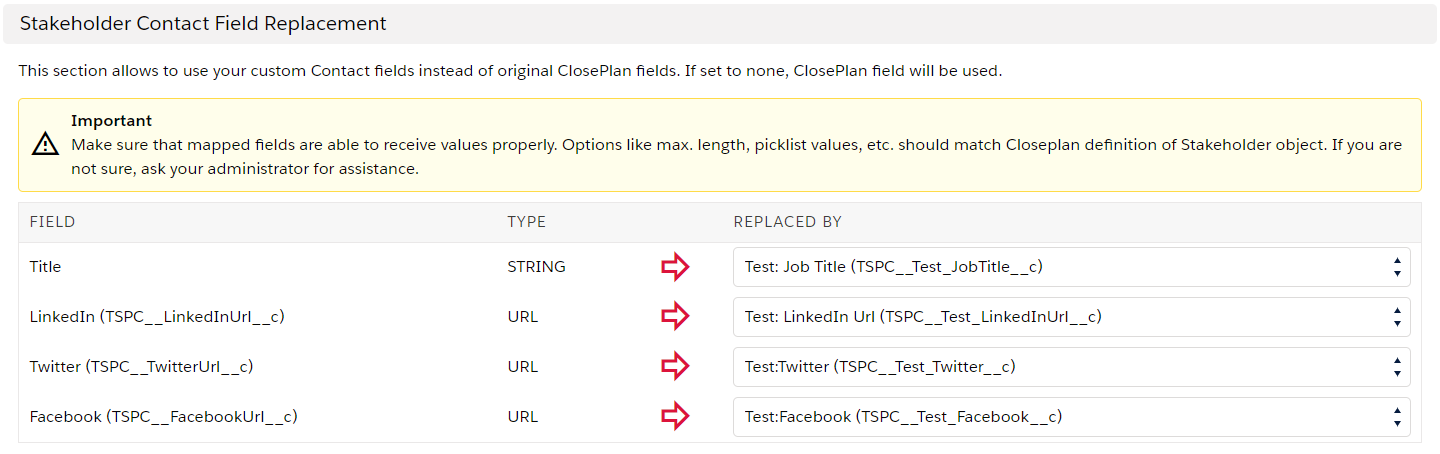
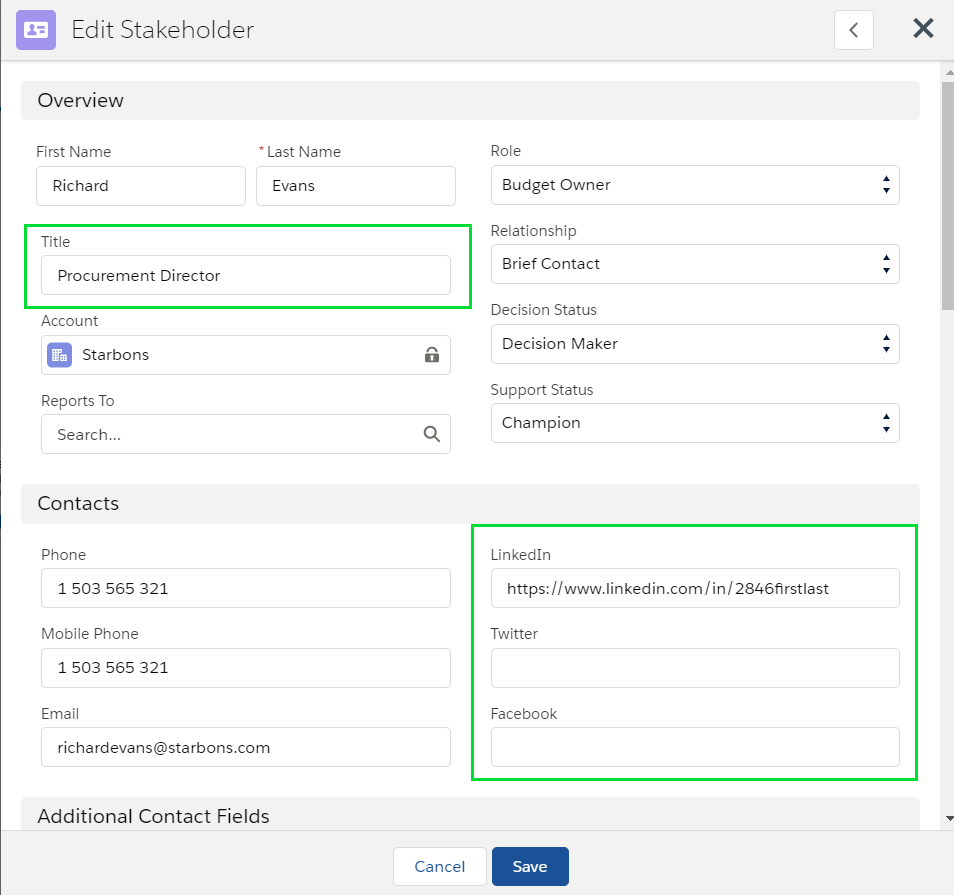
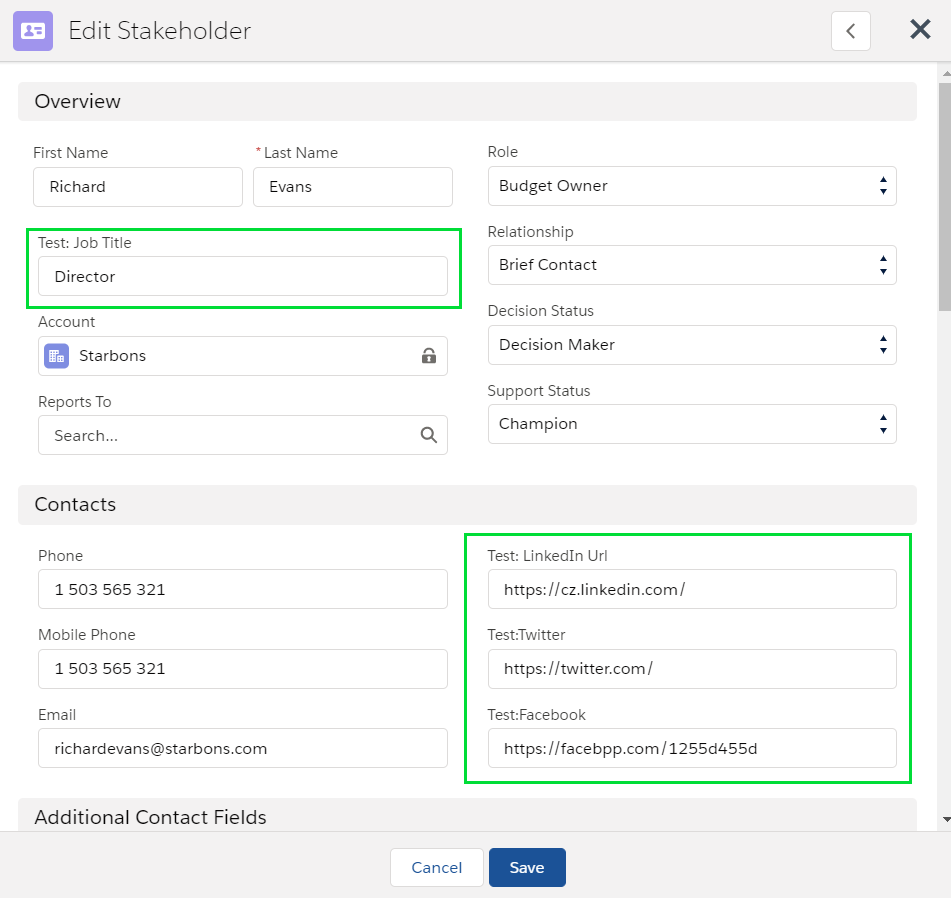
Stakeholder Contact Field Replacement
Allows to replace original ClosePlan field with custom field.
- There are 4 fields that can be replaced by custom fields: Title, LinkedIn, Facebook and Twitter
- To replace a default ClosePlan field, a custom field with the correct value must be selected.
- Select your custom field and click Save Fields.
To create a custom field:
- Go to Setup > Objects and Fields > Object Manager > select Contact > click Fields & Relationships
- Click New > select Data Type (for Title field select Text data type, for other fields - URL type)
- Enter all requested data > click Next > and Save
ClosePlan Fields: Custom Fields:
| Note |
|---|
Make sure that mapped fields are able to receive the intended values properly. Options like max. length, picklist values, etc. should match the ClosePlan definition of the Stakeholder object. If you are not sure, ask your administrator for assistance. |
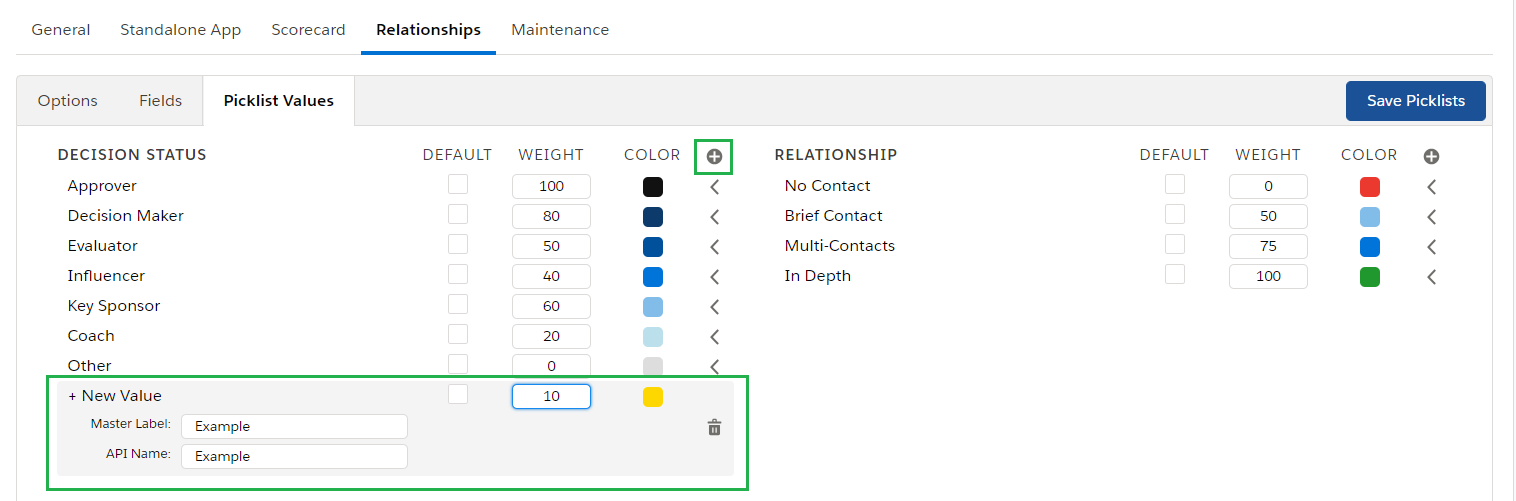
Picklist Value
Defines Stakeholders Picklist Values and is set as a part of ClosePlan package. Contains Decision Status, Relationship, Role and Support Status of the Stakeholder.
Picklist Values can be renamed, reordered, added or deleted. Changes should be completed before using ClosePlan.
| Note |
|---|
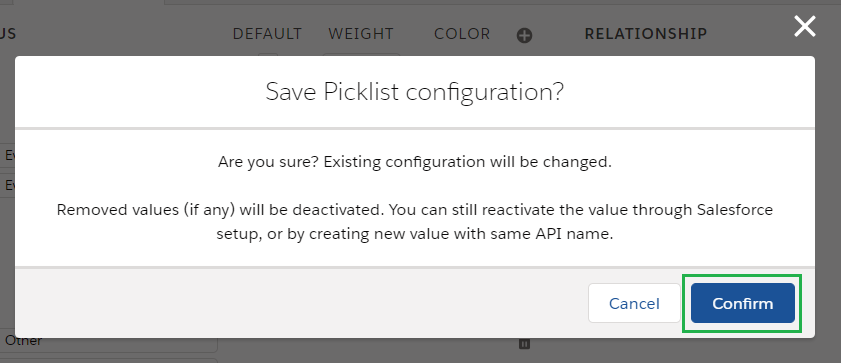
Changes must be saved by clicking on the Save Picklists button! |
How to find which Contact Roles are set in the organization?
- Go to Setup
- Into Quick Find box enter Contact Roles on Opportunities and open it.
| Info |
|---|
Changes in Picklist Values will change the configuration in your administration Setup in Salesforce. Any changes you want to make to Picklist Value must be made in the ClosePlan Application, not in Salesforce!
|
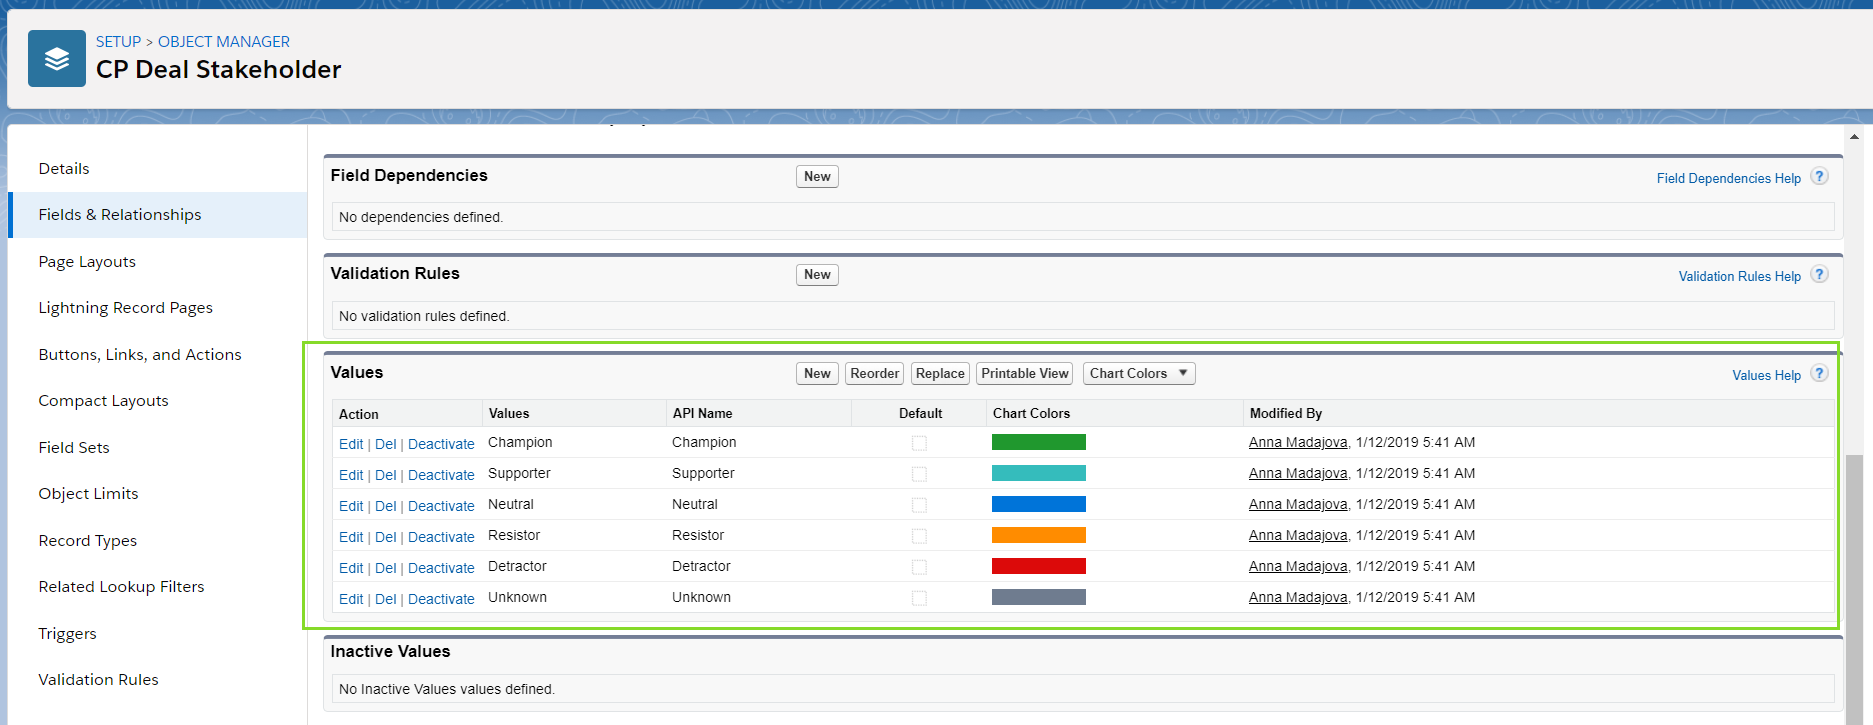
Picklist Values Setting:
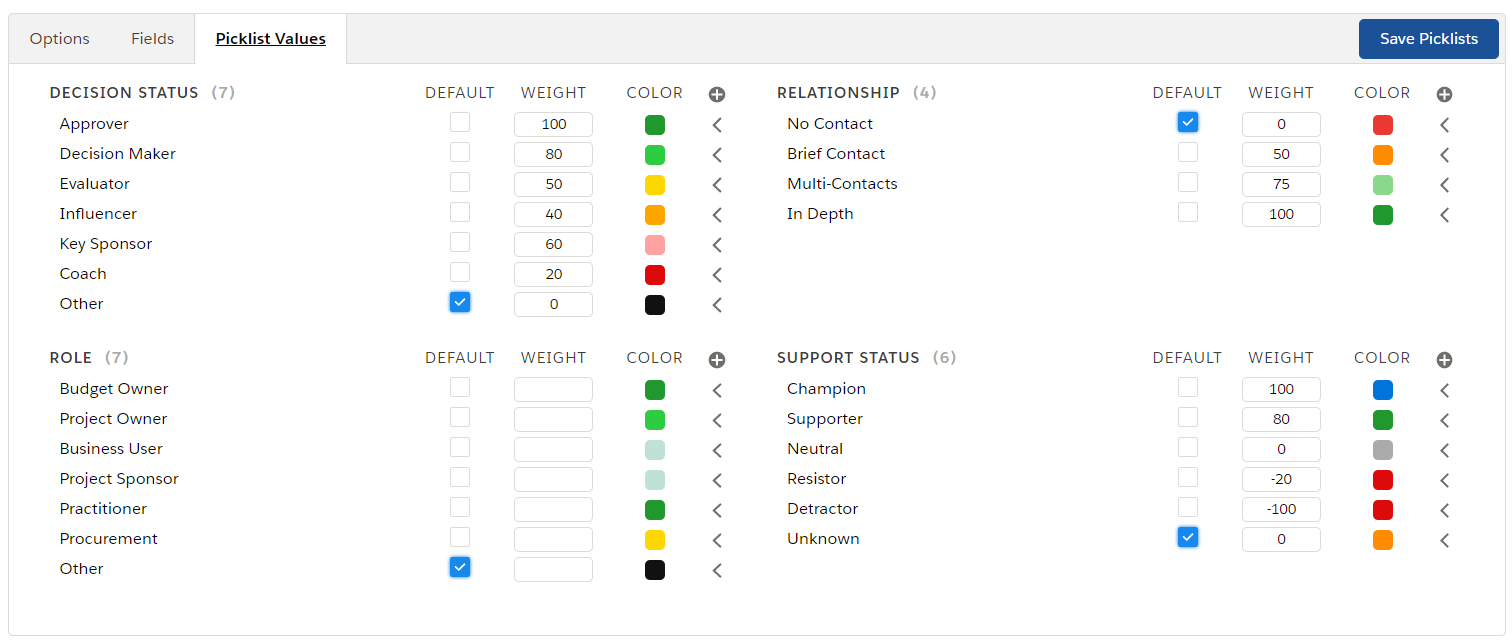
- Default: Selecting a default option will automatically pre-select the default option when a user creates a new record. Only one default is allowed.
- Weight: Assigns the value of each option from 0 - 100
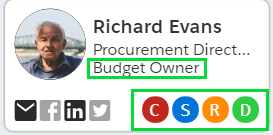
Color: Color used for presentation purposes in the Stakeholder Overview and nodes
Result:

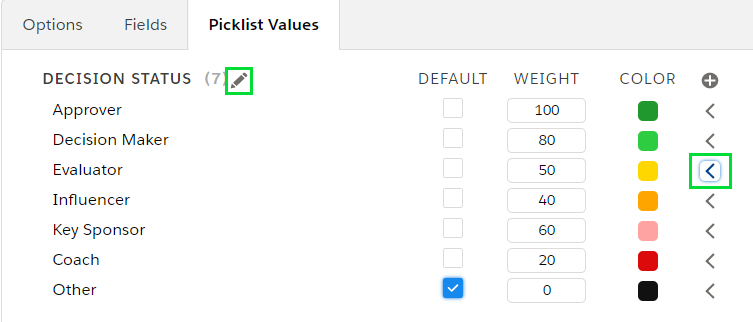
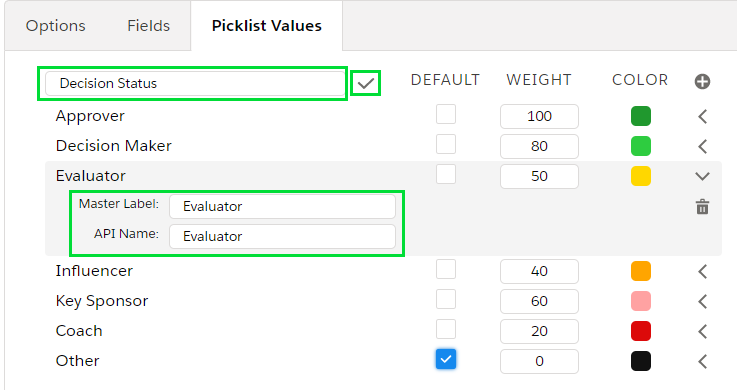
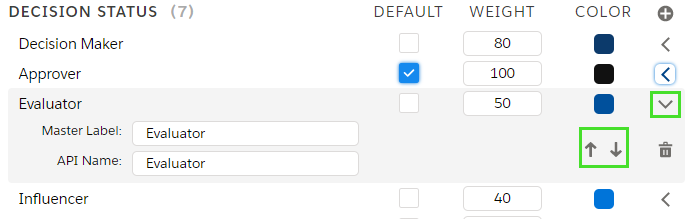
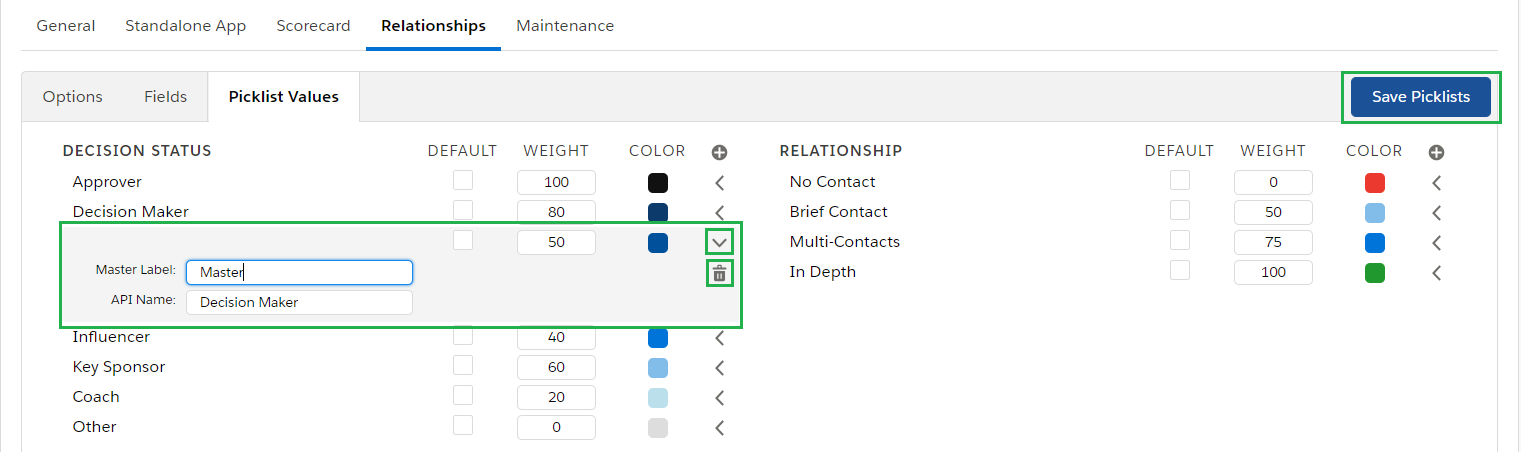
Edit Picklist Values
Allows the renaming of values.
- To edit e.g. Decision Status click
 on hover over > rename and Save
 - To edit a subvalue click the
 button > rename Master Label and API Name (make it the same as the master label)
 - Click Save Picklist to save all changes
Add a new Value
- Click the
 button.
 - Enter Master Label name of the new value and enter the same name into API Name.
- Choose Weight and Color, click the Save Picklists button and Confirm your step.
Reorder the Value
- Click the edit arrow next to the value you would like to move. Click the up or down arrow to place the value in your preferred spot..
Delete the Value
- Click
 button
 - Click on
 > Confirm and save by clicking on the Save Picklists button.
- Deleted values must be recreated if needed again.
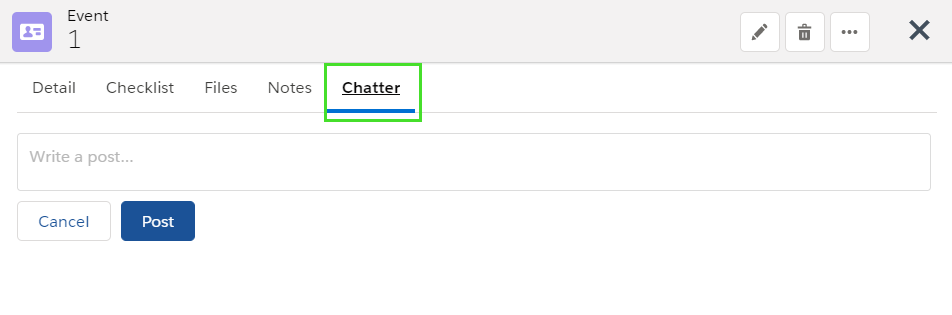
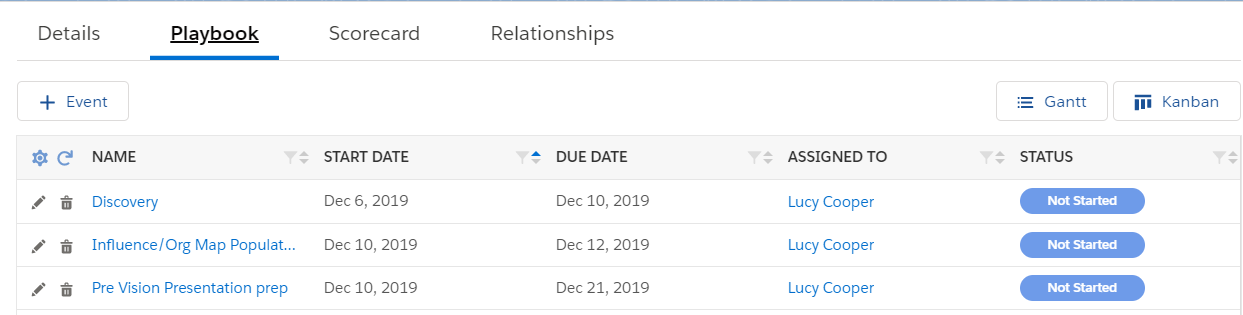
Playbook
Enable or disable Chatter or Hide event type field in the Playbook.
- Toggle the button and Save
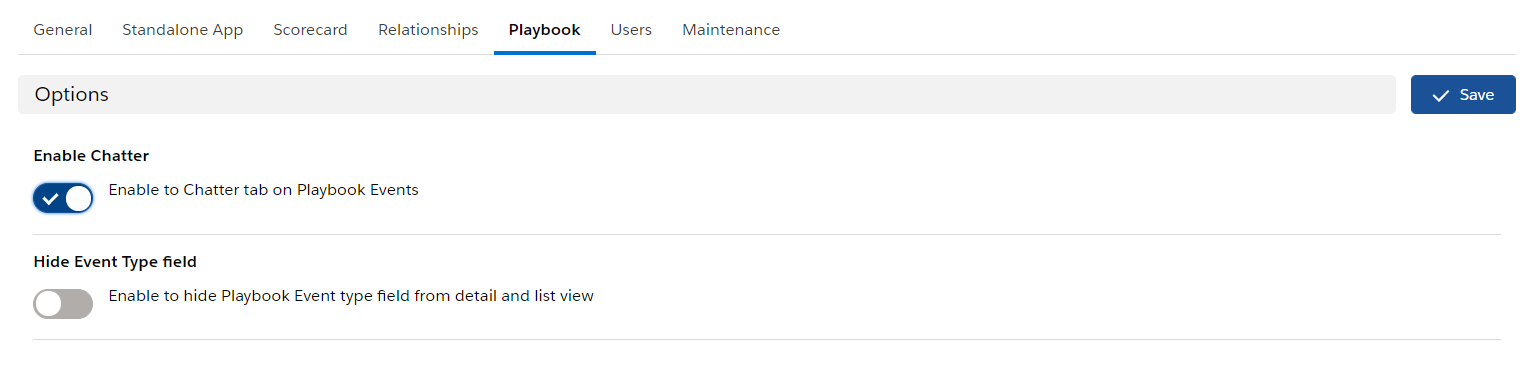
- Enable Chatter = will enable the Chatter tab on the Playbook events
Enabled:
Disabled:
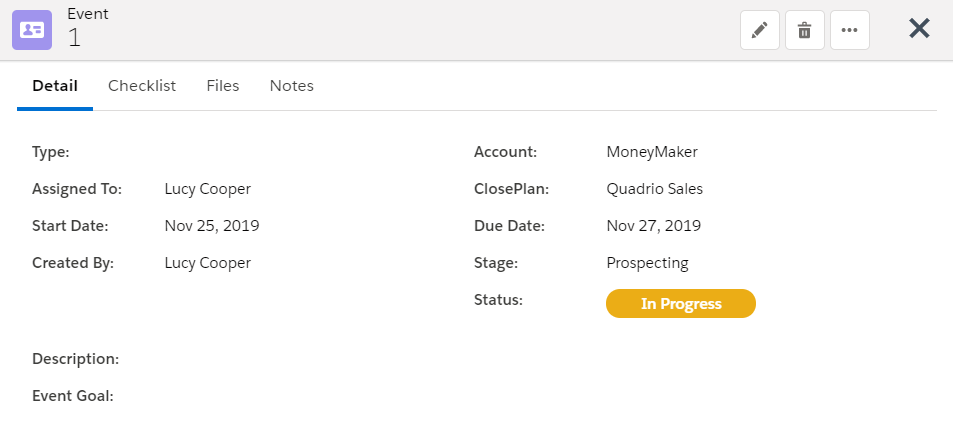
- Hide Event Type field = will hide the Playbook Event type field from detail and list view.
Disabled:

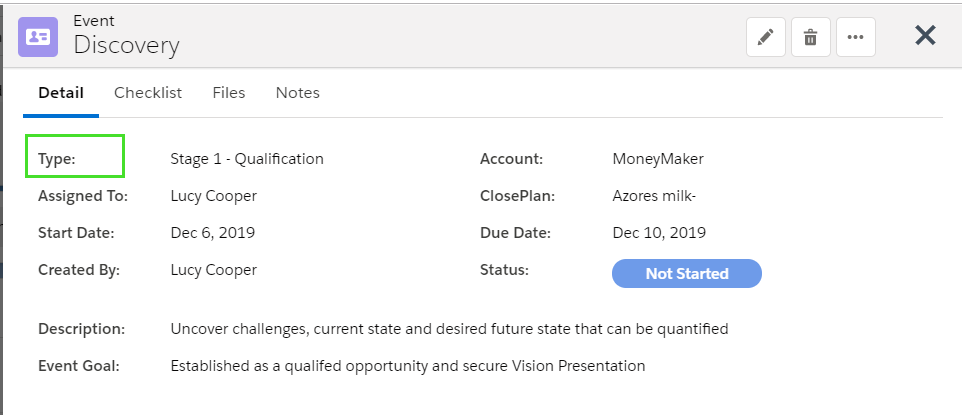
Enabled:
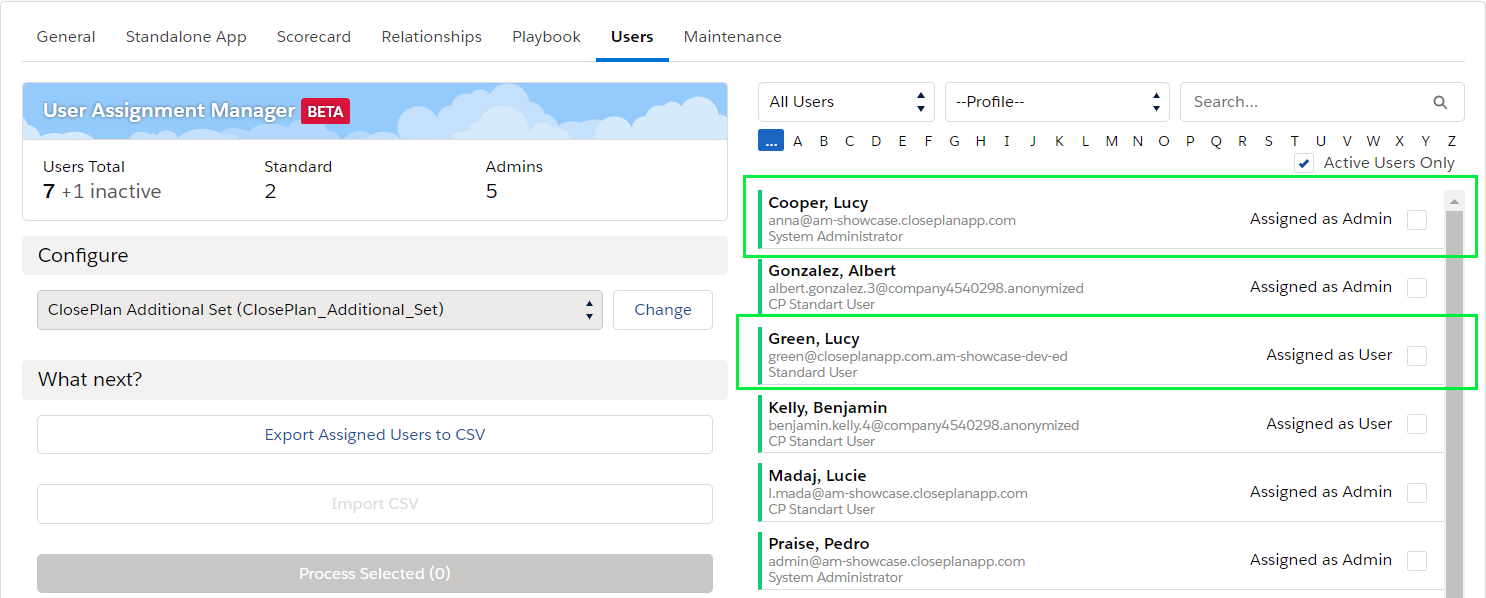
Users
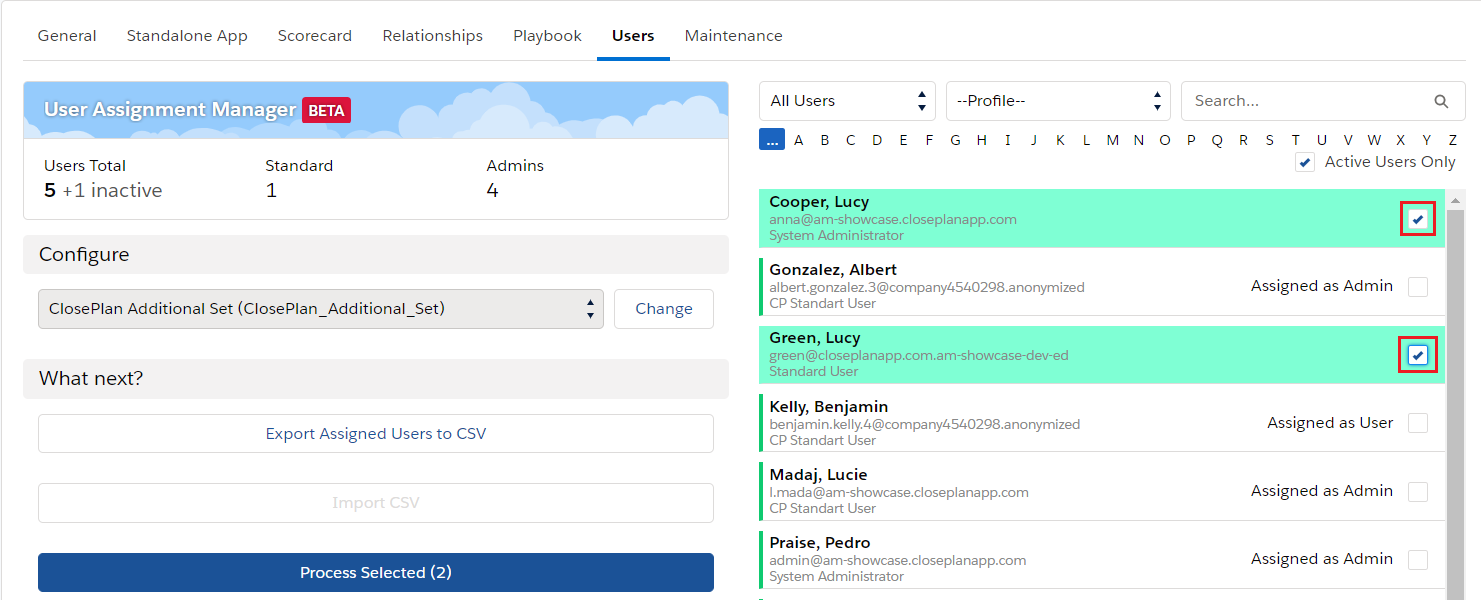
User Assignment Manager assigns Permission Sets for User access to ClosePlan data and gives users the ability to work with ClosePlan.
The User Assignment Manager shows all Users in your organization and indicates if they are assigned or not.
Users can be:
- Assign as User: Allows users to work with ClosePlan as a standard user.
- Assign as Admin: Allows users to work with ClosePlan as an admin user to manage application settings and configurations.
- Remove from Assignment: Removes User access to ClosePlan
Layout & Navigation
...
- User Assignment Manager bar:
- Total - Shows total number of active ClosePlan Users and the number of Inactive Users (those without access to ClosePlan) in your organization
- Users - Shows number of Standard Users in your organization (active and inactive)
- Admins - Shows number of ClosePlan Admin Users in your organization
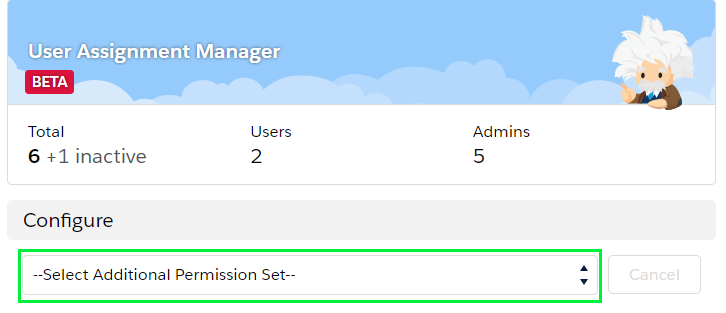
- Configure: Allows for selection of the correct Permission Set "ClosePlan Additional Set"
- " ... " : shows all users. " A-Z " : browse users by first letter of last name
- Enable to browse only Assigned or Not Assigned Users
- Enable to browse Users by Profile
- Enable to search specific User
- Shows only Active Users. Unmark the check box to see all Users.
- Assigned User - green mark
- Assigned User with missing permission "ClosePlan Additional Set"
- Users without assigned permission set - no mark
- Process Selected (0): Completes the process of assigning permission sets to selected Users. (0) shows number of selected Users.
...
Assign Users
- From the Configure section, select the correct Additional Permission Set (commonly named as ClosePlan Additional Set)
- To make changes click the Change button and select the permission set
- Mark the check box by each User to whom you would like to assign the permission set, change or complete the permission set, or remove the Assignment
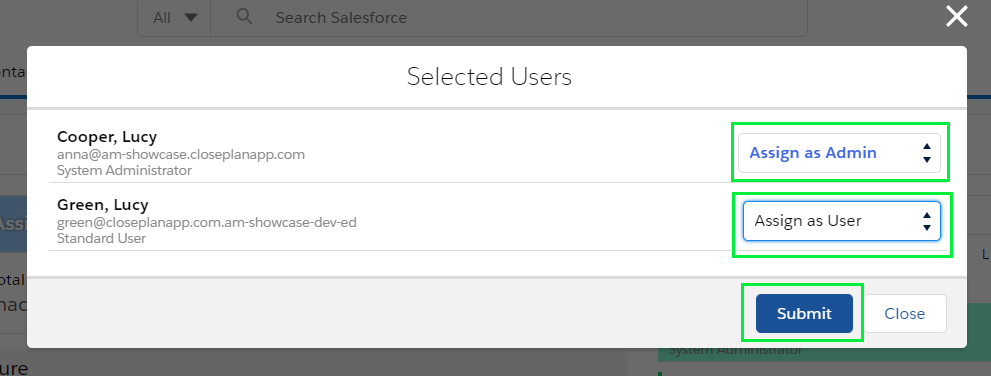
- Click Process Selected and assign the Users as "User or Admin" and Confirm
- to remove user´s assignment, select "Remove Assignment"
Result:
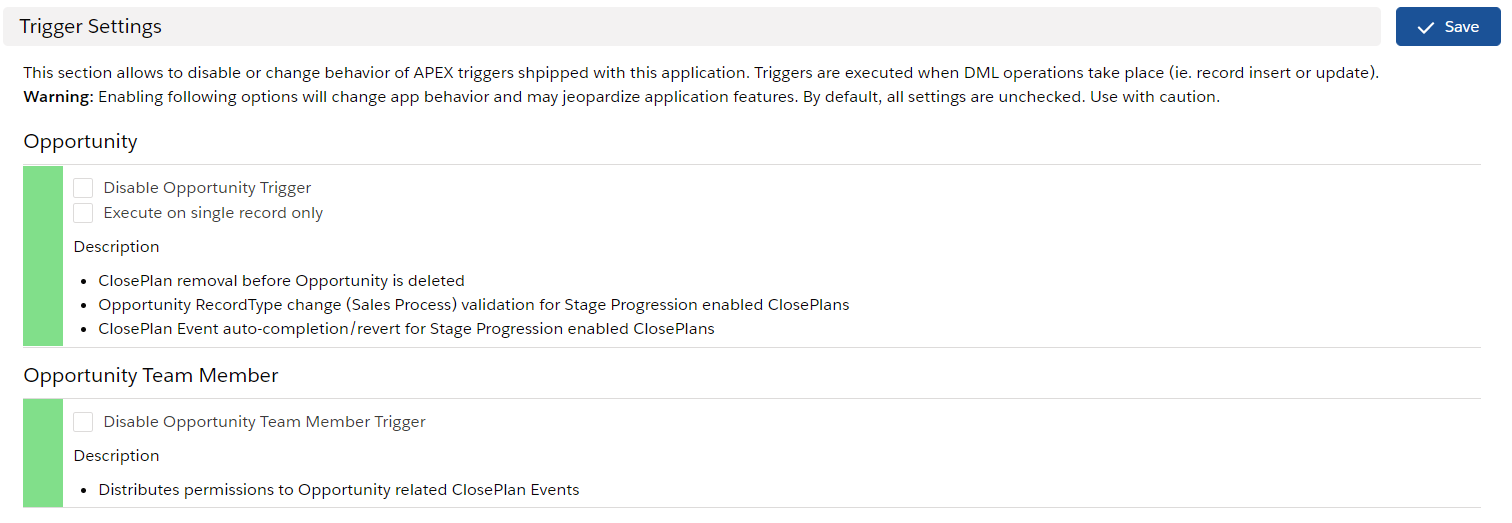
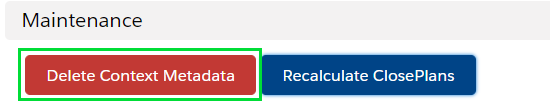
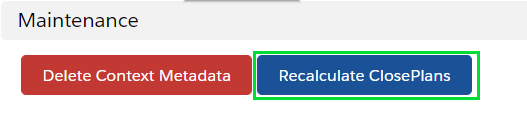
Maintenance
Delete Context Metadata, Recalculate ClosePlan and modify Trigger settings.
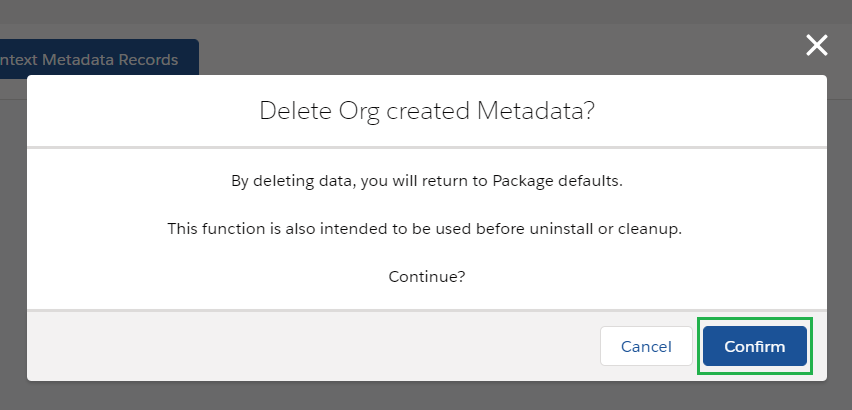
Delete Context Metadata
Clicking on Delete Context Metadata will delete all created metadata in your organization. You will return to default settings.
This function is recommended when you uninstall or cleanup ClosePlan.
- Click Delete Context Metadata and Confirm
Recalculate ClosePlan
Recalculate events in Playbook.
Trigger Settings
Will disable or change behavior of APEX triggers shipped with this application. Triggers are executed when DML operations take place (ie. record insert or update).
Warning: Enabling following options will change application behavior and may jeopardize application features. By default, all settings are unchecked. Use with caution.