Table of Contents
Overview
ClosePlan Relationship Maps enable you to quickly and easily create Relationship Maps natively in Salesforce with easy to use drag and drop functionality.
...
- Assign business role and decision-making status for each stakeholder.
- Understand stakeholder coverage by quantifying the relationship status.
- Add influence lines, conflict lines and informal reporting lines to better understand the organizational power structure.
- Provide additional details for each stakeholder’s background along with goals to add context to your conversations.
- Create Relationship Maps on both the Account and Opportunity levels.
- Export Relationship Maps as images or PDF to share in meetings or presentations.
Accessing Relationship Maps
You can access Relationship Maps in different ways based on your configuration. See the general accessibility description here.
Note: Opportunity level mapping requires creation of a ClosePlan. See how to create a ClosePlan here.
Account Level Map
- Navigate to 'Relationships' under any Account:
- To start using Account level Maps, create a new map inside the Account Map list.
- A list of current Account Level Maps is presented in a table format.
- To open the map, click on the Map Name.
Layout & Navigation
| Drawio | ||||||||||||||||||||||||||||||||
|---|---|---|---|---|---|---|---|---|---|---|---|---|---|---|---|---|---|---|---|---|---|---|---|---|---|---|---|---|---|---|---|---|
|
Access to Account and Opportunity level map list related to the Account
- + Add - Creates a new Account level Relationship Map
- Access to Organigram
- Clears filters, toggles to full screen or exports list as XLS
- Refreshes the map list
- Click on the column header object (Name, Primary,..) to rearrange the data
- Applies Filters - set, apply or clear filters
- Shows number of Stakeholders in the map
- Edits map name and sets map as Primary or Deployed
- Deletes the map
Opportunity Level Map
- Navigate to 'Relationships' under any existing Opportunity:
- In order to start using Opportunity Maps, a ClosePlan must be deployed.
- A list of current Stakeholders is presented in a table format.
- Stakeholders can be manipulated in the table view.
- To graphically display the map for drag and drop capability, click on the icon.
Layout & Navigation
| Drawio | ||||||||||||||||||||||||||||||||
|---|---|---|---|---|---|---|---|---|---|---|---|---|---|---|---|---|---|---|---|---|---|---|---|---|---|---|---|---|---|---|---|---|
|
- + Add Add a contact to the Opportunity Stakeholder List
- Display the map for drag and drop functionality
- Import Data or Delete All Records
- Shows % progress of Stakeholders Role Goals
- # of Economic Buyers present / goal
- # of Procurement Stakeholders present / goal
- Click on the column header object (Name, Reports To, etc..) to rearrange the data
- Click on Name to open Stakeholder Overview
- Inline editing for key attributes
- Edit Stakeholder
- Delete Stakeholder
Differences between Account and Opportunity level Maps
Relationship Mapping is available on both the Account and Opportunity level, however there are a few differences.
- Accounts can have multiple maps, Opportunies can have only one map.
- Account Maps: Maps of individual business units inside the target organization (e.g. Legal, Procurement, etc.)
- Opportunity Maps: Maps of individual Opportunities associated with the account
- Multiple Account Maps can be associated with a single Account
- Each Opportunity can have only one Map
- Account level map menu provides access to the auto generated Organigram.
- The Organigram displays a Relationship Map based on the 'Report to' field in Account related Contacts.
- Changing a 'Reports to' heirarchy on the Organigram will change the 'Reports to' field in the Salesforce Contact.
Creating an Account Level Map
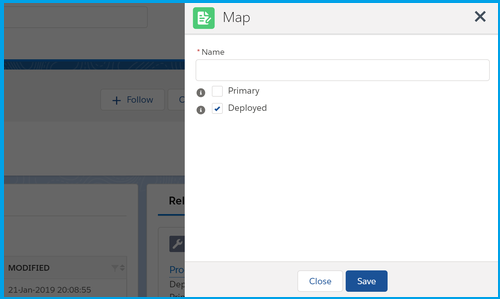
- Click + Add button
- Enter map Name, select Primary or Deployed and Save.
- Primary: Makes the map the Account's primary map. Each account may have only one primary map.
Note: Selecting Primary will override the current primary map. - Deployed: Makes the map generally available.
Note: Deployed maps can be added as a Submap to other maps.
- Primary: Makes the map the Account's primary map. Each account may have only one primary map.
- Click the Save button.
- You will be redirected to the mapping tool once the record is saved.
...
| Drawio | ||||||||||||||||||||||||||||||||
|---|---|---|---|---|---|---|---|---|---|---|---|---|---|---|---|---|---|---|---|---|---|---|---|---|---|---|---|---|---|---|---|---|
|
Opening a Relationship Map
| Note |
|---|
Note: In Salesforce Classic, Maps are opened in a new window due to limited space inside the record layout |
Account Level
- Navigate to an Account and select the Relationships tab.
- Click on the map Name to open the map.
| Drawio | ||||||||||||||||||||||||||||||||
|---|---|---|---|---|---|---|---|---|---|---|---|---|---|---|---|---|---|---|---|---|---|---|---|---|---|---|---|---|---|---|---|---|
|
Opportunity Level
- From any existing Opportunity, select the Relationships tab
- Click the Mapper button
Drawio simple 0 zoom 1 inComment 0 custContentId 1967620188 pageId 903774217 diagramDisplayName Open Opp Level Map lbox 1 contentVer 1 revision 1 baseUrl https://tspcinc.atlassian.net/wiki diagramName Open Opp Level Map pCenter 0 width 728.3299999999999 links tbstyle height 161
Relationship Map Layout & Navigation
The following provides an overview of the Relationship Map components.
...
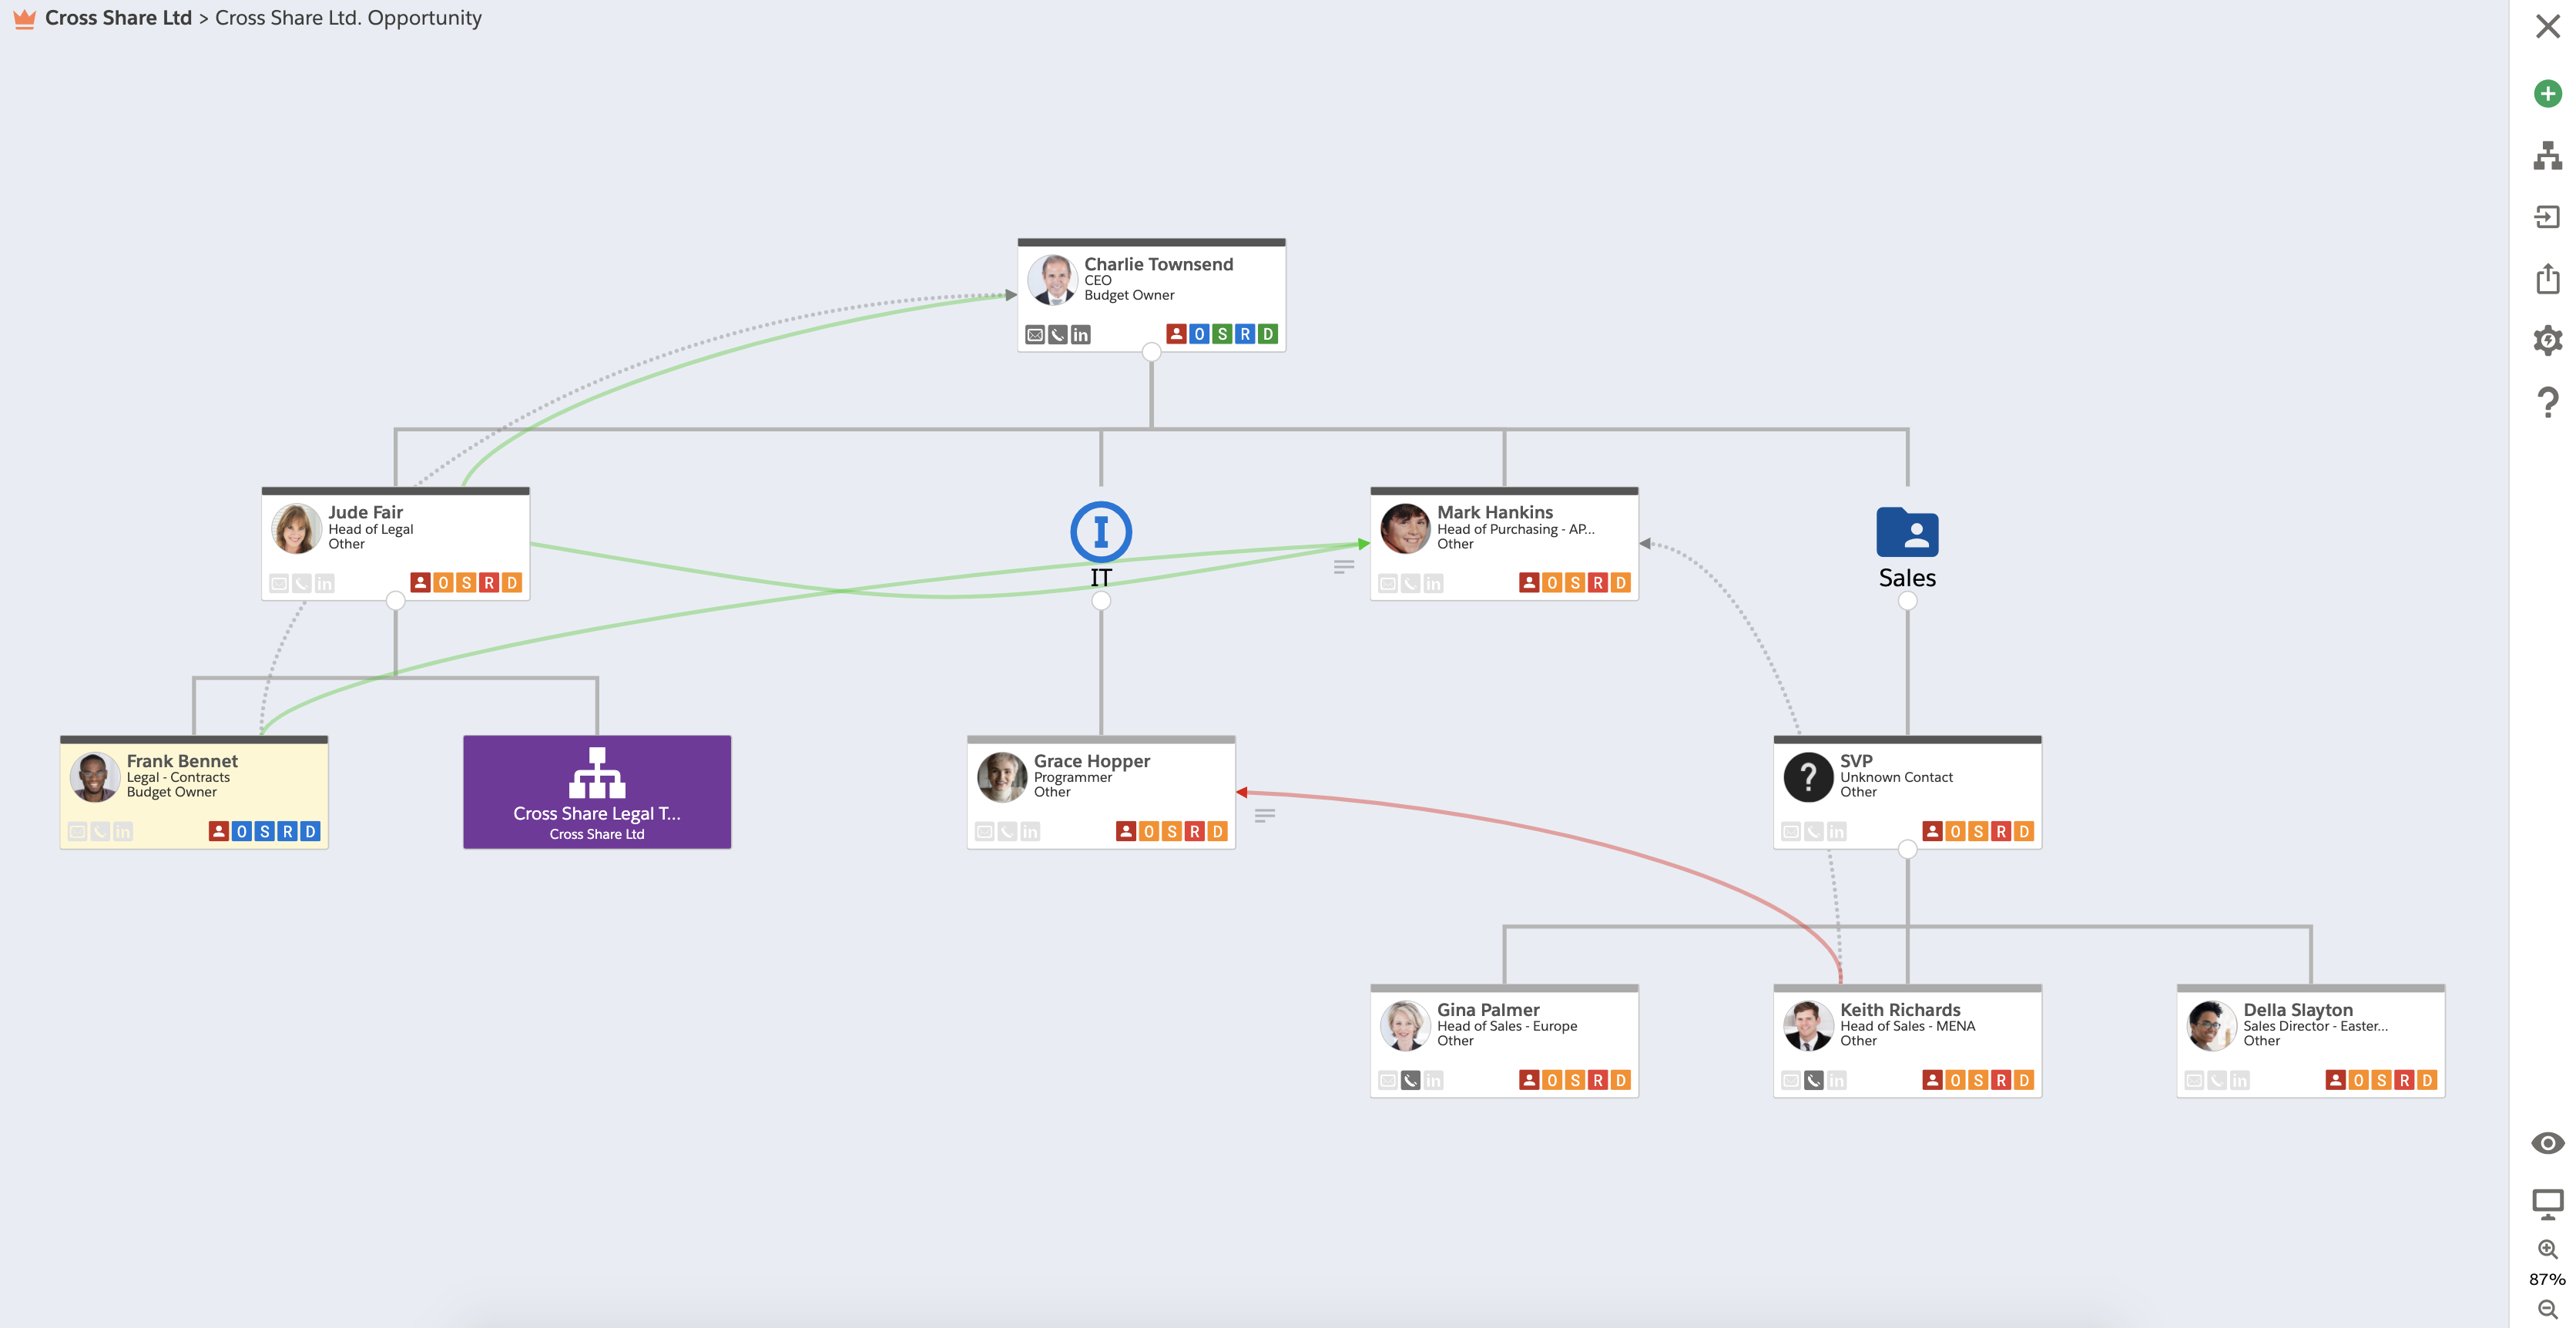
- Account Name - Shows the related Account.
- Map / Opportunity Name - Shows the Opportunity name.
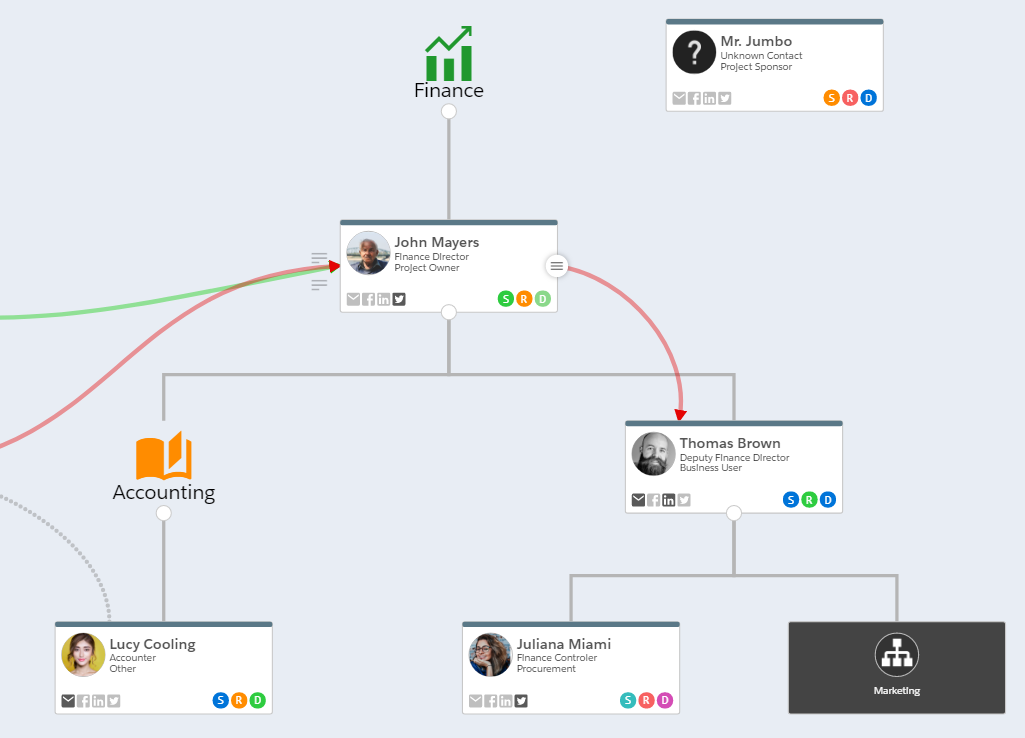
- Map Node - Visually represents a Stakeholder in the map and is the junction between Salesforce Contacts and your Opportunity or Account.
- Group Icon - Stakeholders under this icon are all part of the same group. Group Icons can be moved to the left or right.
- Influence Line - Indicates influence.
- Conflict Line - Indicates conflict.
- Dotted Line - Indicates informal / other relationship.
- Notes Icon - Is displayed if there is an added comment.
- Submap Node - Indicates an imported submap.
- Unknown Contact Node - Indicates a contact whose identity is unknown. (Also referred to as a 'Ghost' contact)
- Close - Will close the Mapper and take Users back to Relationship Map overview, either on the Account or the Opportunity level.
- Contacts & Stakeholders - Shows all available contacts from the account, can include contacts from the Account or from across your organization. Enables Users to create a new Stakeholder from these Contacts, and locates Stakeholders deployed on the map.
- View/Add Submaps - Shows all available submaps that can be added to the map.
- Import Map - Imports an existing map from the Account level, from another Opportunity, or from Contact Roles on the Opportunity Level. If a Map already exists, importing a new Map will replace it.
- Export Map - Exports the Map. Account Level maps are exported as a .png image. Opportunity Level maps can be exported as a PDF or as a .png image.
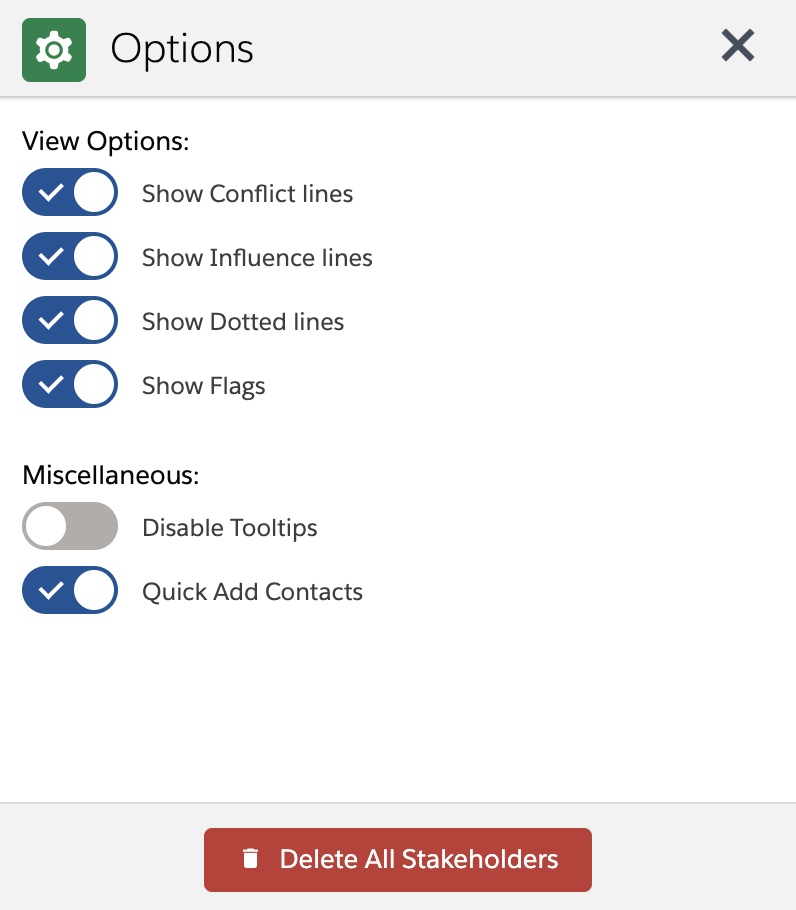
- Map Options - Allows you to:
- Hide relationship lines and flags
- Disable toolbar tool tips
- Delete all nodes from the canvas
- Help - Contains help links to watch our videos, read the User Guide, submit a support request, send us feedback/product suggestions or to contact us.
- Switch to Preview - Preview your map in read-only mode - Preview mode expands all submaps so the entire structure with all Stakeholders is shown. Submaps are not editable in this view.
- Fit to screen - Sizes entire map to fit screen
- Zoom In & Zoom Out - Zoom in or out on the map
Stakeholders
Stakeholders are the individual Contacts on the Account or Opportunity level.
Stakeholders are bound to Salesforce contacts. Each Stakeholder contains relevant information related to the Account and to the Opportunity.
Stakeholder Layout & Navigation
The following describes the relevant components and related navigation.
Drawio simple 0 zoom 1 inComment 0 custContentId 1967620191 pageId 903774217 diagramDisplayName Stakeholder layout.xml lbox 1 contentVer 1 revision 4 baseUrl https://tspcinc.atlassian.net/wiki diagramName Stakeholder layout.xml pCenter 0 width 599.65 links tbstyle height 641
- Contact Photo - Upload/change/delete a photo or url link.
- Stakeholder Name - Opens a new window with contact information.
- Title - Title
- Company - Account Name / Company Name
- Address - Opens the location in google maps.
- Role - Indicates the Stakeholder's role in the buying process.
- Relationship - Indicates the depth of the relationship.
- Decision Status - Indicates the Stakeholder's status in the decision making process.
- Support Status - Indicates the depth of relationships between Stakeholders.
- Detail Tab - Display Stakeholder information.
- Actions Tab - Add tasks
- Notes Tab - Add relevant notes about the Stakeholder.
- Covered By - Indicates the person from your organization responsible for this stakeholder.
Note: The 'Covered By' tab is only visible on Opportunity level Relationship Maps. If this field is not displayed, it has been disabled in the Admin Settings. - Contacts - Key Stakeholder contact attributes.
- About Stakeholder - Provides an overview of the Stakeholder, including goals and background.
- Additional Contact Fields - Displays additional Stakeholder attributes provided by your organization.
- Edit - Edit Stakeholder information.
- Delete - Delete Stakeholder.
Creating, Adding and Importing Stakeholders
A Stakeholder can be added from:
...
| Drawio | ||||||||||||||||||||||||||||||
|---|---|---|---|---|---|---|---|---|---|---|---|---|---|---|---|---|---|---|---|---|---|---|---|---|---|---|---|---|---|---|
|
1. Stakeholder List
Creating / Adding a New Stakeholder:
...
- You can also add Stakeholders from an existing map, from the Account, from another Opportunity or from Contacts Roles.
- Click on " ... " button > Import Data.
- Pick From Account or From Opportunity > select your map and click Import. Stakeholders will be added into the Stakeholder List.
- Pick Sync with Opportunity Contacts Roles and click Import. Stakeholders will be added into the Stakeholder List.
2. Relationships Map
Create a New Stakeholder:
...
You can import Stakeholders from an existing map. (To do this, see the description in the section #ImportingMap below)
Add picture to the Stakeholder
- Open a Stakeholder
- Hover over the picture icon and click Change Photo
...
- To upload picture from your device: Click Upload Files > select your picture and click Use Uploaded File button to save it.
- To upload picture from the picture URL address: Paste the picture Url into the field and click Use Custom Url button to save it.
Mapping available Stakeholders
Stakeholders can be moved onto the canvas:
...
The same method is used to add existing Stakeholders and Groups
Map Node
The Map Node shows Stakeholder information and contains the Stakeholder palette. When you click on the node, the Stakeholder tab will open.
...
- Name - Stakeholder's name.
- Title - Stakeholder's position
- Role - Role played (e.g. Budget Owner, Project Owner)
- Map Node Pallete Menu - Opens and closes the palette menu. Contains additional Node functions
- Email - Indicates that email information is present. Click on this icon to send an email.
- Phone Number - Indicates that a Phone number is present
- LinkedIn - Indicates that a LinkedIn profile is present. Click on this icon to open their LinkedIn profile.
- Twitter - Indicates that a Twitter profile is present. Click on this icon to open their Twitter profile.
- Facebok - Indicates that a Facebook profile is present. Click on this icon to open their Facebook profile.
- Covered by Flag - Indicates who is responsible for the relationship. Available only on the Opportunity level. This feature can be disabled from ClosePlan Admin tab settings.
- Support Status Flag- Shows the Role Status Flag. Hover over the button to see inline text. This feature can be disabled from ClosePlan Admin tab settings.
- Support Status Flag - Shows the support status. Hover over the button to see inline text. This feature can be disabled from ClosePlan Admin tab settings.
- Relationship Status Flag - Shows the Relationship. Hover over the button to see inline text. This feature can be disabled from ClosePlan Admin tab settings.
- Decision Status Flag - Shows the decision making status. Hover over the button to see inline text. This feature can be disabled from ClosePlan Admin tab settings.
Map Node Pallet Menu
Sets relationship lines between Stakeholders, adds importance, moves the map node to the left or right, and can remove the Stakeholder (back to Available Stakeholders icon).
...
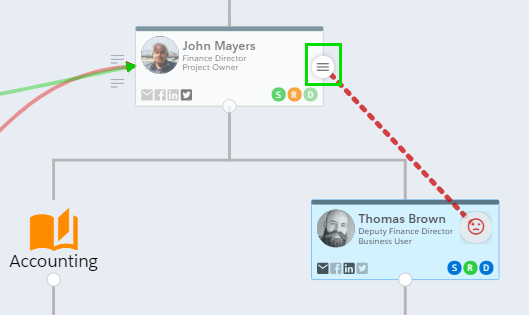
- Relationship Line - Draws a dotted line to establish an informal relationship line to another Stakeholder. Includes the ability to comment in-line to explain the relationship.
- Influence - Draws a positive influence relationship line to another Stakeholder. Includes the ability to comment in-line to explain the relationship.
- Conflict - Adds a conflict relationship line to another Stakeholder. Includes the ability to comment in-line to explain the relationship.
- Move Right - Shifts Stakeholder and map tree to the right.
- Move Left - Shifts Stakeholder and map tree to the left.
- Color - Add a color to the top bar on the Contact Node
- Power - Indicates Stakeholders importance - click on the icon to add the power shield.
- Remove - Removes Stakeholder to the unmapped list or to the contacts list depending on your organizations settings. To delete Stakeholder entirely, go to Stakeholder Overview.
Groups
Grouping Stakeholders enables Stakeholders to be mapped under a specific grouping, and also allows users to add another grouping into an existing grouping.
...
- To move the group into the Stakeholder (Group) tree simply drag the group icon and drop on it onto a Stakeholder or another Group
Relationship Lines
Connects Stakeholders with lines showing the relationship between them. There are 3 Relationship Line options: Relation, Conflict or Influence
Notes can be added to Relationship Lines to add insight into the relationship.
Adding Lines
Click the Pallet menu icon on the Stakeholder
Click on desired relationship line icon > drag and drop the line to another Stakeholder.
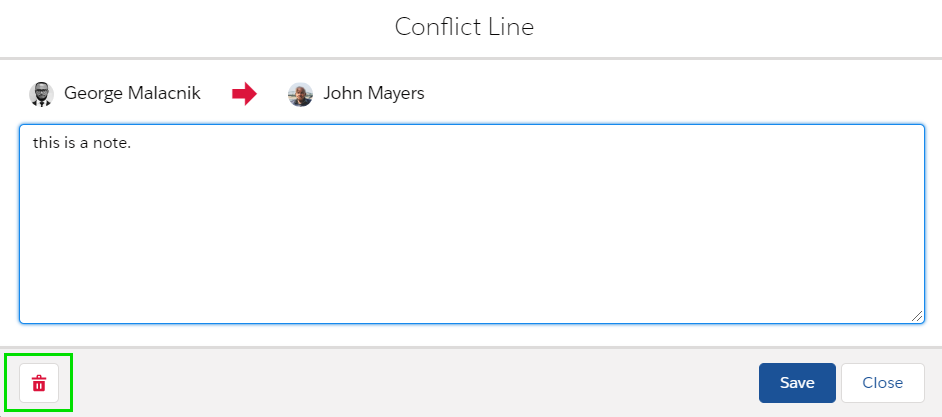
Adding and Deleting Line Notes
- Click on the line > add your notes and Save.
...
- To edit or delete notes, click on the desired line or notes icon > edit or delete your text and Save.
- Note: if you click the icon, the Relationship Line will be deleted.
- To edit or delete notes, click on the desired line or notes icon > edit or delete your text and Save.
Deleting Lines
- Click the desired line > click the icon and Confirm.
Hide or discplay existing Lines and Flags
Hiding or displaying existing Lines and Flags is done from the main relationships map page.
Click the icon on the right side of the Map surface
Toggle to display or hide lines or flags
- Note: Deselecting individual flags from the Stakeholder node must be done from the ClosePlan admin tab > Environment > Relationships > Fields
Preview
The Preview icon displays the map in preview mode.
...
- Click icon to see preview mode
- Click to export the map
- Click icon to display or hide lines and flags
- Click icon for help
- Click icon to return to the edit mode
Export Map
On the Account Level, the Relationship Map can be exported as a .png image from the main relationship map page or from the preview page.
...
| Anchor | ||||
|---|---|---|---|---|
|
Import a Map or Sync Opportunity Contact Roles
You can import an existing map as well as Sync Opportunity Contact Roles into your Relationship Map.
...
When Control Opportunity Contact Roles in the ClosePlan Admin environment is enabled, and you select Role on the Stakeholder, it will propagate to Contact Role on the Opportunity.
.
Submaps
To show the submap´s Stakeholders, open the submap in another window, or view the map in Preview mode via the Preview icon .
...

